If you're here asking how to clean a clogged gas cap vent, odds are your engine started fine, then starved and died partway through the job. Cracking the cap loose probably gave you a sharp hiss, and everything ran normally right after. That hiss is tank vacuum talking.
Nine times out of ten, a plugged vent hole is the whole story.
There's a wrinkle worth knowing before you grab tools. Cars built for the 1996 OBD-II era and newer don't breathe through an open hole at all, because federal rules moved them to sealed caps with an internal relief valve. Both designs fail the same way but clean up very differently.
A thirty-second test sorts out which one you're holding.
Quick Answer: The Hiss Test That Confirms a Clogged Gas Cap Vent
Cleaning a clogged gas cap vent starts with the hiss test. Loosen the cap during a stall and listen for suction release. Soak the cap in warm soapy water for ten minutes.
Clear old-style vent holes with a wooden toothpick, never wire. Sealed modern caps hide a relief valve that aggressive cleaning ruins.

Why a Clogged Vent Stalls Your Engine After 10 to 20 Minutes
A fuel tank has to breathe in as fuel goes out. Every drop the pump sends out leaves empty space behind, and air fills that space through the vent. Block it and a vacuum slowly builds inside the tank.
Eventually the pull gets strong enough that fuel stops flowing, and the engine starves.
In our research across service manuals and owner reports, the starvation window on a small engine lands between 10 and 20 minutes. Crack the cap and air rushes in, so the engine restarts like nothing happened. Then it dies again.
That repeating cycle is your confirmation clue.
Not every mid-run stall is a vent problem, so compare the patterns:
| Clue | Clogged vent | Failing fuel pump | Vapor lock |
|---|---|---|---|
| Hiss when cracking the cap | Almost always | No | Rarely |
| Dies after steady running | Yes, 10 to 20 min | Any time, getting worse | Mostly extreme heat |
| Instant restart after loosening cap | Yes | Not usually | Sometimes |
| Repeats every long run | Yes | Yes | Heat dependent |
Small engines suffer most because their caps vent through a pinhole barely wider than a sewing needle. Briggs & Stratton's engine documentation describes the vented cap as the air supply that replaces consumed fuel. Dust, storage varnish, and the occasional mud dauber nest plug that pinhole fast.
Most cases surface on the first mow of spring, which is why following a simple seasonal maintenance calendar catches the problem before it strands you mid-lawn.
How Gas Cap Vents Actually Work: Vented Caps vs. Sealed EVAP-Era Caps
Two completely different designs wear the name "gas cap," and cleaning advice that fixes one can wreck the other.
A vented cap is the old-school design. It has a tiny open hole, sometimes hidden behind a baffle, that lets outside air in and lets vapor escape. You'll find it on pre-1996 vehicles, lawn mowers, motorcycles, ATVs, and older tractors.
A sealed cap does the opposite. A thick rubber gasket locks the filler neck airtight, and the tank breathes through hoses routed to a charcoal canister that stores vapor until the engine burns it off. Regulators treat raw fuel vapor as smog pollution, which is the entire reason the sealed system exists.
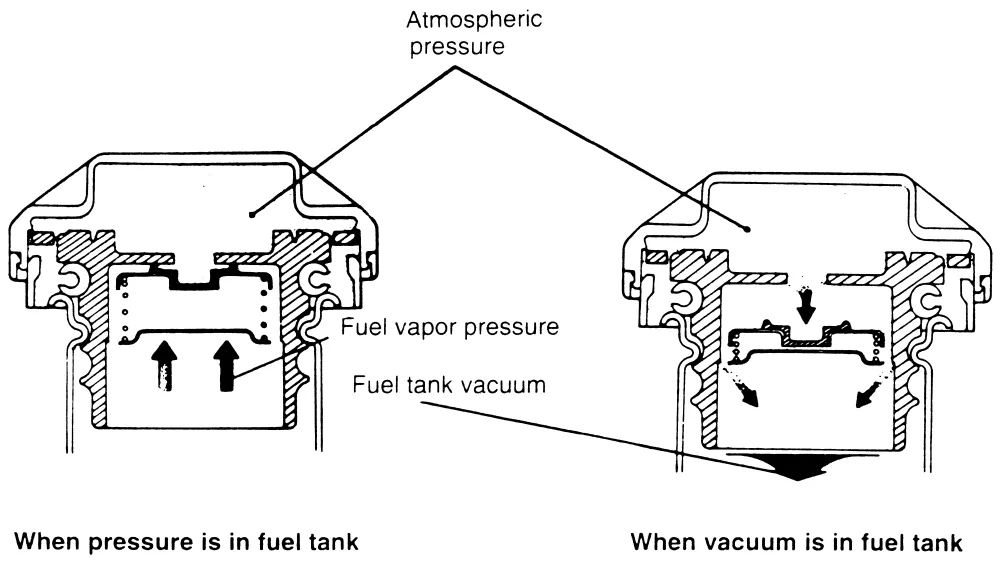
The Internal Check Valve (and Why It Changes Everything)
A sealed cap isn't a dead end, though. Inside sits a spring-loaded relief valve calibrated to crack open at a set pressure or vacuum level. Its job is protecting the tank from dangerous pressure in either direction.
As of 2026, essentially every new US-market vehicle still ships this way, and makers like Stant publish separate part numbers for vented and sealing designs precisely because they aren't interchangeable.
That calibration is why cleaning method matters so much. Jab a wire into the wrong port or blast it with shop air and you can unseat or tear the valve. A damaged valve either leaks vapor and trips a dashboard code, or sticks shut and mimics the original clog.
Step One: Identify Which Type of Gas Cap You Have
Look for a visible pinhole. That one detail splits the decision tree.
- Tiny open hole, usually top-mounted or offset: vented cap
- Solid face with a thick rubber O-ring and a tether: sealed EVAP-era cap
- Any US car or truck, model year 1996 or newer: sealed, virtually guaranteed
- "VENTED" stamped on a small-engine cap: vented, proceed with confidence
- Locking cap: flip it over and inspect the underside, because both styles come locked
| What you see | Cap type | Your path |
|---|---|---|
| Daylight through a pinhole | Vented | Clean it, next section |
| Sealed face, fat gasket, tether | EVAP-era sealed | Jump to sealed-cap steps |
| 1996-or-newer vehicle | Sealed | Same as above |
Getting this right matters most for mower and bike owners who wrench on their own machines. Pairing a fix like this with a complete do-it-yourself lawn program keeps the whole machine honest, not just the cap. Brand new to engine-side work?
Our beginner lawn handbook covers the basic tool kit before you start pulling things apart.
How to Clean a Vented Gas Cap (Lawn Mowers, Motorcycles, ATVs, Classic Cars)
Everything here needs items you probably already own:
| Item | Job |
|---|---|
| Warm, soapy water | Softens varnish and packed grime |
| Wooden toothpick or plastic pick | Clears the hole without scratching |
| Soft toothbrush | Scrubs threads and baffles |
| MAF sensor cleaner | Evaporating flush that's plastic-safe |
| Hand vacuum pump | Proves airflow once you're done |
Work through it in this order:
- Pull the cap off a cold engine and hold the vent hole up to a light. No daylight means you've found the clog.
- Soak the whole cap in warm soapy water for 10 to 15 minutes.
- Pick the vent gently with the toothpick. Old fuel leaves amber varnish, dust packs into paste, and wasps occasionally build entire nests in that hole.
- Flush the passage with MAF sensor cleaner. Skip harsher sprays on plastic-bodied caps, since strong solvent can craze the housing.
- Rinse, shake the water out, and let the cap dry fully overnight.
- Reinstall and run the engine 15 to 20 minutes, then crack the cap loose. Silence where the hiss used to be means you're done.
Soaking, Picking, and Flushing Without Damaging the Vent Hole
A few models add quirks worth knowing. Some motorcycle caps hide a small brass screen behind the vent hole, so flush backward to push debris out instead of packing it deeper. Whatever you do, resist the urge to drill the opening larger.
You'd trade a five-minute job for constant vapor loss and, on anything street-legal, an inspection headache.
While the cap dries overnight, it's a natural window for the rest of the machine. Our walkthrough of routine backyard lawn care covers those checks in order.
The Hand Vacuum Pump Suction Test After Cleaning
A bench test beats guesswork. Once the cap is bone dry, draw gentle suction on the vent hole with a hand vacuum pump, or simply pull air through it yourself. Steady, easy airflow means the passage is open.
Weak or zero flow sends you shopping, since most vented caps cost under $15.
For the field version, run the engine under load a full 20 minutes. No faltering and no hiss means the fix held. With fuel delivery sorted, lock the rest of the season into a month-by-month yard treatment schedule so nothing else sneaks up on you mid-cut.
How to Clean a Modern Sealed Gas Cap Without Destroying the Relief Valve
Here's the surprise: a sealed cap almost never needs deep cleaning. The tank vents through the vehicle's EVAP plumbing, so the real trouble spots are the rubber seal and the tiny relief ports underneath. Gentle work finishes the job in ten minutes.
Follow this order:
- Inspect the rubber gasket under bright light. Cracks, flat spots, or hardened swelling disqualify the seal outright.
- Wash the whole cap in warm soapy water and scrub the gasket groove with a soft brush.
- Rinse briefly, shake out trapped water, and set it seal-side down to dry overnight.
- If the relief ports look grimy, give them a single one-second burst of MAF sensor cleaner from below. Nothing pokes inside them. Ever.
If the gasket fails inspection, stop there. A dead seal leaks vapor whether the valve works or not, so cleaning is wasted effort. Manufacturer specs list an exact pressure and vacuum threshold for each cap, and a hand vacuum pump checks yours against the number.
Locking versions add one wrinkle. Keep water out of the keyway while washing, then dry it well, since a frozen cylinder makes the next fill-up miserable. Back on the vehicle, run the engine 20 minutes and crack the cap mid-run.
No hiss on release means the seal and valve are doing their jobs.
When Cleaning Is Wasted Effort: Signs You Need a Replacement Cap
Some caps are simply finished. Soaking won't un-crack a gasket or revive a corroded housing. Learn the walk-away signs:
- Gasket flattened, brittle, or swollen out of shape
- Plastic body cracked around the threads
- Snapped tether, which invites a loose cap and a P0457 code
- Rust inside a metal cap's vent passage
- Relief valve that rattles loosely or feels fully seized
- Same stall returning after two honest cleanings
| What you found | Call |
|---|---|
| Grimy but intact gasket | Clean and retest |
| Cracked gasket or body | Replace |
| Corroded or seized valve | Replace |
| Passes every test, engine still stalls | Look downstream, next section |
Pricing stays friendly. Verified listings put vented small-engine caps at $5 to $15, OEM automotive caps at $10 to $25, and Stant or Motorad aftermarket units right alongside. California buyers should confirm CARB certification on the label, because inspectors check.
Dealers sell caps by VIN lookup, which removes thread-pitch guessing for a few dollars more.
If the Cap Isn't the Problem: EVAP Vent Solenoid, Charcoal Canister, and Smoke Testing
Suppose the cap passes everything and symptoms stick around. Then the blockage moved downstream, and three suspects lead the list: a stuck-closed vent solenoid, a crushed vent hose, or a charcoal canister soaked stiff with liquid fuel.
That third one deserves a hard look. Topping off the tank after the nozzle clicks pushes raw gasoline up the vapor line, and the carbon bed stops breathing. Aggregate repair estimates put a saturated canister at $250 to $600 installed, which makes that extra squirt at the pump the priciest habit in driving.
EPA emissions rules govern these systems because raw vapor ranks among the worst smog contributors.
Don't confuse the vent valve with the purge valve, its upstream cousin. The purge valve feeds stored vapor into the intake while driving, and its failures show up as rough idle rather than tank vacuum.
Small engines run a simpler version of this game. Many tanks vent through a thin hose routed to a frame fitting, and mud daubers love packing those fittings shut. Blow low-pressure air backward through the line before condemning anything pricier.
Shops settle ambiguous cases with a smoke test. Technicians push inert smoke through the EVAP system and watch where it escapes or refuses to flow. Typical diagnostics run $90 to $160, and the test turns guesswork into a named part.
Branch logic from here:
- If the vent solenoid fails its electrical test → replace it, usually $50 to $150 in parts
- If smoke pools at the canister → replace the canister and quit topping off
- If a hose is crushed or nested → clear it or swap that section
- If everything passes and the tank still vacuums → suspect a collapsed line deeper in the chassis
Common Codes Behind a Clogged-Vent Diagnosis: P0442, P0446, P0455, and P0457 Explained
Five OBD-II codes cover nearly every cap and vent fault a modern car can report. All involve the evaporative system, but they disagree about how badly it leaks.
| Code | Plain meaning | Usual suspect |
|---|---|---|
| P0457 | Cap loose or off | Unseated cap, torn seal, broken tether |
| P0455 | Large vapor leak | Missing cap, disconnected hose, stuck-open vent valve |
| P0442 | Small vapor leak | Aging gasket, hairline crack in the filler neck |
| P0456 | Very small leak | Pinholed line, tired seal |
| P0446 | Vent path restricted | Plugged canister vent, failed solenoid |
P0446 is the closest thing to a literal clogged-vent code. It fires when the computer opens the vent solenoid and airflow doesn't match expectations.
Two habits make these codes useful instead of maddening. Pull the code before spending anything, since a free parts-store scan narrows the field instantly. And grab the freeze-frame data while you're plugged in, because it snapshots conditions at the moment of detection.
Clearing the code only resets the countdown anyway. The computer reruns its leak checks over several drive cycles, sometimes taking days, and the light returns exactly when the fault does.
Mistakes That Turn a Free Fix Into a $900 Fuel Pump Bill
Every disaster on this list began life as a shortcut.
- Replacing the fuel pump on stall symptoms alone. Vacuum lock imitates pump failure almost perfectly, and a pump runs $400 to $900+ installed. The stall usually returns within a week, wallet lighter.
- Drilling a sealed cap or jabbing wire into its ports. That kills the calibrated relief valve and swaps a cleaning job for a permanent code.
- Swapping cap styles. A sealed cap on older equipment recreates the original clog forever, and a vented cap on a modern car trips codes on day one.
- Cleaning plastic caps with brake cleaner or acetone-type solvents. Strong chemicals craze housings and swell rubber seals fast.
- Torquing past the clicks. Most modern caps seal at three clicks per the owner's manual, and muscle strips threads or cracks the filler neck.
- Ordering the $3 mystery cap. Wrong pitch, no tether, zero relief calibration.
The pattern is obvious. Nearly every expensive ending traces back to skipping a ten-minute diagnosis.
Fuel Vapor Safety: Compressed Air, Solvents, and Fire Risk Rules
Is this job dangerous? Only if you get careless, because gasoline vapor ignites far easier than liquid fuel. Work outdoors with a cold engine, and keep every flame, spark, and lit cigarette well away.
Two rules carry most of the weight. First, never blast high-pressure shop air into a fuel-wetted opening, since atomized vapor can form an ignition-ready cloud. Second, lay fuel-soaked rags flat outside to dry, because balled-up rags generate enough heat to self-ignite.
Gloves, glasses, and an extinguisher within reach round it out.
Venting raw vapor isn't just a fire issue either. Emissions law restricts releasing it because of its smog contribution, which is why drilling new vents is off the table.
Preventing the Next Clog: Storage Habits, Ethanol Fuel Residue, and Dusty Conditions
How do you keep the vent clear for good? Start with storage, since most clogs form while equipment sits. Fill the tank nearly full before storing to shrink condensation space, add fuel stabilizer, and run the engine a few minutes so treated fuel reaches the cap.
Ethanol blends leave amber varnish as they age, and that residue is the number-one plug in small-engine caps. Stabilizer slows it noticeably. In dusty conditions, wipe the cap before every removal and glance at the vent hole monthly during the season.
Folding these checks into a structured seasonal plan means the vent never surprises you again.
Gas Cap Vent FAQs
Can you drive with a clogged gas cap vent?
Short trips only, and honestly, don't. The engine will stall once tank vacuum builds, sometimes mid-intersection, and the strain works your in-tank pump harder than designed. The fix costs minutes, so handle it first.
How long does it take to clean a gas cap vent?
Roughly 15 minutes of hands-on work plus overnight drying. Run the soapy soak, pick the hole, flush, then retest the next day with a 20-minute loaded run and the hiss check.
Does a bad gas cap turn on the check engine light?
It can. A torn seal or stuck relief valve reads as an evaporative leak, typically setting P0442 or P0455. Rule out the cap before anyone sells you a smoke test.
What happens if you drill a hole in a sealed gas cap?
You destroy its calibrated relief valve and create a permanent vapor leak. That means recurring EVAP codes, a failed inspection, and possible emissions-tampering penalties. Replacement caps start around $10, which beats all three outcomes.
Why does my engine still stall after cleaning the cap?
Then the blockage lives downstream of the cap. Prime suspects are a crushed vent hose, a stuck-closed vent solenoid, or a fuel-soaked charcoal canister. A shop smoke test names the guilty part in about an hour.
Final Decision Guide: Clean It, Replace It, or Look Deeper
Everything above compresses into four moves:
- Vented cap, no daylight through the hole → soak, pick, flush, retest
- Sealed cap with an intact gasket → gentle wash, dry, retest
- Cracked gasket, seized valve, or a second failed cleaning → replace it
- Cap passes every test but stalling continues → move to the EVAP side and book a smoke test
Run the hiss test before anything else. Ten minutes of diagnosis protects you from a $900 mistake.