You're staring at a patch of dirt where grass should be. Or maybe your lawn looks fine from the road, but up close it's thin, patchy, and full of weeds. Sound familiar?
You're not alone, and honestly, that's exactly why so many people search for a "Lawn care for Dummies pdf" every single spring.
Here's the good news: you don't need a degree in agronomy to grow a thick, healthy lawn. What you need is a simple visual framework, a few basic tools, and a seasonal rhythm that actually makes sense. In our research, the difference between thriving yards and struggling ones almost always comes down to mowing height, watering depth, and soil health.
Get those three things right, and your grass will do the rest. Let's walk through it step by step.
Image source: Web (Bing) / agreenhand.com (Web image (fair-use with source credit))
Quick Answer
A "Lawn care for Dummies" guide is your practical playbook for a healthy yard. It teaches you to identify grass type, test soil, mow at the right height, water deeply, feed on schedule, and fix bare patches. Master these fundamentals and weeds and pests become manageable.
The process takes one season to see real results. Start small, observe weekly, and adjust as you go.
Why Most Lawn Guides Fail (and How This One's Different)
Most lawn advice online falls into two traps. Either it's so generic it could apply to a golf course in Florida or a backyard in Minnesota, or it's so technical you need a chemistry degree to decode fertilizer labels. Neither approach helps the person staring at a brown patch wondering where they went wrong.
The real problem is that lawn care is visual. You can't fix what you can't see, and most guides never teach you how to look at your grass properly. They hand you a checklist without showing you what each problem actually looks like in the dirt.
Our approach flips that. Instead of memorizing rules, you'll learn to read your lawn's visual cues. Yellow blades mean something different than brown tips.
Spongy ground tells a different story than rock-hard soil. Once you can see what your lawn is telling you, the fixes become obvious.
And here's the honest truth from our research: most lawns fail from simple neglect, not complex disease. Wrong mowing height. Shallow watering.
Fertilizer at the wrong time. These are fixable problems that don't require expensive products or professional help.
The 30-Second Lawn Assessment: Look Before You Touch
Before you spend a dime on seed, fertilizer, or tools, take a walk. Stand at the edge of your lawn and just look. A quick visual scan tells you more than any soil test ever will.
What to Look For
Walk the perimeter and note what you see. Check for these visual cues:
- Color: Is the grass a deep green, a pale yellow-green, or brown? Dark green usually means healthy nitrogen levels. Yellow-green often signals a nutrient deficiency or too much water.
- Density: Can you see bare soil between the blades? Thick grass that hides the soil is your goal. Thin grass invites weeds to move in.
- Texture: Run your fingers through the grass. Is it soft and springy, or brittle and crunchy? Springy grass is hydrated and healthy. Crunchy grass is stressed.
- Patterns: Are the problem areas in straight lines, random patches, or along the edges? Straight lines often point to mower issues or underground utility lines. Random patches suggest pests, disease, or pet damage.
The Footprint Test
Here's a quick check that takes ten seconds. Walk across your lawn and turn around. Look at your footprints.
If they spring back within a few minutes, your lawn is properly hydrated. If the grass stays flattened for an hour or more, it's water-stressed. This test works because grass blades have internal water pressure.
When that pressure drops, the blades can't bounce back.
The Screwdriver Test
Take a flathead screwdriver and push it into the soil. In a healthy lawn, it should sink in easily, several inches deep. If you have to lean on it hard, your soil is compacted.
Compacted soil means roots can't breathe, water can't penetrate, and your lawn will struggle no matter what you do.
Lawn Types Made Simple: Cool-Season vs. Warm-Season Grasses
You can't care for grass you can't identify. Different varieties have completely different needs, and if you're watering and feeding a warm-season lawn on a cool-season schedule, you're working against nature.
How to Identify Your Grass Visually
Look at the blade shape and the growth habit. Hold a single blade in your hand and feel the texture.
- Cool-season grasses have thin blades with a V-shape or boat-shaped tip. They grow actively in spring and fall, go semi-dormant in summer heat, and stay green in winter.
- Warm-season grasses have wider blades, often with a coarse texture. They go dormant and turn brown in winter, then green up in late spring and grow like crazy through summer.
A Quick Reference Table
| Grass Type | Blade Shape | Peak Growth Season | Winter Color | Best Regions |
|---|---|---|---|---|
| Kentucky bluegrass | Boat-shaped tip, fine | Spring & fall | Green | Northern US, Midwest |
| Tall fescue | Coarse, wide, prominent veins | Spring & fall | Green | Transition zone, Midwest |
| Perennial ryegrass | Glossy underside, narrow | Spring & fall | Green | Northern US, coastal |
| Bermudagrass | Fine, dense, pointed | Summer | Brown/dormant | Southern US |
| Zoysiagrass | Medium, stiff | Summer | Brown/dormant | Transition zone, South |
| St. Augustinegrass | Wide, rounded, coarse | Summer | Brown/dormant | Gulf Coast, Southeast |
Why It Matters for Care
The grass type dictates everything. Mowing height, watering frequency, fertilizer timing, and overseeding schedules all depend on whether your lawn runs on a cool-season or warm-season calendar.
Cool-season lawns need their heaviest feeding in the fall. Warm-season lawns need theirs in late spring and summer. Get this backwards and you'll either push growth at the wrong time or waste fertilizer entirely.
If you're not sure which type you have, snap a photo and compare it against photos of each species. Local university extension websites usually have clear identification guides, and they're free to access. As of 2026, many extension services even offer a photo ID service by email.
The Soil Truth: Why pH and Compaction Are Everything
Here's the part nobody wants to hear: your grass doesn't care about your fertilizer spreader. It cares about what's happening underground. Soil health drives everything above it, and if your soil is off, no amount of expensive treatment will fix a struggling lawn.
The pH Factor
Soil pH measures how acidic or alkaline your soil is, and it controls how well grass absorbs nutrients. Most turf grasses prefer a pH between 6.0 and 7.0, which is slightly acidic to neutral.
Below 6.0, nutrients like nitrogen and phosphorus become locked up. Above 7.0, iron and manganese become unavailable. In both cases, your grass shows the same symptoms: yellowing blades and poor growth, even when you're feeding it properly.
How to Check pH Without Guessing
You have two options. The cheap and quick route is a home test kit from any garden center, which gives you a color-coded reading in about five minutes. It's not laboratory precise, but it's accurate enough to know whether you're in the right zone.
The better route is a mail-in soil test through your local university extension office. These run about $15 to $25 as of 2026 and give you a full breakdown, including pH, nutrient levels, and organic matter percentage. The extension office also sends back specific recommendations for your grass type and region.
What to Do With Your Results
If your soil is too acidic, you'll need to add lime. If it's too alkaline, sulfur or compost can bring it down. These aren't quick fixes; they take several months to work through the soil.
Plan to make adjustments in the fall or early spring, well before your peak growing season.
Compaction: The Hidden Killer
Compacted soil is your lawn's silent enemy. It prevents water from soaking in, oxygen from reaching roots, and grass from spreading. And it's everywhere, especially in yards with kids, pets, or regular foot traffic.
Walk across your lawn after a heavy rain. If water pools on the surface instead of soaking in, you have compaction. If that screwdriver test we mentioned earlier takes real effort, that's another sign.
The fix is core aeration. You pull small plugs of soil out of the ground, which relieves compaction and lets air, water, and nutrients reach the root zone. Plan to aerate once a year, typically in the fall for cool-season lawns and late spring for warm-season ones.
Mowing Like a Pro: Height, Sharpness, and Patterns
Mowing seems simple, but it's where most lawns get damaged. The mower is the most-used tool in your arsenal, and using it wrong stresses your grass weekly.
The Ruler Test
Set your mower deck height according to your grass type, not what looks pretty. Use a ruler to measure from the ground to the blade tip.
- Cool-season grasses: 2.5 to 3.5 inches
- Warm-season grasses: 1.5 to 2.5 inches, depending on variety
- Bermudagrass: 1 to 2 inches
For most lawns, taller is better. Taller grass shades the soil, retains moisture, and crowds out weeds. The old habit of scalping your lawn short is one of the biggest mistakes in residential lawn care.
The 1/3 Rule
Never remove more than one-third of the grass blade length in a single mow. If your grass is 3 inches tall, cut it to 2 inches minimum. Anything shorter shocks the plant and exposes the soil to sun and weeds.
If you let your grass grow too long while on vacation, don't hack it all the way down at once. Cut it taller this week, then lower it gradually over a few mows.
Sharp Blades Matter More Than You Think
Dull blades tear grass instead of cutting it cleanly. The torn ends turn brown and ragged, giving your lawn a white or tan cast from a distance.
Check your blades monthly. Run your finger along the cutting edge; if it feels rounded or nicked, it's time to sharpen. As a general rule, sharpen every 6 to 8 hours of mowing time.
That's about twice a season for a typical suburban lawn.
Alternate Your Pattern
Mowing the same direction every week creates ruts and trains grass to lean. Alternate your pattern each time: north-south one week, east-west the next, maybe diagonal after that.
This also prevents the grass from matting down in one direction, which can block sunlight from reaching the lower blades.
When to Mow
Mow when the grass is dry. Wet grass clumps, clogs your mower deck, and leaves uneven piles that smother the turf. Early morning dew counts as wet.
If you're mowing at 7 AM, you're probably mowing wet grass.
The Thatch Problem: Aeration and Overseeding
You've probably heard the term "thatch," but let's make sure we're on the same page. Thatch is a spongy layer of dead stems, roots, and organic matter that builds up between the soil surface and the green grass blades.
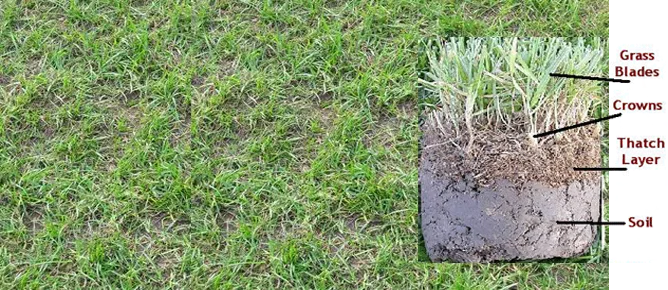
Image source: Web (Bing) / betterpetsandgardens.com.au (Web image (fair-use with source credit))
How to Check Thatch Depth
This is a purely visual and tactile test. Push a sharp knife or a screwdriver straight down through the grass. When you hit resistance, pull it back and look at what's stuck to the blade.
Thatch is the brown, fibrous material sitting on top of the dark soil. A thatch layer under half an inch is healthy; it acts like mulch and helps retain moisture. Anything over an inch becomes a problem, physically blocking water and nutrients from reaching the root zone.
Why Thatch Builds Up
Thatch accumulates when organic matter breaks down faster than the microbes in your soil can process it. Over-fertilizing with quick-release nitrogen, heavy mowing, and compacted soil all speed up thatch buildup.
Core Aeration: The Right Fix
Core aeration pulls actual plugs of soil, roughly an inch long and the width of your pinky finger, out of your lawn. This relieves compaction, creates channels for water and air, and kick-starts the breakdown of thatch.
Rent a plug aerator from your local hardware store, or hire a service if you don't want to haul equipment. Plan to do this once a year, and do it when your grass is in its active growth phase so it can recover quickly.
Overseeding After Aeration
The perfect time to overseed is immediately after aeration. The holes give seeds direct contact with soil, which is the number one requirement for germination. Seed sitting on top of thatch dries out and dies before it ever roots.
For cool-season lawns, overseed in late summer or early fall. Soil temperatures should be between 55 and 65 degrees, which you can check with a soil thermometer or simply by watching when daytime highs drop into the 70s.