Transform your yard with beautiful Zoysia sod! This comprehensive guide provides a step-by-step process for installing Zoysia sod, ensuring a vibrant and healthy lawn. Follow these easy instructions for proper preparation, laying techniques, and essential post-installation care to achieve stunning results.
So, you’ve decided Zoysia sod is the right choice for your dream lawn. That’s fantastic! Zoysia grass is known for its dense growth, excellent weed resistance, and beautiful texture. It’s a warm-season grass that thrives in the heat, creating a lush carpet that’s perfect for families and pets. But getting that beautiful lawn doesn’t happen overnight. It starts with a solid foundation and a proper installation. Don’t worry, installing Zoysia sod yourself is totally achievable, and this guide will walk you through every single step. We’ll break down the process so you can feel confident and ready to create the lawn you’ve always wanted.
Getting a beautiful, green lawn can feel like a huge undertaking. If you’re tired of battling weeds or dealing with bare patches, laying sod is a fantastic way to get an instant lawn. Zoysia sod, in particular, offers a dense, resilient turf that can stand up to heavy foot traffic and outcompete many common lawn pests and diseases. This article is your go-to guide for how to install Zoysia sod, from the moment you decide to dig in to the first time you mow your new, glorious lawn. We’ll cover everything you need to know to ensure your Zoysia sod takes root and thrives.
Key Takeaways
- Proper Site Preparation is Crucial: Removing old grass, debris, and leveling the soil are the first critical steps for successful Zoysia sod installation.
- Soil Amendment Enhances Growth: Testing and amending your soil with compost or other organic matter will provide the necessary nutrients for your new Zoysia sod.
- Timing Matters for Installation: Laying Zoysia sod during warmer months, typically late spring through summer, allows for optimal root establishment.
- Laying Sod Requires Precision: Begin laying sod along a straight edge, like a driveway or sidewalk, and stagger the seams to avoid gaps and create a seamless look.
- Immediate Watering is Essential: Water the newly laid Zoysia sod thoroughly immediately after installation to ensure good contact with the soil and prevent drying out.
- Consistent Watering and Mowing are Key: Maintain consistent moisture and follow proper mowing techniques for the first few weeks to encourage strong root development and healthy growth.
Quick Answers to Common Questions
What is the best time of year to install Zoysia sod?
The best time to install Zoysia sod is during the warmer months, from late spring through summer, when temperatures are consistently warm to allow for optimal root establishment.
How much extra sod should I order?
It’s recommended to order about 5-10% extra sod to account for cuts, waste, and any pieces that might not lay perfectly.
How often should I water newly laid Zoysia sod?
For the first 1-3 days, water at least once or twice a day. Then, gradually reduce to once a day for the next 10-11 days, watering more deeply each time.
When can I mow my new Zoysia sod?
Wait until the Zoysia sod has rooted firmly. You can test this by gently tugging on a piece. The first mow should be done at a slightly higher setting than usual.
Do I need to fertilize Zoysia sod right after installation?
No, it’s best to wait at least 3-4 weeks after installation before fertilizing. The sod usually comes with a starter fertilizer, and the roots need time to establish.
📑 Table of Contents
1. Planning and Preparation: Setting the Stage for Success
Before you even think about ordering your Zoysia sod, a little planning goes a long way. This is arguably the most important phase. Getting the ground ready ensures your new sod will establish quickly and healthily.
Assessing Your Site and Gathering Materials
First, take a good look at the area where you plan to lay the sod. Is it sunny? Zoysia loves sun, so if you have shady spots, consider if Zoysia is the best fit for those areas, or if you’ll need a different solution. Check for any existing drainage issues. If water tends to pool, you might need to address that first. You can explore options like installing drainage pipes or a French drain to improve water flow.
You’ll need to estimate how much sod you require. Measure the length and width of the area in square feet. It’s always a good idea to order about 5-10% extra to account for cuts and waste.
What materials will you need?
- Zoysia sod (of course!)
- A sod cutter or tiller (you can often rent these)
- A rake (a heavy-duty landscape rake is ideal; you might consider a power rake if you have a large area)
- A wheelbarrow
- A shovel and a garden hoe
- Topsoil or compost
- A soil test kit (optional but recommended)
- A sharp knife or spade for cutting sod
- A hose or sprinkler system
- Stakes and string (for a straight starting line)
- A roller (optional, but helpful for ensuring good soil contact)
- Work gloves and sturdy shoes
Removing Old Grass and Debris
The first physical step is to get rid of what’s currently there. If you have an existing lawn, you’ll need to remove the old grass and its root system. A sod cutter is the most efficient tool for this. It slices under the sod, making it easier to roll up and remove. You can then use a shovel and wheelbarrow to haul it away. If you have a smaller area, you can also use a tiller to churn up the existing grass and vegetation.
Clear the entire area of rocks, roots, weeds, and any other debris. The smoother and cleaner the surface, the better your new sod will establish.
Leveling the Soil
Once the old grass is gone and the area is cleared, it’s time to level. You want a smooth, firm surface. Use a rake to spread out any high spots and fill in low spots. If you have significant unevenness, you might need to add a thin layer of topsoil or compost. For major leveling, check out our guide on how to level an uneven lawn. The goal is to create a consistent grade that slopes slightly away from any structures to prevent water from pooling against your house.
Amending the Soil
Zoysia grass prefers well-drained, slightly acidic to neutral soil. A soil test kit can tell you your soil’s pH and nutrient levels. Based on the results, you can amend the soil. Adding a 2-3 inch layer of good quality compost or a suitable soil amendment and mixing it into the top 4-6 inches of soil will greatly improve drainage, aeration, and fertility. This is crucial for healthy root development. If your soil is heavily compacted, adding compost is especially beneficial.
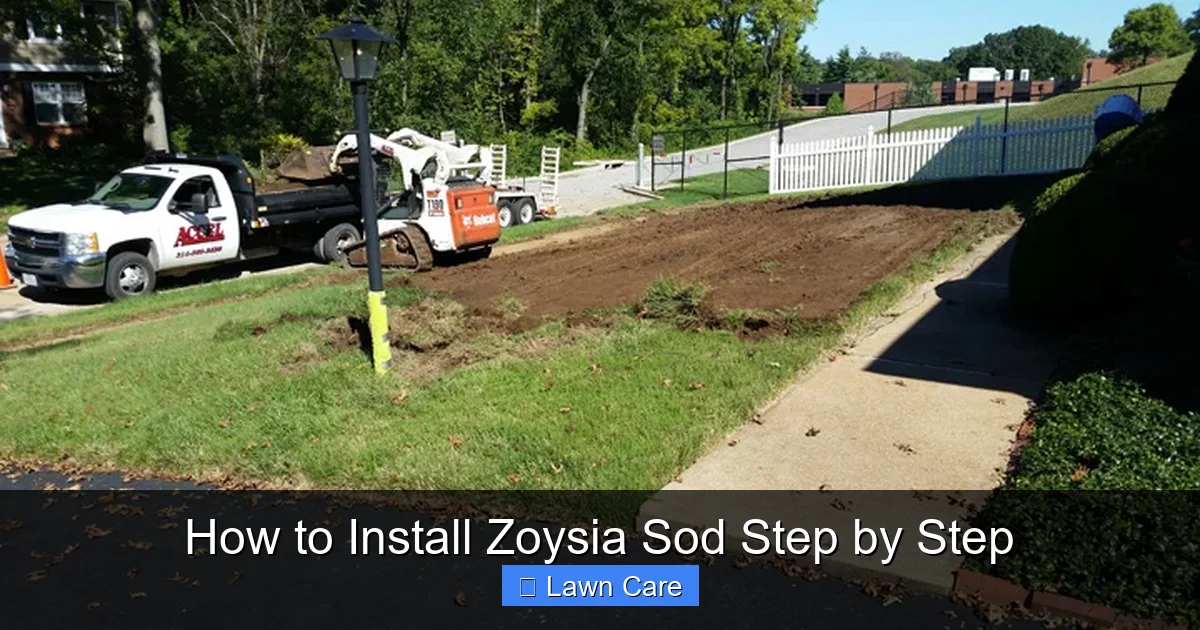
2. Timing and Delivery: Getting Your Zoysia Sod Ready
Visual guide about How to Install Zoysia Sod Step by Step
Image source: accellandscaping.com
When you decide to install Zoysia sod and how you get it delivered are important considerations.
When to Install Zoysia Sod
Zoysia is a warm-season grass, meaning it thrives in heat. The best time to lay Zoysia sod is when the temperatures are consistently warm, ideally from late spring through summer. This allows the sod to establish its roots before the cooler weather arrives. Avoid laying sod during extreme heat waves or when there’s a risk of frost. You can learn more about the ideal timing by checking out when is the best time to lay Zoysia sod.
Ordering and Receiving Your Sod
Once you’ve prepared your site, it’s time to order your sod. Try to order it for delivery as close as possible to when you plan to lay it. Sod is a living product and needs to be installed quickly. Ideally, you want to lay it within 24 hours of delivery.
When the sod arrives, inspect it. It should be green and healthy-looking, with firm roots. If you can’t lay it immediately, unroll the sod and keep it moist. However, prolonged storage can lead to deterioration.
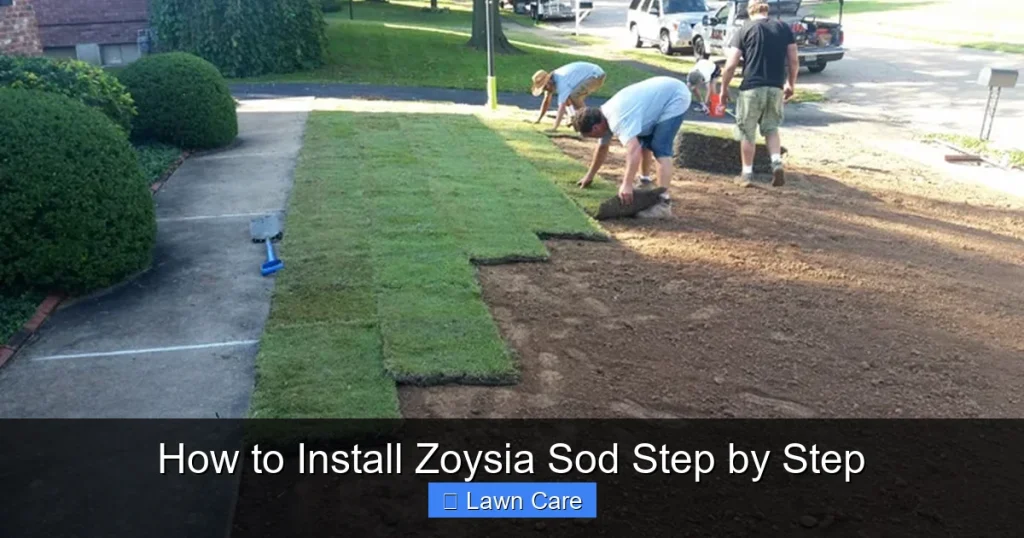
3. Laying the Zoysia Sod: Creating a Seamless Lawn
Visual guide about How to Install Zoysia Sod Step by Step
Image source: accellandscaping.com
This is where your beautiful new lawn starts to take shape. Laying sod might seem straightforward, but a few techniques will ensure a professional-looking result.
Starting Your Layout
Begin laying your Zoysia sod along a straight edge, such as a driveway, sidewalk, or patio. This provides a clean starting point. Use stakes and string to ensure your first line is perfectly straight. It’s like laying bricks or tiling a floor – a good start makes the rest of the job easier.
Technique for Laying Sod Rolls
You’ll typically receive sod in rolls or rectangular pieces. Place the first piece against your straight edge. Then, lay the next piece right up against the first one, without any gaps or overlaps. Think of it like putting together a jigsaw puzzle or a carpet.
Continue laying the sod in a staggered pattern, similar to how bricks are laid. This means the seams of each row should not line up with the seams of the row next to it. This interlocking pattern creates a stronger, more uniform lawn and prevents the sod from shifting.
Cutting and Fitting Sod
As you reach the edges of your lawn or go around obstacles like trees or garden beds, you’ll need to cut the sod to fit. You can use a sharp spade or a utility knife for this. Measure carefully and make clean cuts. Don’t be afraid to use smaller pieces to fill in odd-shaped areas. It’s better to have a few well-placed small pieces than large gaps.
For curves around trees, gently lay the sod and then carefully trim away the excess with your knife. If you’re planning to install stepping stones, now is a good time to plan their placement and cut the sod accordingly.
Ensuring Good Soil Contact
This is a critical step that many people overlook. After laying each section of sod, press it down firmly to ensure good contact with the soil underneath. You can do this by walking on it or using a roller. If you don’t have a roller, stepping on it is perfectly fine. This eliminates air pockets, which can dry out the roots and prevent establishment. Good soil contact is essential for the sod to begin rooting.
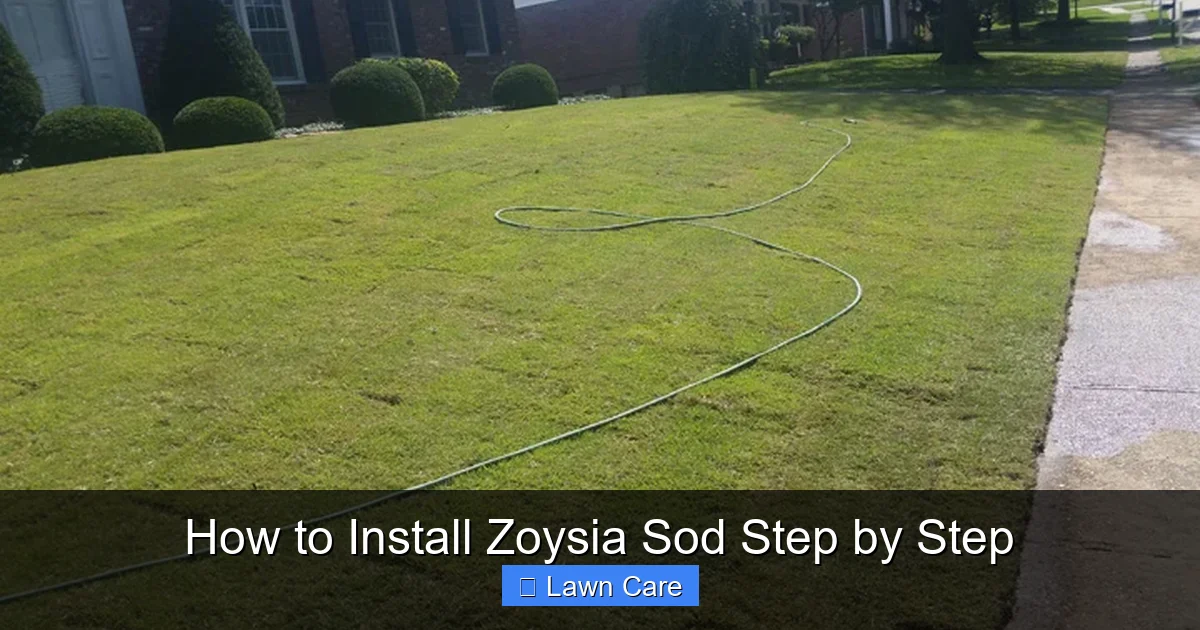
4. Watering and Initial Care: Nurturing Your New Lawn
Visual guide about How to Install Zoysia Sod Step by Step
Image source: accellandscaping.com
Once the last piece of sod is laid and you’ve ensured good soil contact, the immediate watering begins. This is non-negotiable for successful Zoysia sod installation.
Immediate and Thorough Watering
As soon as you’ve finished laying the sod, water it deeply and thoroughly. You want to moisten the soil beneath the sod, not just the sod itself. The goal is to settle the sod and provide immediate hydration to the roots. Continue watering until the soil is damp about 4-6 inches deep. You should see water starting to run off the surface slightly if you’ve watered enough.
Watering Schedule for the First Few Weeks
For the first week or two, you need to keep the sod consistently moist. The exact watering schedule will depend on your climate and the weather.
* Days 1-3: Water at least once or twice a day, especially if it’s hot or windy. The goal is to keep the surface moist.
* Days 4-14: Gradually reduce watering frequency to once a day, but water more deeply each time. Check the moisture level by lifting a corner of the sod. If it’s dry underneath, water more.
* After 2 Weeks: As the sod begins to root, you can slowly transition to a more established watering routine. Your goal is to water deeply and less frequently to encourage deeper root growth. You can find more tips on watering efficiently by hand, though for newly laid sod, consistent coverage is key. Always refer to guides on how to water newly laid sod for specific instructions.
Fertilizing and Mowing
Hold off on fertilizing for at least 3-4 weeks after installation. Your sod comes with a starter fertilizer from the nursery, and the new roots need time to establish before being subjected to additional nutrients.
Wait until your Zoysia sod has rooted firmly before mowing. You can test this by gently tugging on a piece of sod. If it resists and doesn’t pull up easily, it’s rooted. The first mowing should be done at a higher setting than usual to avoid stressing the new grass. For Zoysia, a mowing height of about 1 to 2 inches is generally recommended. Ensure your mower blades are sharp to avoid tearing the grass. You can learn more about how to mow Zoysia grass for optimal results.
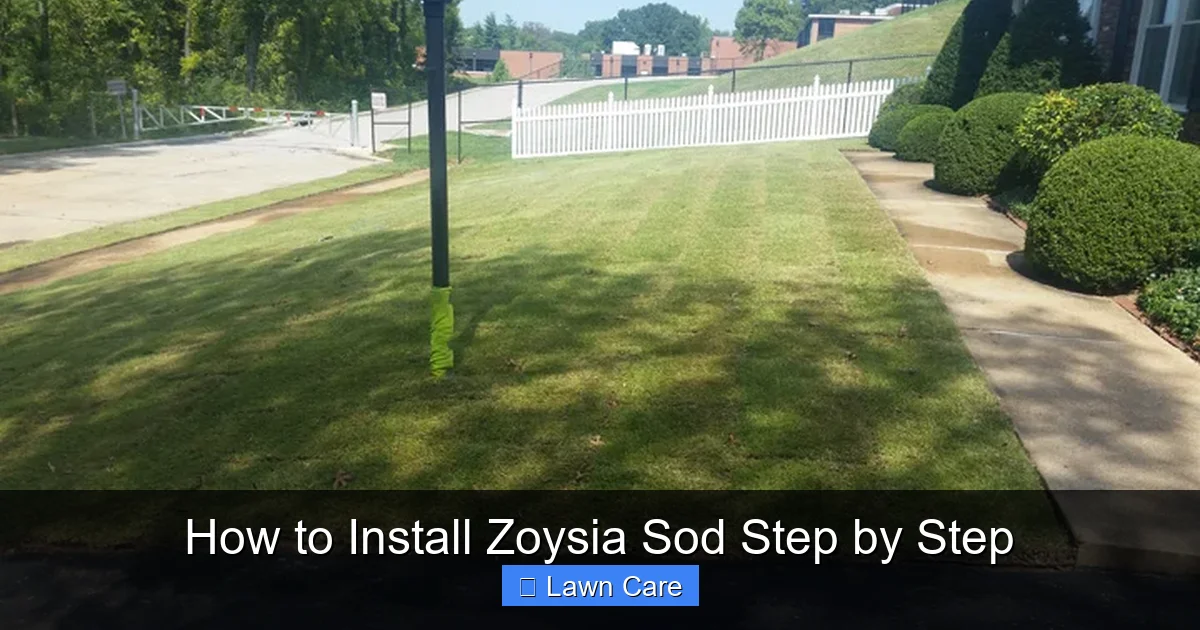
5. Ongoing Care and Troubleshooting
Once your Zoysia sod is established, you’ll want to maintain its health and beauty.
Long-Term Watering and Fertilizing
Established Zoysia lawns are drought-tolerant, but they will perform best with regular watering, especially during prolonged dry spells. Water deeply and less frequently. Fertilize according to Zoysia grass recommendations, typically in late spring or early summer. Our guide on when and how to fertilize Zoysia grass will be invaluable.
Weed and Pest Management
One of the benefits of Zoysia is its excellent weed-fighting ability once established. However, some weeds may still pop up. Regular mowing and proper watering will help keep your lawn dense and less susceptible. If you encounter specific issues like grubs or diseases, address them promptly. You can find information on lawn repairs and common Zoysia problems.
Dealing with Dormancy
Zoysia grass turns brown and goes dormant in the fall and winter. This is a natural process. Don’t panic! It will green up again in the spring. Proper care during the growing season will help it recover and thicken up each year. Preparing your Zoysia grass for winter dormancy is also important for its health.
6. Benefits of Zoysia Sod Installation
Choosing to install Zoysia sod offers numerous advantages for homeowners looking for a low-maintenance, beautiful lawn.
Instant Lawn Appearance
One of the most significant benefits is the immediate transformation of your yard. Instead of waiting months for grass seed to grow, you get a mature, established lawn the day you lay the sod. This is perfect for special events or when you want instant curb appeal.
Superior Weed Resistance
As Zoysia grass thickens, it forms a dense mat that chokes out weeds, significantly reducing the need for herbicides. This creates a cleaner, healthier lawn.
Drought Tolerance
Once established, Zoysia is very drought-tolerant, making it a great choice for areas with water restrictions or for homeowners who want to conserve water. It can survive long periods without rain by going dormant, then greening up again when conditions improve.
Durability and Foot Traffic Tolerance
Zoysia grass is known for its resilience. It can withstand heavy foot traffic, making it ideal for families with children and pets. It recovers quickly from wear and tear.
Reduced Erosion
The dense root system of Zoysia helps bind the soil together, reducing erosion from wind and rain, especially on slopes.
Installing Zoysia sod step by step is a rewarding process that leads to a beautiful, functional, and low-maintenance lawn. By following these detailed instructions, you’re setting yourself up for success and can enjoy your new Zoysia lawn for years to come. Remember, good preparation is key, and consistent care in the initial stages will pay off immensely.
Frequently Asked Questions
How do I prepare the soil before laying Zoysia sod?
Prepare the soil by removing any existing grass or debris, leveling the ground, and amending it with compost or other organic matter to improve drainage and fertility. A soil test can help determine specific amendments needed.
What is the most common mistake people make when installing sod?
A common mistake is not watering the sod immediately and thoroughly after installation. Proper watering is critical for the sod to establish a connection with the soil and prevent it from drying out.
Can I install Zoysia sod on a slope?
Yes, you can install Zoysia sod on a slope. Ensure the slope is graded properly to prevent water runoff and erosion. Laying sod perpendicular to the slope can also help.
How long does it take for Zoysia sod to establish roots?
With proper watering and care, Zoysia sod can start rooting within 1-2 weeks. Full establishment, where it’s resistant to pulling up, typically takes about 3-4 weeks.
What are the signs that my Zoysia sod is not rooting properly?
Signs of poor rooting include the sod lifting easily when tugged, dry or brown patches that don’t recover with watering, and wilting even after watering.
How do I transition from an old lawn to Zoysia sod?
You will need to remove the old lawn, prepare the soil as described in this guide, and then lay the Zoysia sod. If you are transitioning from a different type of grass like fescue, specific steps to manage the transition might be necessary, such as those found in guides on how to transition from fescue to Zoysia grass.