Watching clean water pour off your roof and vanish into a storm drain feels wasteful, especially when your plants are thirsty. The question "What is the best way to collect rainwater for plants?" has a simpler answer than you'd think: it depends entirely on what you're watering and how much space you have. There's no universal winner.
There's only the method that fits your roof, your garden, and your patience.
Here's the key number to remember. One inch of rain falling on 1,000 square feet of roof yields about 620 gallons of water. Most gardens need around one inch of water per week, so even a modest roof catches more than enough.
In our research, the difference between a frustrating setup and a smooth one comes down to a few smart decisions.
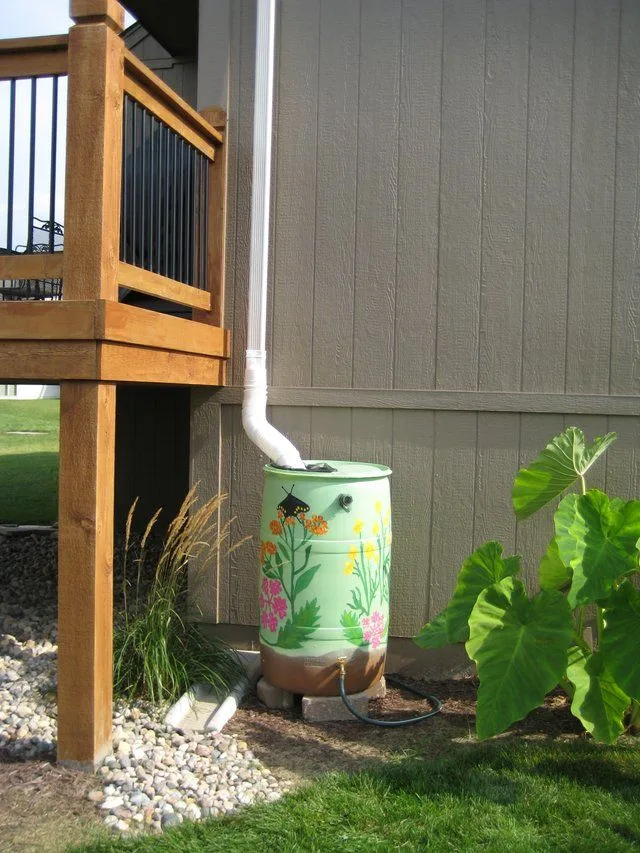
Image source: Web (Bing) / pinterest.com (Web image (fair-use with source credit))
Why the "Best" Rainwater Method Isn't the Same for Everyone
If you search for advice on rainwater collection, you'll see the same photo over and over: a pristine rain barrel under a perfect downspout with a copper diverter and a wooden stand. That setup works beautifully for some people. For others, it's a recipe for clogged gutters and soggy foundations.
The "best" method changes based on three things.
- What you're watering. A few pots on a balcony need far less than a 200-square-foot vegetable bed.
- Where you live. A dry climate with occasional downpours calls for big storage. A rainy climate lets you get away with a smaller tank and constant refills.
- How much effort you want to invest. A simple barrel is almost zero-maintenance. A pumped system adds parts, power, and winterizing chores.
Think of it like choosing a water bottle. A 16-ounce thermos is perfect for a walk around the block. You'd never bring it on a week-long camping trip.
Rainwater collection works the same way. Match the container to the job, and the whole experience gets easier.
The core logic is simple: catch water where it falls, keep it clean, and deliver it to your plants without drowning them. Every choice after that is a more elaborate version of that basic loop.
The Only Question That Matters: What Are You Watering?
This single question filters out most of the confusion. Your watering needs determine tank size, pump pressure, and whether you can rely on gravity alone.
Container plants and balcony gardens
If you're watering a handful of pots, you don't need a giant tank. A 50-gallon rain barrel will last you weeks. You can fill a watering can by hand, so you never need a pump or fancy hoses.
Keep it small, keep it simple, and don't overthink it.
Vegetable beds and raised gardens
This is the classic use case. A 100-square-foot vegetable bed needs roughly 60 gallons per week in the peak of summer. A single standard rain barrel holds about 50 gallons, which means you'll likely want two barrels, an IBC tote, or a cistern if you want to stay off the tap.
Greenhouse or polytunnel
Greenhouses keep plants warm, but they also block rainfall. You must supply every drop. If you're growing in a greenhouse, you'll need reliable storage with drip irrigation.
A gravity-fed tank on a stand works great because the water pressure comes from height alone.
Lawn watering and large landscape beds
Lawns are thirsty. They suck up significantly more water than any vegetable patch. Letting a lawn go dormant in summer is often smarter than storing thousands of gallons just for grass.
But if you're committed to keeping a green lawn, look at large cisterns, not barrels. You'll need hundreds of gallons to make a difference.
As of 2026, most urban gardeners fall into the first two categories. Start there. You can always scale up later if the system proves useful.
Quick Answer: The Best Starter Setup for Most Gardeners
The best way to collect rainwater for plants is a food-grade rain barrel connected to a gutter downspout with a diverter and a mosquito-proof screen. That setup works for most homes and budgets. It is simple, cheap, and easy to maintain.
You can expand it later if you need more water.
A rain barrel is approachable. It requires no plumbing skills, no electricity, and no building permits in most areas. You set it on a sturdy stand, attach a diverter to the downspout, and let rain do the work.
A basic kit costs between $30 and $150, depending on whether you build it yourself or buy one ready-made.
The two upgrades that matter most are a first-flush diverter and a fine mesh screen. The screen keeps leaves, twigs, and mosquitoes out. The first-flush diverter lets the dirtiest water, the stuff that washed off the roof first, go down the drain instead of into your barrel.
Both are cheap insurance for keeping the water clean.
From there, you can connect a hose to the spigot and fill watering cans directly. For most container and small-bed gardeners, this is all you'll ever need.
Storage Options: Rain Barrel vs. IBC Tote vs. Underground Cistern
Once you know how much water you need, the next step is picking a storage vessel. You have three main routes, and each fits a different lifestyle.
| Option | Typical capacity | Best for | Price range | Maintenance |
|---|---|---|---|---|
| Rain barrel | 50–55 gallons | Container plants, small beds | $30–$150 | Low |
| IBC tote | 275–330 gallons | Large vegetable gardens, greenhouses | $50–$200 used | Medium |
| Underground cistern | 1,000+ gallons | Lawn irrigation, off-grid homes | $500–$5,000+ | High |
Rain barrel: the practical entry point
A rain barrel sits above ground and catches water from your gutters. It's the easiest option to install and move. Most are made of food-grade plastic, though you can find galvanized steel versions that look prettier and last longer.
The catch is size. Fifty gallons disappears fast in summer. If you water a vegetable patch, you'll empty it in a day.
That's fine if your climate gives you regular rain, but tough during dry spells. You can solve this by chaining two or more barrels together with an overflow hose.
IBC tote: the budget workhorse
An IBC tote is a large plastic cube with a steel cage, typically used for shipping liquids. Used food-grade totes are cheap and hold five to six times more water than a rain barrel. Many gardeners consider them the sweet spot for serious growing.
You'll need to raise it off the ground to let gravity do the work. A cinder block or wooden stand is enough. But the tote is ugly, and some neighbors or homeowner associations might complain.
It also requires cleaning before first use, since you don't know what it previously carried.
Underground cistern: the big-boy option
An underground cistern is the most permanent and expensive choice. It's buried in your yard and collects water from your entire roof. The water stays cool and algae-free because it's out of the sun.
You'll need a pump to bring it back up to the surface.
This makes sense for larger properties with irrigation systems. It also requires excavation, permits, and careful planning. In our research, most home gardeners don't need a project this large.
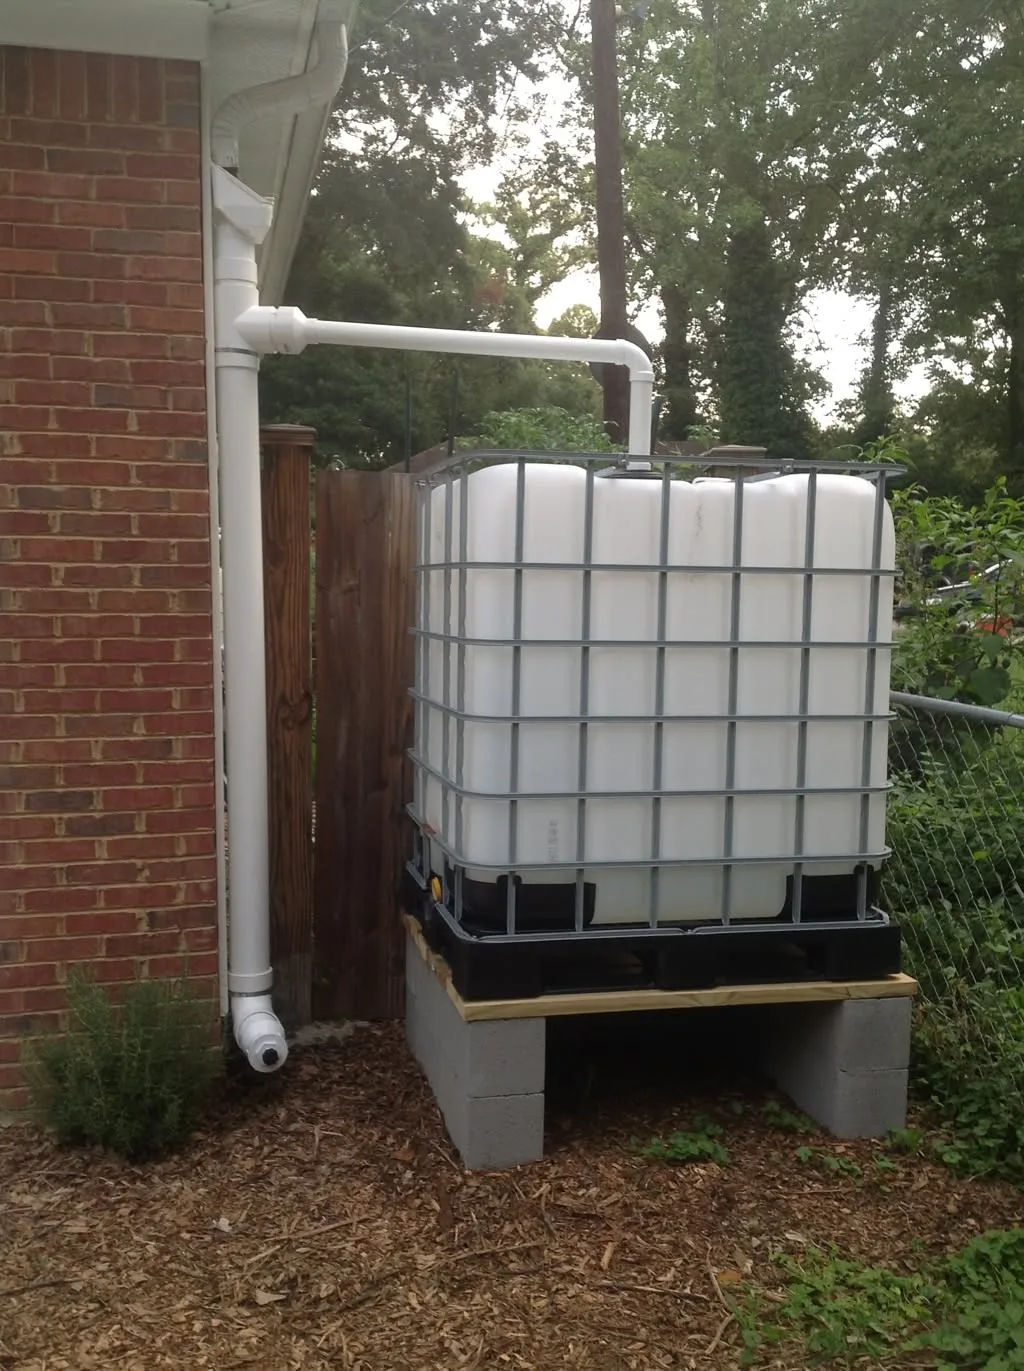
Image source: Web (Bing) / pinterest.com (Web image (fair-use with source credit))
Collection Methods: Downspout Diverters, Rain Chains, and Rain Saucers
Storage matters, but the real question is how you get water into the tank. You can't just position a barrel and hope rain finds it. You need a deliberate collection method.
Downspout diverter
This is the most common approach. A diverter taps directly into your existing gutter downspout and redirects a portion of the water into your barrel. Some models route water back to the downspout when the barrel is full.
That means you don't need to babysit it during a storm.
Installation is straightforward. You cut a section out of the downspout, fit the diverter, and tighten the seal. It takes about thirty minutes with basic tools.
The downside is that your barrel must sit right next to your house, which isn't always ideal for your layout.
Rain chain
A rain chain is a decorative alternative to a closed downspout. Water flows down a series of linked cups into a positioned barrel. It looks lovely, especially in a garden setting.
However, it's less efficient during heavy rain. Water can splash, spray, or miss the barrel entirely. It's more of an aesthetic choice than a practical workhorse.
Rain saucer
If you don't want to touch your gutters, a rain saucer is a clever workaround. It's a wide funnel that sits under the downspout opening and catches water before it hits the ground. You can angle it to direct water into a barrel located a few feet away.
It's not as water-tight as a diverter, but it costs less and requires zero slicing into your gutter system.
The first-flush upgrade
No matter which collection method you choose, you should add a first-flush diverter. The first ten gallons of rain wash bird droppings, dust, and roof debris off the surface. That water contains contaminants you don't want on your vegetables.
A first-flush diverter captures the initial runoff and lets the cleaner water pass through to your tank. This is one of those upgrades that turns an okay system into a genuinely good one.
Getting Water to Your Plants: Gravity Feed vs. Pump and Drip Irrigation
Gravity is the simplest, cheapest way to move water. Raise the tank on a stand and connect a hose. Every foot of height gives roughly 0.43 psi.
A stand three feet tall offers enough pressure for drip lines and soaker hoses.
For longer runs or finer misting, a submersible pump works better. Pumps cost between $50 and $150 and push 200 to 400 gallons per hour. They handle slopes, long distances, and overhead watering without losing steam.
Drip irrigation pairs beautifully with gravity systems because it's designed for low pressure.
Here's the trade-off: gravity is free, pumps are convenient. If your garden sits downhill from your tank, skip the pump. If not, budget for one.
For lawns and large beds, a pump with a zone valve gives you control without dragging hoses around.
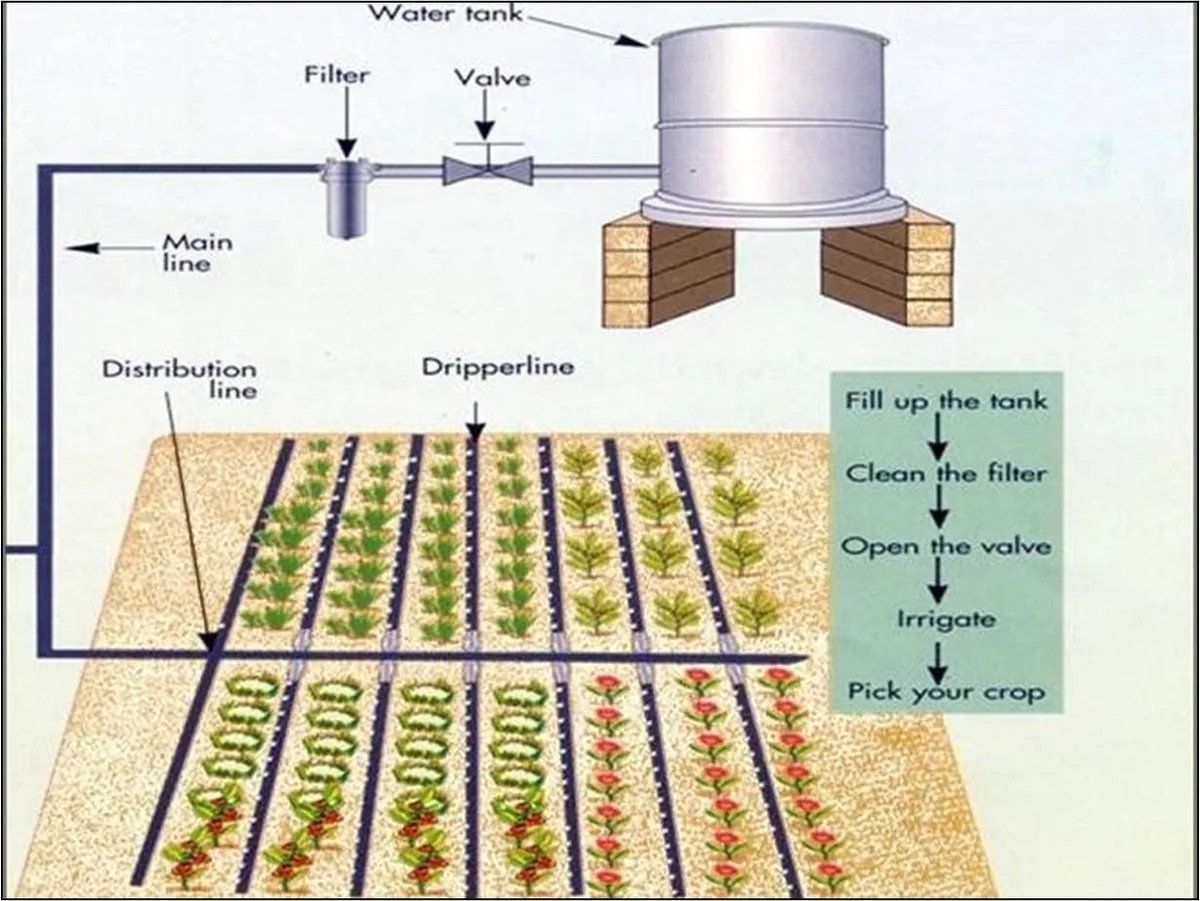
Image source: Bing (Web (fair-use with source credit))
Step-by-Step: How to Set Up a Basic Rainwater System
The full install takes about 60 minutes. You'll need a barrel, a downspout diverter, a mesh screen, and a level stand.
- Position the barrel on a sturdy stand at least 12 inches off the ground. Level it.
- Cut the downspout to fit the diverter using its template.
- Attach the diverter and tighten the seals.
- Place the mesh screen over the inlet.
- Connect an overflow hose and route it away from your foundation.
For the first flush, add a simple DIY diverter. A short vertical pipe collects the dirtiest early runoff. Once that fills, clean water spills into the barrel.
This small upgrade protects your plants from roof residue.

Image source: Web (Bing) / gearacres.blogspot.com (Web image (fair-use with source credit))
Rainwater Math: How Much Your Roof Can Actually Catch
The formula is simple. Multiply your roof's square footage by the rainfall in inches, then by 0.62 gallons. That's the total water you can collect.
Example: a 1,000-square-foot roof catching one inch of rain yields 620 gallons. A 50-gallon barrel fills in about one-tenth of that storm.
| Roof area (sq ft) | 1 inch rain (gal) | 2 inches rain (gal) |
|---|---|---|
| 500 | 310 | 620 |
| 1,000 | 620 | 1,240 |
| 2,000 | 1,240 | 2,480 |
If your garden needs about 60 gallons per week, one inch of rain on a 500-square-foot roof covers five weeks of watering. That's why gutter placement matters more than tank size for most people.
DIY vs. Kits: Which One Saves You More Real Money?
A DIY system costs less upfront. You can repurpose a food-grade drum for $20, buy a diverter for $30, and assemble everything with basic tools. Total cost: under $100.
A complete kit runs $100 to $250. It includes a purpose-built barrel, diverter, screen, spigot, and overflow fitting. Kits are plug-and-play.
No drilling, no guesswork, no leaks.
In our research, DIY saves about 30% but demands more effort. Kits are worth it if you want reliability without tinkering. For most home gardeners, a mid-range kit strikes the best balance.
If you enjoy projects, DIY gives you room to customize. If you'd rather water plants than seal threads, buy a kit.
Common Mistakes and How to Fix Them
First-time collectors tend to make three errors.
Mistake one: placing the barrel directly on soil. That strains the spigot and shifts the weight. Fix it with a level stand.
Mistake two: forgetting the overflow. A full barrel during a storm backs up into your downspout and floods your foundation. Always connect an overflow hose.
Mistake three: skipping the screen. Uncovered barrels become mosquito breeding grounds. A fine mesh screen on every opening solves that problem.
Overwatering is the hidden one. Soggy soil encourages root rot and makes your lawn attractive to pests like grubs. If you're dealing with grub damage, checking your watering schedule is a smart first move.
Maintenance Musts: Mosquitoes, Algae, Sediment, and Winter
Mosquitoes are the biggest complaint. A fine mesh screen over every opening blocks them completely. Check the screen after storms for debris.
Algae need sunlight. Opaque, dark-colored tanks keep algae at bay. So does simply using the water regularly.
Stored water that sits in the sun for weeks will green up.
Sediment settles on the bottom. Once a season, drain and rinse the barrel. Clean the gutters too, because the water pulls whatever is up there.
Winter is the real killer. Freezing water expands and cracks tanks. As temperatures drop, disconnect the hoses, drain everything, and leave the spigot open.
For IBC totes, tilt them slightly so residual water escapes. If you can store barrels indoors, do it. If you see patchy brown lawn areas in spring, look for early warning signs of grubs before assuming it's a watering issue.
Local Rules, Roof Materials, and Safety Checks
Before you build anything, check your local rules. Some states restrict rainwater collection, especially for potable use. Most home gardening setups are fine, but a quick search of your municipal code is worth it.
Roof material matters. Asphalt shingles are common and acceptable. Avoid collecting water from roofs with lead flashings, copper-treated wood, or asbestos-coated surfaces.
Those contaminants aren't great for edible plants.
Safety first. Secure the lid so kids and pets can't access the tank. Collected rainwater is for plants, not for drinking.
The U.S. Environmental Protection Agency offers guidance on rainwater catchment, and local extensions usually do too.
Also, don't let spillage create marshy spots. Those patches become prime real estate for turf pests, so check new brown patches before reaching for the hose.
Case Scenario: What to Choose for a Small Garden, Large Plot, and Greenhouse
Small Container Garden
Go with a single 50-gallon rain barrel and a downspout diverter. Fill a watering can by hand. No pump, no irrigation lines, no complexity.
Total cost stays under $100 and the install takes an hour.
Large Vegetable Beds
Use an IBC tote or chain two barrels together. Place the tank on a stand and run a gravity-fed drip line down the rows. You'll want 200 to 300 gallons of storage to carry you through dry weeks.
Greenhouse or Polytunnel
Pick a large tank with a submersible pump. The greenhouse needs every drop, since the roof blocks rain entirely. Connect to drip irrigation with a timer, and you can leave for days without losing a crop.
Your Decision Guide: Which Setup Fits Your Situation
Start with your watering routine, then match the gear.
- Watering a few pots by hand: 50-gallon barrel with a spigot.
- Watering a vegetable garden: 200+ gallons with gravity-fed drip lines.
- Watering a lawn: a pump and a large cistern, or let the lawn go dormant.
- Living in a freezing climate: prioritize easy drain-down and indoor storage.
- Renting or short-term: a rain saucer needs no permanent changes to gutters.
Keep the system as small as you can live with. Expanding later is always easier than managing a giant tank you don't fully use. If lawn damage shows up anyway, focus on reviving dead patches instead of watering everything in sight.
Frequently Asked Questions
How much rainwater can I collect from my roof?
Multiply your roof area in square feet by each inch of rainfall, then by 0.62 gallons. A 1,000-square-foot roof catches about 620 gallons per inch of rain. That's more than enough for a typical vegetable garden.
Do I need a pump for my rain barrel?
No. A barrel raised on a stand provides enough pressure for watering cans and soaker hoses. You only need a pump for long hoses, overhead sprinklers, or large drip systems.
Is rainwater safe for vegetable gardens?
Yes for the soil and plants, but not for drinking. Avoid roofs with lead or asbestos materials. A first-flush diverter keeps bird droppings and dust out of the tank.
Always wash produce before eating.
What's the best way to store rainwater without it turning green?
Use an opaque tank and keep it covered. Sunlight causes algae growth, so dark plastic or burying the tank helps. Regular use also keeps fresh water moving through.
How do I stop mosquitoes from breeding in my rain barrel?
Fit a fine mesh screen over every opening, including the inlet and overflow. Check the screen monthly for holes. Stagnant water attracts mosquitoes and lawn grubs, so acting quickly keeps both under control.