To quickly adjust the valves on your Craftsman riding lawn mower, start by removing the engine’s valve cover, then set the engine to Top Dead Center (TDC), and finally, use a wrench to tighten or loosen the rocker arm nuts until the correct valve clearance is achieved. Ensuring proper valve adjustment can improve mower performance and longevity.
Adjusting valves on a Craftsman riding mower might sound intimidating, but with the right steps, it’s straightforward enough for most DIY enthusiasts. Proper valve clearance ensures the engine runs smoothly, doesn’t burn oil, and maintains its power. First, you’ll need to access the valve cover, which involves disconnecting some components, then locate TDC to set the timing. By checking and adjusting the rocker arm torque and clearance, you can optimize the mower’s operation. Regular maintenance like this can extend the lifespan of your mower and prevent costly repairs, so it’s worth learning how to do it yourself with a few basic tools and a bit of patience.

How to Adjust Valves on a Craftsman Riding Lawn Mower
Adjusting the valves on your Craftsman riding lawn mower is an important maintenance task that can improve engine performance and extend the mower’s lifespan. Proper valve adjustment ensures that the engine runs smoothly, starts easily, and doesn’t waste fuel. In this section, we will go through the step-by-step process to help you understand and perform this task effectively.
Understanding Valve Adjustment and Its Importance
Valves control the airflow and exhaust gases in your lawn mower’s engine. Over time, they can become loose or tight, causing poor engine performance. Regular adjustment prevents issues like misfiring, loss of power, or difficulty starting. For Craftsman riding mowers, adjusting valves is a straightforward process if you follow the right steps.
Tools Needed for Valve Adjustment
Before starting, gather these essential tools:
- Socket wrench set
- Screwdriver
- Feeler gauge set
- Spark plug socket
- Torque wrench (optional)
- Work gloves and safety glasses
Having all tools ready will make the process smoother and safer.
Locating the Valves on Your Craftsman Mower
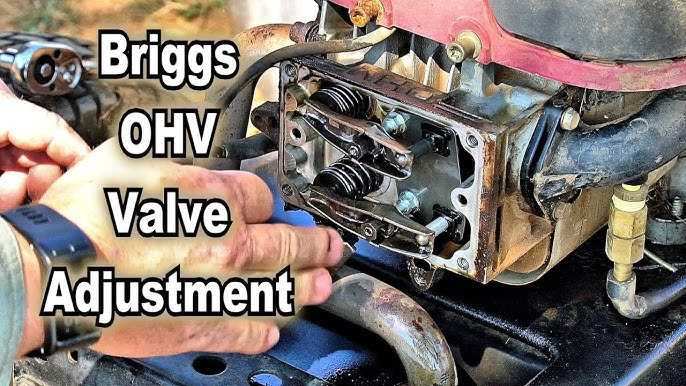
The valves are accessible once you remove the engine cover or shroud. Typically, you’ll see two valves per cylinder: intake and exhaust. Consult your mower’s user manual or engine diagram for specific locations and valve sizes.
Identify the cylinder you want to work on, usually the front or side, and ensure you have clear access to the valves and timing components.
Preparing for the Valve Adjustment Process
Start by parking the mower on a flat surface and turning off the engine. Let the engine cool completely to avoid burns. Disconnect the spark plug wire to prevent accidental starting. Clean the area around the valve cover to prevent debris from entering the engine.
Removing the Valve Cover
Use the socket wrench to remove the bolts securing the valve cover. Carefully lift off the cover, taking care not to damage any gasket or seal. Examine the valve components for wear or damage and replace if necessary.
Checking Valve Clearance with a Feeler Gauge
Valve clearance, or valve lash, is the gap between the valve stem and rocker arm. Proper clearance allows the engine to breathe correctly. To measure it, select the feeler gauge recommended in your manual, usually between 0.003 and 0.005 inches for small engines.
Insert the feeler gauge between the rocker arm and valve stem to check the gap. It should slide in smoothly without too much resistance.
Adjusting the Valve Clearance
If the clearance is too tight or too loose, adjustment is necessary. Loosen the lock nut using a wrench, then turn the adjustment screw to set the proper gap. Use the feeler gauge to verify the correct clearance.
Once the proper gap is achieved, tighten the lock nut firmly to secure the setting without changing the clearance. Repeat this process for both intake and exhaust valves.
Reinstalling the Valve Cover
Clean the gasket surface and replace the valve cover. Tighten the bolts in a crisscross pattern to evenly distribute pressure. Ensure the gasket is seated properly to prevent oil leaks.
Reconnect the spark plug wire, and double-check all tool placements and connections before proceeding.
Testing the Mower After Adjustment
Start the engine and listen for smooth operation. Check for any unusual noises or performance issues. Make sure the engine idles steadily and accelerates without hesitation. If needed, readjust the valves for optimal performance.
Perform a test cut to confirm that the mower operates efficiently and that the adjustments have taken effect properly.
Additional Tips for Maintaining Your Craftsman Riding Lawn Mower
Regularly inspecting and adjusting valves can prevent many engine problems. Follow a maintenance schedule that includes oil changes, air filter replacements, and spark plug checks. Keeping the engine clean and well-maintained ensures smoother operation for years to come.
If you’re unsure about any step or uncomfortable with the process, consulting a professional mechanic is always a good idea. Proper maintenance preserves the value and functionality of your riding mower.
Related Topics for Better Lawn Mower Care
- How to Change the Oil on a Craftsman Riding Lawn Mower
- Replacing the Spark Plug in Your Craftsman Mower
- Cleaning and Replacing Air Filters
- Signs You Need a Carburetor Tune-Up
- Proper Storage Tips for Off-Season Maintenance
By understanding and performing valve adjustments correctly, you can ensure that your Craftsman riding lawn mower remains reliable and efficient. Remember to follow safety procedures and take your time to get precise, accurate results.
Frequently Asked Questions
What tools do I need to adjust the valves on a Craftsman riding lawn mower?
To adjust the valves on a Craftsman riding lawn mower, gather a socket set, a screwdriver, a feeler gauge, and possibly a wrench. These tools help you remove the valve cover, measure the valve clearance, and make necessary adjustments. Having a clean workspace and gloves can also make the process smoother.
How can I locate the valve cover on my Craftsman riding mower?
Locate the valve cover by opening the mower’s hood and inspecting the top of the engine. The valve cover is typically a black or metal plate secured with bolts or screws. It sits on top of the cylinder head and covers the valves and camshaft. Consult your mower’s manual if you’re unsure, as the cover’s position may vary between models.
What is the proper valve clearance setting for most Craftsman riding mowers?
The standard valve clearance for most Craftsman riding mowers ranges from 0.003 to 0.005 inches for the exhaust valve and 0.002 to 0.004 inches for the intake valve. Always check your specific model’s manual for the precise measurements to ensure optimal engine performance and prevent damage.
How do I safely adjust the valves without damaging engine components?
Start by disconnecting the spark plug to prevent accidental ignition. Remove the valve cover carefully, taking care not to strip the bolts. Use a feeler gauge to measure the clearance and loosen or tighten the adjustment screw accordingly. After adjustments, double-check the clearance and reassemble the cover securely. Always handle parts gently and follow safety procedures to avoid damaging engine parts.
How often should I perform valve adjustments on my Craftsman riding mower?
Typically, you should check and adjust the valves every 50 to 100 hours of mowing or at the beginning of each mowing season. Regular inspection helps maintain engine performance, improves fuel efficiency, and extends the mower’s lifespan. Refer to your mower’s manual for specific maintenance intervals recommended by the manufacturer.
Final Thoughts
To adjust valves on a Craftsman riding lawn mower, start by locating the valve cover and removing it carefully. Use a wrench to rotate the engine and align the timing mark. Measure the valve clearance with a feeler gauge and adjust the rocker arms as needed. Tighten everything securely once adjustments are correct.
In conclusion, knowing how to adjust valves on a craftsman riding lawn mower ensures optimal performance. Carefully follow each step and double-check your work. Proper valve adjustment maintains engine health and prolongs your mower’s lifespan.