To change the belt on your Craftsman self-propelled lawn mower, start by disconnecting the spark plug for safety, then remove the mower’s side cover to access the belt. Release the tensioner, slide the old belt off the pulleys, and install the new belt by reversing the process, ensuring proper tension. Finally, double-check that everything is aligned correctly before testing your mower.
If your mower isn’t moving smoothly or making strange noises, a worn or broken belt could be the culprit. Replacing it is straightforward once you understand the steps involved. In this guide, I’ll walk you through each step so you can get your mower running like new in no time, saving you from costly repairs or professional service. Changing the belt isn’t complicated and can be done with basic tools and a little patience.

How to Change Belt on Craftsman Self Propelled Lawn Mower
Replacing the belt on a Craftsman self propelled lawn mower may seem complicated at first, but it’s a straightforward process that you can do yourself with the right tools and instructions. The belt is essential because it drives the mower’s blades and propulsion system, so keeping it in good condition is key for optimal mower performance. In this guide, we’ll walk through each step carefully to help you replace your mower’s belt efficiently and safely.
Tools and Materials Needed
Before starting, gather these tools and materials for the job:
- Screwdrivers: Flathead and Phillips
- Socket wrench set: with various sizes
- Replacement belt: compatible with your Craftsman model
- Work gloves: for protection
- Safety glasses: to protect your eyes
- Block or wedge: to secure the mower blades
Preparing the Mower for Belt Replacement
Start by parking your mower on a flat surface in a well-lit area. Ensure the engine is off and cool before handling any parts. Disconnect the spark plug wire to prevent accidental starting. Using a block or wedge, secure the mower blades to prevent them from moving during the process. This step is vital for safety and ease of work.
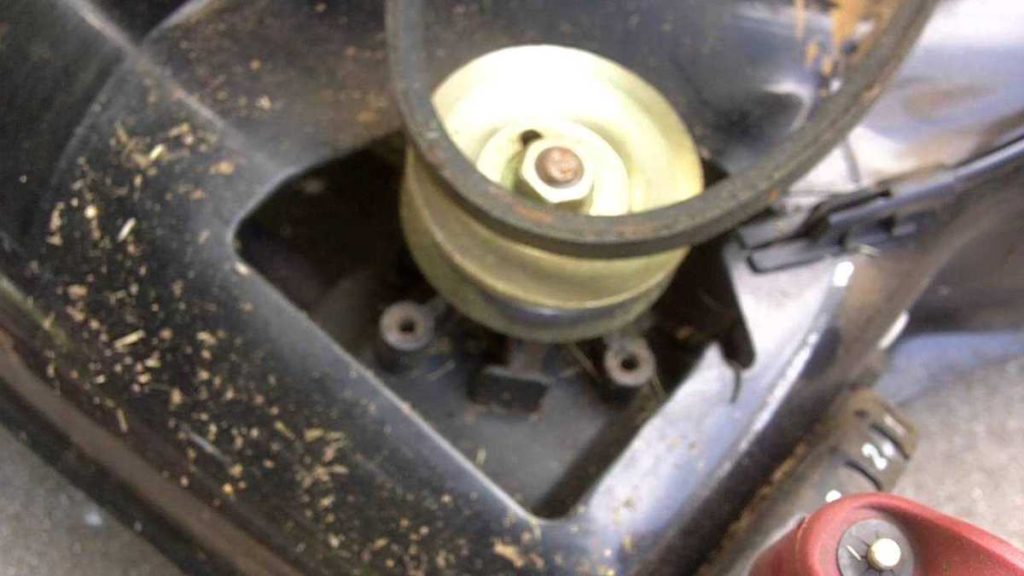
Locating and Inspecting the Belt
Open the mower’s side or rear panel to access the belt compartment. Depending on your Craftsman model, the belt may be located around the pulley systems near the engine and blades. Carefully examine the belt for signs of wear, cracks, fraying, or stretching. If the belt looks damaged, it’s time for replacement.
Removing the Old Belt
Loosen the Belt Tension
Identify the tension pulley, which maintains the belt’s tightness. Use a socket wrench to release the tension by loosening the pulley bolt or nut. Some models may have a tension adjustment bolt; check your mower’s manual for specifics.
Slip the Belt Off
Gently slide the belt off the pulley system, ensuring you note or record how it wraps around each pulley. This information will help when installing the new belt. Be careful not to damage any other components during removal.
Preparing the New Belt for Installation
Compare the new belt with the old one to confirm they match in length and width. Lay the new belt flat and inspect it for any manufacturing defects. If your mower has a specific routing diagram, review it to understand how the belt should be positioned around the pulleys.
Installing the New Belt
Routing the Belt Correctly
Follow the diagram or the original routing of the belt, wrapping it around the pulleys appropriately. Ensure it sits snugly in the pulley grooves without twisting or crossing.
Tensioning the Belt
Use the tension pulley or adjustment bolt to tighten the belt. Make sure there is the proper amount of tension; it should be tight enough to prevent slipping but not so tight as to strain the pulleys or motor. Consult your mower’s manual for specific tension specifications.
Testing and Final Checks
After installing the new belt, manually rotate the pulleys to ensure the belt moves smoothly without slipping. Reconnect the spark plug wire and start the mower engine. Engage the blades and drive system to verify everything runs correctly. Check for unusual noises or vibrations that may indicate improper belt installation.
Reassembling the Mower
Once satisfied with the belt’s operation, reattach any panels or covers you removed. Make sure all bolts and screws are securely tightened. Clean your work area and dispose of the old belt properly.
Additional Tips for Belt Maintenance
Regular Inspection
Periodically check your mower’s belt for wear, cracks, or stretching, especially before the mowing season begins. Early detection of issues can prevent breakdowns during use.
Proper Tension Adjustment
Maintaining the correct belt tension prolongs the life of the belt and ensures efficient operation. Avoid over-tightening, which can cause premature bearing wear.
Replacing the Belt at Recommended Intervals
Follow the manufacturer’s suggested schedule for belt replacement, typically every two to three years or after significant wear is observed. Using the right belt type is essential for compatibility and performance.
Common Problems and Troubleshooting
Belt Slipping During Use
If the belt slips or disengages, check the tension pulley and adjust it as needed. Inspect for belt damage, and replace if frayed or cracked.
Unusual Noises or Vibrations
These can signal misalignment or a loose belt. Recheck the routing and tension, and ensure pulleys are free of debris or damage.
Belt Not Engaging the Blades or Drive System
Ensure the belt is correctly routed and tight enough. Look for obstructions or damaged pulleys that could interfere with belt movement.
Related Topics
- Replacing Drive Belts on Lawn Mowers
- How to Adjust Mower Blade Height
- Maintaining Your Craftsman Lawn Mower
- Signs Your Lawn Mower Needs Belt Replacement
Changing the belt on your Craftsman self propelled lawn mower doesn’t have to be a daunting task. Following these detailed steps ensures your mower remains in top shape, ready for every mowing job. Regular maintenance and timely belt replacements will extend the life of your mower and keep your yard looking its best.
Craftsman Self-Propelled Lawnmower Belt Replacement
Frequently Asked Questions
What are the main tools needed to replace the belt on a Craftsman self-propelled lawn mower?
To replace the belt, you will need a socket set, screwdrivers, pliers, and possibly a belt tensioner tool. Additionally, having a work gloves and safety goggles can help protect your hands and eyes during the process. Make sure to consult your mower’s manual for any specific tools required for your model.
How do you access the belt compartment on a Craftsman self-propelled mower?
Start by turning off the mower and disconnecting the spark plug for safety. Remove the mower’s side panels or covers by loosening screws or clips, which usually hold the belt cover in place. Once the cover is removed, you will see the belt and pulley system. Take note of the belt routing before removing it to help with proper reinstallation.
What steps should I follow to remove the old belt from my lawn mower?
First, release the tension on the belt using the tensioner pulley or by loosening mounting bolts, depending on your model. Carefully slide the belt off the pulleys, noting its routing. If the belt is stuck or difficult to remove, use pliers to gently loosen any knots or tight spots without damaging the pulleys. Keep the old belt intact if you plan to compare it with the new one.
How can I ensure the new belt is properly installed on my lawn mower?
Place the new belt along the same routing path as the old one, ensuring it sits correctly on all pulleys. Reapply tension by adjusting the tensioner pulley or tightening the mounting bolts. Double-check that the belt has proper tension and is seated evenly on each pulley. Rotate the pulleys manually to confirm the belt moves smoothly without slipping or binding.
What maintenance tips should I follow after replacing the belt?
After installing the new belt, inspect the pulleys for wear and debris. Clean any dirt or grass that may interfere with belt operation. Reassemble the mower panels or covers securely, and reconnect the spark plug. Test the mower to make sure the self-propel function works smoothly and the belt runs without noise or slipping. Regularly check the belt tension during routine maintenance to extend its lifespan.
Final Thoughts
To change the belt on a Craftsman self-propelled lawn mower, first disconnect the spark plug wire for safety. Remove the mower deck cover to access the belt area. Loosen the pulleys and slide the old belt off, then position the new belt correctly around the pulleys. Finally, reassemble the deck cover securely.
Understanding these steps helps ensure a smooth replacement process. Regularly inspecting and replacing your mower’s belt prolongs its lifespan and maintains optimal performance. Following this guide on ‘how to change belt on craftsman self propelled lawn mower’ makes the task straightforward and manageable.