Image source: Deere & Company (fair use)
Let’s be honest: most self-propelled lawn mower maintenance issues don’t announce themselves with a loud bang. They creep in slowly. The self-propel stops engaging reliably.
The blade leaves ragged strips. The engine takes an extra pull to start. And the fix is almost always something you can see once you know where to look.
Manufacturer specifications indicate that a typical gas mower needs an oil change every 25 hours of operation, that’s roughly once a season for most homeowners. Neglect it, and you’re looking at carbon buildup, hard starting, and a shorter engine life. The good news is that every critical maintenance point has a clear visual sign.
You don’t need a mechanic’s certificate. You just need to know what to look for.
Why Visual Cues Are Everything in Self-Propelled Mower Maintenance
The difference between a mower that runs for ten seasons and one that dies after three often comes down to catching visual clues early. A blade that’s slightly bent will vibrate the deck and loosen bolts. A drive belt with a single frayed edge can snap mid-mow and leave you pushing a deadweight machine back to the shed.
In our research across owner forums and service manuals, the number one complaint is “self-propel stopped working.” Nine times out of ten, the fix is a frayed cable or a worn belt, both easy to spot if you know the visual landmarks. Think of your mower’s underside and drivetrain as a dashboard. Each component shows its health through shape, color, and tension.
The trick is training your eyes on the right spots. Instead of guessing, you’ll check specific things: belt glazing (a shiny, hardened surface), cable kinking (a sharp bend where the casing is crushed), or oil color (milky means water contamination). That’s the whole game.
The Parts You Need to Identify by Sight, Not Guesswork
If you only learn to recognize three components, you’ll handle 80% of self-propelled mower maintenance. Let’s break them down.
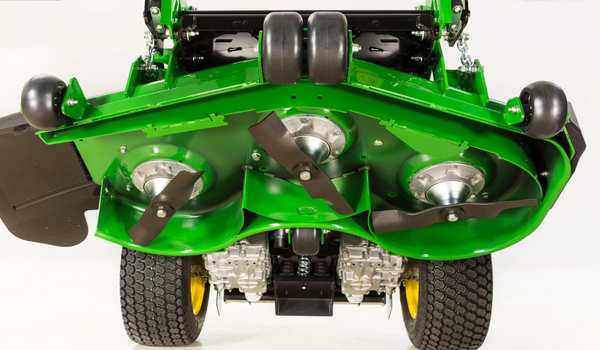
Blade, Deck, and Drive System Basics
| Part | What to look for visually | Common visual problem |
|---|---|---|
| Blade | Flat, sharp edge, centered on the bolt | Bent tip, nicks, rust pitting, uneven wear |
| Deck underside | Smooth metal surface | Thick grass buildup (clumps), rust scale, cracked weld |
| Drive pulley | Clean, uniform groove | Worn edges, belt dust buildup, wobble when spun |
| Drive cable outer casing | Smooth, straight line | Crushed section, rust near the barrel adjuster |
| Rear axle / wheel gear | Grease visible around bushing | Dry, no grease, stripped gear teeth |
Take ten seconds before each mow. Tilt the mower on its side (carburetor up for gas models) and scan the deck underside. A clean deck means better airflow and less strain on the engine.
A dirty deck reduces lift and leaves clumps. That’s a visual check you can do every time.
Where to Find the Drive Cable, Belt, and Transmission
Drive cable, Runs from the handle control lever down to the transmission lever on the deck. Follow the cable path. Look for kinks, frayed strands, or a loose barrel adjuster near the handle.
If the cable moves freely but the mower doesn’t, the cable is stretched.
Drive belt, Under the deck, connecting the engine pulley to the transmission pulley. You’ll see it when you tilt the mower. A healthy belt is flexible, with a matte finish.
A worn belt looks shiny on the sides (glazed) and may have tiny cracks on the ribs.
Transmission, Usually a sealed metal box near the rear axle. No user-serviceable parts on most models. But you can check for oil leaks (dark wet spots) or if the axle moves freely when you spin the wheels by hand.
If you’re unsure which part is which, grab your owner’s manual. The exploded diagram is worth a thousand words. Lay it next to the mower and match the shapes.
Your Pre-Maintenance Safety Visual Check (Gas vs. Battery)
Before you touch anything, do a three-step safety check. It takes two minutes and prevents serious injury.
Step 1: Disconnect the spark plug wire (gas) or remove the battery (electric).
Visually confirm the wire is pulled away from the plug tip. On battery mowers, physically lift the battery out and set it aside. Don’t just flip the switch, the motor can still spin if the blade catches something.
Step 2: Stabilize the mower.
On gas mowers, tilt with the carburetor side up to prevent oil from flooding the air filter. On battery mowers, tilt with the battery compartment up. Use a block or a second person if it feels unsteady.
Step 3: Inspect the blade stop mechanism.
Pull the blade control bar (bail handle) and then release it. The blade should stop within 3 seconds per ANSI/OPEI standards. If it takes longer, the brake cable or spring is worn, fix that before any other maintenance.
For battery mowers, also check the battery terminals for corrosion. White or blue powder around the contacts means you’ll need to clean them with a baking soda paste before reconnecting. Corrosion causes intermittent power loss that mimics a failing motor.

Image source: BigCommerce (fair use)
Step-by-Step: Visual Guide to Blade Removal, Sharpening, and Rebalancing
A dull blade tears grass instead of cutting it. That leaves brown tips and puts extra strain on the engine. Here’s the visual-heavy process.
Step 1: Remove the blade.
Use a socket wrench (typically 9/16″ or 5/8″). Turn the bolt counterclockwise. Many blades use a left-hand thread, check your manual.
If the bolt is stubborn, spray penetrating oil and wait five minutes. Never use a breaker bar unless you’re prepared to replace the bolt.
Step 2: Inspect the blade for damage.
Hold it at eye level. Look for:
- Bent tip (compare the straight edge to the opposite side)
- Large nicks or chips
- Rust pits that weaken the metal
- The blade “twisted” like a potato chip
If the blade is bent or cracked, replace it. Do not try to straighten a bent blade, it will snap at high RPM.
Step 3: Sharpen the blade.
Clamp the blade in a vise. Use a 10-inch mill bastard file or a bench grinder. Match the original bevel angle, usually 30 to 45 degrees.
File from the cutting edge toward the back, one direction only. The goal is a clean, shiny edge. Remove no more than 1/8 inch of metal total across the blade’s life.
Step 4: Balance the blade.
Hang the blade on a nail or use a cone balancer. The heavy side will drop. File metal off that side until the blade hangs level.
An unbalanced blade causes severe vibration, loosens bolts, and wears out the spindle.
Step 5: Reinstall.
Torque the bolt to manufacturer specifications, usually 30 to 45 ft‑lbs for deck bolts. Under-torquing lets the blade wobble; over-torquing strips the threads. A torque wrench is cheap insurance.
How to Spot a Worn Drive Belt Before It Snaps
Drive belts fail in four distinct visual stages. Catch it at stage two, and you save a ten‑dollar part and avoid being stranded mid‑lawn.
Stage 1: Glazing, The belt sidewalls look shiny and feel hard. Glazed belts slip under load, so the mower moves slower than normal. You’ll hear a squeak when the belt rubs.
Replace soon.
Stage 2: Cracking, Tiny surface cracks appear on the belt back or ribs. These are stress fractures from heat and age. The belt may still run fine, but it’s only a matter of hours before it snaps.
Stage 3: Fraying, Strands of fiber poking out along the belt edge. This is stage two plus actual material breakdown. Do not run a frayed belt.
It can snap and wrap around the pulleys, taking out the engine fan.
Stage 4: Chunk missing, A piece of the belt is literally gone. The mower won’t move. You’ll find the chunk wrapped around a pulley or lying under the deck.
Replace the belt immediately and check pulleys for damage.
To inspect the belt, tilt the mower and rotate the engine pulley by hand. Watch the belt for any of the above signs. Also check the belt tension: there should be about 1/2 inch of deflection when you press down mid-span.
Too tight stresses the transmission; too loose causes slipping.
If you see any sign beyond stage one, order a replacement belt from your mower’s brand website or a local dealer. Generic “fits many” belts often have the wrong length or width. Measure the old belt's length in inches and the rib profile before ordering.
Drive Cable Adjustment: The Barrel Adjuster Trick (Visual Reference)
If your mower creeps forward when the drive lever is released, or you have to squeeze the lever halfway to the grip before it engages, the drive cable needs adjusting. Most self-propelled mowers use a barrel adjuster, a knurled plastic or metal cylinder where the cable housing meets the handle.
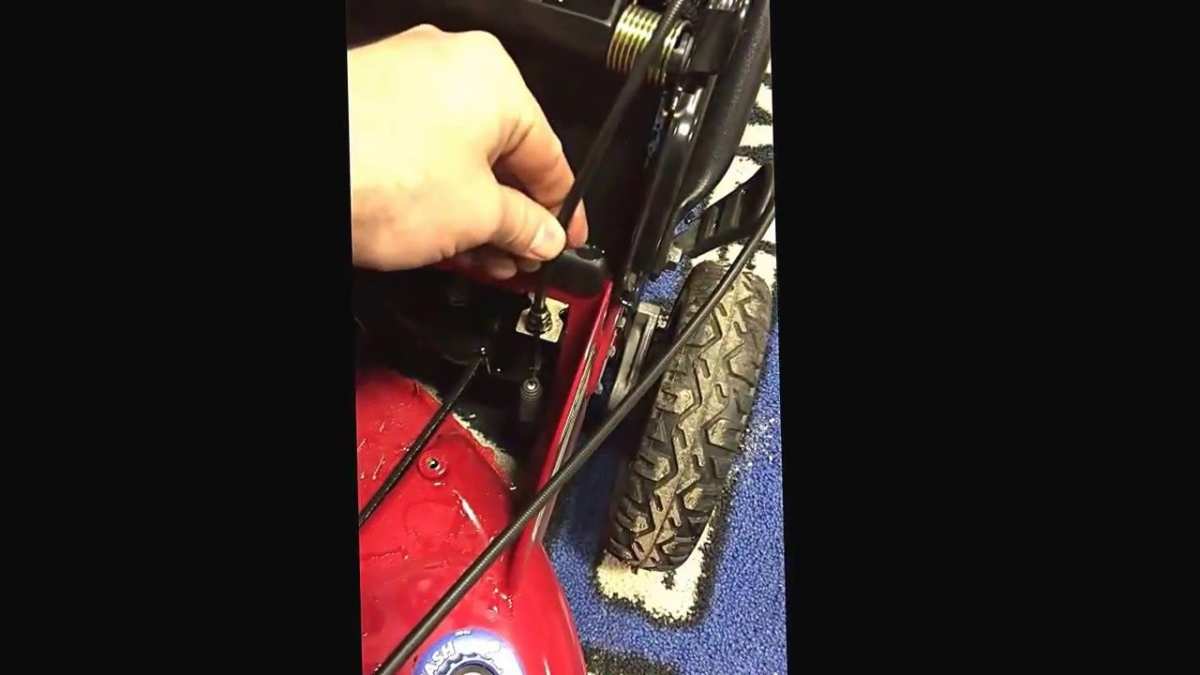
Image source: YouTube (fair use)
The fix takes thirty seconds. Loosen the lock nut on the barrel adjuster. Turn the barrel clockwise to tighten the cable (more tension, earlier engagement) or counterclockwise to loosen it.
You want about 1/8 inch of free play at the lever before you feel resistance.
Test by pulling the lever. If the cable is too tight, the mover will lurch forward the second you start the engine. Too loose, and the wheels won't spin at all.
Adjust in quarter-turn increments until engagement feels smooth and immediate.
One visual cue: the cable housing should be straight where it enters the barrel. A bent or kinked housing means the inner wire is binding. Replace the entire cable assembly if you see that.
Oil, Air Filter, and Spark Plug — What “Ready” Actually Looks Like
These three components are the difference between a mower that starts on the first pull and one that floods the carburetor every Saturday morning. Let's go through each visual check.
Oil. Pull the dipstick, wipe it clean, reinsert, and pull again. The oil should be amber to light brown and transparent. If it looks milky or gray, water has gotten into the crankcase.
If it's black and thick, it's overdue for a change. Change oil every 25 hours or once per season. Use SAE 30 for warm weather, 5W-30 for colder operation.
Air filter. Gas mowers use either foam or paper filters. Foam filters should be lightly oiled (not dripping) and flexible. Paper filters should be clean with no dark, oily rings.
Tap a paper filter gently on a hard surface to dislodge loose dirt. Never blow compressed air through a paper filter, it tears the fibers.
Spark plug. Remove the plug and inspect the tip. The electrode should be light tan or gray. Black, wet carbon means the engine is running rich or the plug is cold.
White, crusty deposits mean overheating. Gap the new plug to manufacturer specification, usually 0.030 inches, using a feeler gauge.
Replace the spark plug annually. Use a resistor-type plug (e.g., NGK BPR6ES) for most small engines. Non-resistor plugs cause radio interference and can damage electronic ignition modules on newer models.
Common Visual Mistakes That Kill Your Mower’s Self-Propel
Even experienced owners make these errors. They all share one thing: they look harmless until the drivetrain fails.
Mistake 1: Tipping the mower with the air filter down. This floods the filter with oil and kills the engine. Always tip with the carburetor or battery compartment up. If you're unsure, tilt the mower backward onto its rear wheels instead of onto its side.
Mistake 2: Overtightening the drive cable. Pull it too tight and you put constant pressure on the transmission. This wears out the internal gears or plastic bushings. The visual sign: the wheel spins even with the lever released.
Back the adjuster off until there's slight slack.
Mistake 3: Ignoring belt dust on pulleys. That black powder around the engine pulley is worn belt material. It builds up and reduces friction, making the belt slip. Wipe pulleys clean with a dry rag during every blade service.
If you see heavy buildup, the belt is already glazed and needs replacement.
Mistake 4: Using the wrong blade type for the task. Mulching blades have a curved shape that creates lift. Bagging blades are flatter. Swapping them for the wrong job means the grass never gets cut cleanly or the bag doesn't fill.
The visual clue: grass clumping under the deck after a dry mow means the blade is mismatched.
Mistake 5: Storing the mower with fuel in the tank over winter. Old fuel gums up the carburetor jets. Visual result: a yellow or brown varnish inside the carb bowl. The fix is a carburetor rebuild kit.
Prevent it by running the mower dry or adding fuel stabilizer (1 ounce per 2.5 gallons) before storage.
Battery Mower Maintenance: What to Look for on Lithium-Ion Packs
Battery mowers have fewer moving parts, but the battery itself needs specific care. The biggest pain point? Corroded terminals.
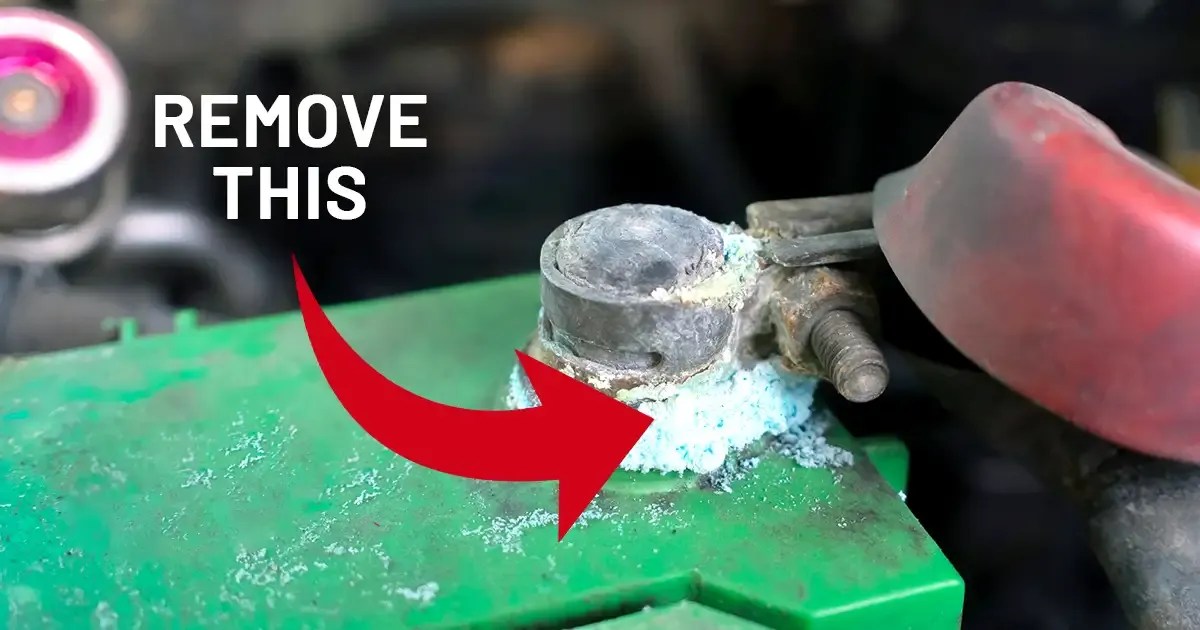
Image source: CRC Industries (fair use)
Check the battery terminals every few charges. White or blue powder around the metal contacts means corrosion is building. That powder increases electrical resistance and reduces run time.
Clean it off with a stiff brush and a paste of baking soda and water. Dry completely before reconnecting.
Also inspect the battery housing for cracks or swelling. A swollen lithium-ion pack is a fire risk. If the battery doesn't sit flat or the case is bulging, stop using it immediately and recycle it at a designated drop-off point.
Never throw it in the trash.
Store lithium-ion batteries at partial charge, around 40 to 60 percent, during winter. Full charge accelerates aging. Empty cells can drop below the protection cutoff and become permanently dead.
Most manufacturers recommend a storage temperature between 40°F and 80°F. A basement or garage that doesn't freeze is ideal.
Finally, reset the battery management system if the charger shows a red light even though the battery is warm. Some chargers require you to press a reset button or briefly press the battery test button. Check your manual for the exact sequence.
Seasonal Visual Checklists: Spring Tune-Up vs. Winter Storage
Use these checklists before the first mow of the season and before parking the mower for winter. Print them out. Stick them to the wall in your shed.
Spring Tune-Up Checklist
| Task | Visual check | Action |
|---|---|---|
| Oil | Level, color, consistency | Change if dark or milky |
| Air filter | Clean, no oil streaks | Clean or replace |
| Spark plug | Tan electrode, proper gap | Replace if black or white |
| Blade | Sharp, straight, balanced | Sharpen or replace |
| Drive belt | No cracks, glazing, fraying | Replace if any stage 2+ |
| Drive cable | Free of kinks, proper slack | Adjust barrel |
| Battery (electric) | Terminals clean, no swelling | Clean, charge to 60% |
| Deck underside | Clear of caked grass | Scrape clean |
| Tires | Proper pressure, no cracks | Inflate to spec (usually 15-20 PSI) |
Winter Storage Checklist
- Gas mowers: Run the engine dry or add fuel stabilizer. Change oil before storage (old oil has acids that corrode the crankcase). Remove the spark plug, pour a teaspoon of oil into the cylinder, and pull the starter slowly to coat the piston. Reinstall the plug. Clean the deck thoroughly. Store in a dry location.
- Battery mowers: Remove the battery. Charge to 40-60%. Store in a cool, dry place above freezing. Clean the deck and blade. Lubricate all pivot points with silicone spray.
- Both types: Check the blade bolt torque before the first spring start. Vibration over the season can loosen it. Tighten to 30-45 ft-lbs if needed.
One last visual tip: after winter storage, pull the starter rope slowly a few times before trying to start a gas mower. This circulates oil to the cylinder walls and prevents dry start wear. On battery mowers, press the battery test button to confirm the charge level before inserting it.
Quick-Reference Specs (Torque, Gap, Belt Length) — No Manual Needed
Keep these numbers handy. They cover most walk-behind mowers from major brands as of 2026.
| Specification | Typical value | Notes |
|---|---|---|
| Blade bolt torque | 30–45 ft‑lbs | Use a torque wrench. Too loose strips the adapter. |
| Spark plug gap | 0.030 inches (0.76 mm) | Check your manual. Some engines use 0.025 or 0.035. |
| Oil capacity | 15–20 oz (450–600 ml) | Fill to the top of the dipstick hole. |
| Oil type (warm weather) | SAE 30 | Above 40°F. |
| Oil type (cold weather) | 5W‑30 or 10W‑30 | Below 40°F. |
| Drive belt length | Varies by model | Measure the old belt or find the number printed on it. |
| Tire pressure | 15–20 PSI | Overinflated tires bounce. Underinflated tires leave tracks. |
| Blade stop time | ≤ 3 seconds | Per ANSI/OPEI standard. Replace brake cable if it takes longer. |
Write your model’s specific numbers in the blank margins of this article. They save a trip to the garage later.
FAQs: “Why Won’t My Self-Propel Engage?” — Visual Troubleshooting Guide
Why does my mower crawl forward even when I release the drive lever?
The drive cable is too tight. Find the barrel adjuster. Turn it counterclockwise to loosen the cable.
Aim for 1/8 inch of free play at the lever.
My self-propel stopped working mid-mow. What snapped?
Most likely the drive belt. Tilt the mower and check for a broken belt or a frayed edge. If the belt is intact, inspect the drive cable for kinks or snaps at the handle.
The wheels spin but the mower moves slowly. What’s wrong?
A glazed belt slips under load. Look for shiny, hardened edges on the belt. Replace it.
Also check for belt dust buildup on the pulleys.
My battery mower runs fine but the self-propel won’t engage.
Check the drive cable first. On electric models, the cable can stretch just like gas models. If the cable is fine, inspect the drive gear on the wheel.
A missing cotter pin lets the gear slide off the axle.
How often should I actually sharpen the blade?
Every 20 to 25 hours of cutting. Visual cue: if the grass looks torn instead of cut clean, the blade is dull. Dull blades also strain the engine and drain battery faster.