Figuring out how to tell if you have grubs comes down to a handful of reliable symptoms and one or two quick tests you can do in your own yard. It's a common problem. Lots of homeowners see brown patches spreading across their lawn and assume the worst, but plenty of other issues look the same at first glance.
The good news is you don't need a degree in entomology to get this right. Per university extension research, most treatment decisions come down to three things: what the damage looks like, what a simple dig test reveals, and how many grubs you actually find. Once you've got that information, you'll know whether you've got a real problem or if something else is going on.
IMAGE 1

Image source: Bing (Web (fair-use with source credit))
Quick Answer
You can tell if you have grubs by checking for spongy turf that lifts easily, irregular brown patches, and increased animal digging. Perform a soap flush or dig a one-square-foot sample 2 to 3 inches deep to confirm. If you find more than 5 to 10 C-shaped white grubs per square foot, treatment is usually warranted.
Why Brown Patches Don't Always Mean Grubs (Read This First)
Before you start diagnosing, you need to know something important. Brown, dying patches in your lawn have a lot of possible causes. Drought stress, fungal disease, dog urine, and other pests can all create damage that looks suspiciously like grub activity.
The treatment approach is completely different for each one. Applying grub killer to a lawn with a fungal infection wastes money and doesn't fix the problem. Skipping treatment on a real grub infestation can lead to dead turf by fall.
So the goal here is simple. We're going to walk through a process of elimination. You'll check the symptoms that matter, run one or two quick tests, and come away with a confident answer.
No guessing. No wasted money on the wrong solution.
University extension services across the country recommend scouting before treating every single time. It's the single most important step in the whole process.
The Real Signs That Point to a Grub Problem
Grub damage has a specific pattern once you know what to look for. Here are the four most reliable indicators, ranked from early warning to full-blown infestation.
Spongey Turf That Lifts Like Carpet
This is the number one sign. Grubs feed on turf roots, severing the plant's connection to the soil. That means the sod loses its anchoring.
When you walk across an affected area, it feels soft and spongy underfoot.
Push your foot against the turf or grab a handful and try to lift it. If it rolls back easily, almost like pulling up a carpet, that's a strong indicator the root system has been compromised. Healthy turf resists because the roots hold the sod firmly in place.
This symptom often shows up before visible browning. So if your lawn feels weirdly soft in spots, that's your cue to investigate further.
IMAGE 2

Image source: Bing (Web (fair-use with source credit))
Irregular Brown Patches That Keep Spreading
Grub damage doesn't show up as neat circles. You'll see irregular, amoeba-shaped brown areas that gradually expand. The patches typically start small, maybe a foot or two across, and merge into larger dead zones over several weeks.
Here's a key detail. Watering won't help. If you're irrigating and those patches keep browning anyway, grubs are high on the suspect list.
Drought stress responds to water. Grub damage doesn't.
The timing matters too. In most of the U.S., grub damage peaks between August and October. In the Southeast, you might see it as early as July.
If your lawn stayed green all summer and suddenly started dying in late August, that's classic grub activity.
Unexpected Visitors (Skunks, Raccoons, Birds)
If you're noticing animals digging in your lawn at night, grubs are likely the reason. Skunks, raccoons, and armadillos all feed on grubs. They tear up patches of sod to get at them.
Birds can be a clue too. Starlings, crows, and grubs will poke around in damaged turf looking for larvae. A little bird activity is normal.
Repeated concentrated pecking in the same areas is worth investigating.
Here's how to tell the difference between animal damage caused by grubs and other causes. Animal digging from grubs tends to be shallow and focused on areas where the turf is already compromised. Random digging in healthy-looking turf is more likely moles hunting earthworms.
Damage That Gets Worse When You Water Less
This one confuses people. They figured watering more would fix their lawn. Instead, the problem got worse.
Here's what's happening. Water-stressed grass is already weakened. Grubs feeding on the roots push it over the edge faster.
So the combination of moderate drought stress plus active grub feeding accelerates the visible damage.
If you've had a dry spell and your lawn went from mostly green to patchy brown in a week or two, don't rule out grubs just because there's been drought. In fact, that scenario makes grub damage more obvious, not less.
How These Signs Stack Up
| Symptom | Points to Grubs | Points to Something Else |
|---|---|---|
| Spongy, lifts easily | ✓ | ✗ |
| Irregular brown patches | ✓ | Maybe (disease also irregular) |
| No response to watering | ✓ | ✗ |
| Fresh animal digging in damaged areas | ✓ | ✗ (earthworm digging in healthy turf) |
| Neat circular spots | ✗ | ✓ (fairy ring, dog urine) |
| Damage follows sprayer pattern | ✗ | ✓ (chemical burn) |
| Grass pulls up but roots intact | ✗ | ✓ (likely disease) |
Could It Be Something Else? Common Misdiagnoses
This is where people get tripped up most often. Several lawn problems mimic grub damage closely. Running through this checklist before you commit to treatment will save you time and money.
Drought Stress vs. Grub Damage
Drought causes uniform browning across entire sections of lawn, especially in full sun or on slopes. Grub damage is patchier and more irregular. The pull-test is your friend here.
Drought-stressed grass stays anchored. Grub-damaged grass lifts.
Brown Patch Disease vs. Grubs
Brown patch, caused by Rhizoctonia fungi, creates circular spots that can range from a few inches to several feet across. The outer edge often has a darker "smoke ring" appearance in the early morning when dew is present. That border is a giveaway.
Grub damage doesn't have that defined edge.
Another difference. Brown patch thrives in hot, humid conditions with excessive nitrogen fertilizer. It often shows up in mid-summer.
Grub damage typically appears later.
Chinch Bugs vs. Grubs
Chinch bugs are more common in warm-season grasses like St. Augustine, zoysia, and Bermuda. Their damage looks like irregular yellow-to-brown patches, usually starting in sunny areas near driveways or sidewalks where heat radiates.
Chinch bugs live above ground and suck sap from grass blades. Grubs live below ground and eat roots.
The chinch test involves pushing a coffee can with both ends removed into the turf, filling it with water, and watching for chinch bugs to float to the surface within 10 minutes. If you see small black-and-white bugs floating up, that's your culprit instead.
Billbug Damage: Similar but Not Grubs
Billbugs leave hollowed stems and brown patches that look like grub damage. But the culprit is not a C-shaped larva. Billbug larvae are legless, white, with a more elongated body.
The adult weevil also damages grass by chewing holes in stems to lay eggs. Look for small round holes in turf stems as a clue.
If you dig and find legless, non-C-shaped larvae, you're likely dealing with billbugs, not true grubs. The management approach is slightly different.
Dog Urine Spots vs. Grubs
Dog urine creates small, concentrated dead spots usually surrounded by a ring of dark green, lush grass. The center is brown or dead, and the urine acts as a fertilizer at the edges. These spots are typically 3 to 8 inches across and scattered randomly wherever pets do their business.
Grub damage is larger, more spreading, and doesn't have that green halo effect. If you've got a dog and the damage pattern matches, you probably don't have grubs. But remember, both can occur in the same yard at the same time.
Quick Test: The Soap Flush Method (Do This Before You Dig)
The soap flush test is the easiest way to check living turf without cutting into your lawn. It irritates grubs and brings them to the surface so you can see exactly what's there.
Here's what you'll need. A garden hose with a spray nozzle, a watering can or bucket, and ordinary liquid dish soap, any brand works fine.
The recipe is straightforward. Mix one to two ounces of dish soap per gallon of water. Some extension guidelines call for a stronger concentration of up to four ounces per gallon, but the lower rate is usually effective and less harsh on the grass.
Pour the soapy water over a one-to-two-square-yard section of turf that's showing symptoms. Focus on the border between damaged and healthy grass, that's where grubs tend to be most active.
Wait 5 to 10 minutes. The soap irritates the grubs' soft bodies, and they'll surface to escape it. Then examine the area carefully.
What you're looking for are small white or cream-colored larvae, roughly half an inch to one inch long, curled into that characteristic C-shape. They'll have a brownish head capsule and three pairs of legs near the head. That combination distinguishes true white grubs from other soil-dwelling larvae.
If you count 10 or more per square yard, you've got a significant infestation.
The soap flush is a good screening method. But it won't always bring every grub to the surface. If you get negative results but still suspect grubs, move on to the shovel test for a more definitive count.
A few things to keep in mind. The soap flush won't show you which species you're dealing with since very young larvae are hard to distinguish. And the test is less effective in heavy clay soil where drainage is slow.
Core Explanation / What's Happening
White grubs are the larval stage of several species of scarab beetles, including Japanese beetles, European chafers, masked chafers, and June beetles. The beetles lay eggs in midsummer, and those eggs hatch into larvae that begin feeding on grass roots almost immediately.
The lifecycle matters for understanding the damage pattern. Beetles lay eggs in July and August. Eggs hatch within a few weeks.
The young larvae are tiny and don't eat much at first. But as they grow through late August, September, and October, their appetite increases dramatically.
By fall, the larvae are at their largest and most destructive. They feed heavily on roots, which is when you see the sudden onset of brown patches and spongy turf. When temperatures drop in late fall, the grubs burrow deeper into the soil to overwinter.
They resume feeding briefly in spring before pupating into adult beetles.
So here's the thing to remember. The damage you're seeing in September and October tends to be the accumulated feeding of several weeks. By the time browning appears, the grubs have already done significant harm.
That's why early detection in July and August is so valuable. Treatment options are much more effective on young, small grubs than on mature ones.
Spring damage from grubs is usually mild because the larvae are finishing their feeding phase and preparing to pupate. If your lawn greens up poorly in spring despite adequate water and fertilizer, last year's grub damage to the root system could be the cause.
Generally speaking, preventive treatment applied in late spring to early summer targets eggs and newly hatched grubs. Curative treatment applied in fall targets the larger, more damaging larvae. Knowing which window you're in determines your entire approach.
More Details / Deeper Dive
Understanding the environmental factors that influence grub pressure helps you assess your risk and interpret what you're finding in your lawn.
Moisture plays a big role. Damp soil in midsummer encourages beetle egg-laying. Lawns that are well-irrigigated during July and August can attract more egg deposition.
Conversely, severe drought during egg-laying periods can reduce survival of young grubs. That's why grub pressure can vary significantly from one summer to the next.
Grass type matters too. Japanese beetles prefer Kentucky bluegrass, perennial ryegrass, and fine fescue. European chafers have a broader host range.
In warm-season grasses, green June beetles and tropical sod webworms can cause confusion because their symptoms overlap with those of true white grub damage.
Previous damage history is a useful predictor. If your lawn had grubs last year, there's a reasonable chance beetles returned to lay eggs in the same area. The adult beetles are not particularly mobile, so infestations tend to stay localized.
Beneficial organisms also influence grub populations naturally. Ground beetles, parasitic wasps, and entomopathogenic nematodes all help keep grub numbers in check. Healthy soil with good biological activity can suppress outbreaks on its own.
The time of day you sample is less important for digging than timing of year. However, doing a soap flush in the early morning or late afternoon when the soil is slightly cooler can be more productive. Grubs tend to be near the soil surface during those times rather than deeper in the profile.
The Shovel Test: How to Confirm Grubs for Sure
The shovel test is the gold standard for confirming grubs. It gives you a real count and takes about two minutes per sample. If you only do one thing, do this.
Step-by-Step: Dig, Count, Decide
Grab a sharp flat-blade shovel and pick a spot at the edge of a damaged area. That transition zone between green and brown is where grubs concentrate.
Drive the shovel 2 to 3 inches deep and cut a square roughly 1 foot on each side. Flip that section of sod over onto a tarp or cardboard. Break apart the soil by hand and sift through it.
Count every C-shaped larva you find. Then replace the sod and water it back in so it can re-root. That's the whole process.
Multiply your count across several spots to get an average per square foot.
Sample at least three to four different areas of your lawn. Grub populations are rarely uniform. A single sample might miss them entirely or overrepresent the problem.
What You're Actually Looking For
A true white grub has a cream or white body curled into a C-shape. The head capsule is tan to brown. Three pairs of forelegs are visible near the head.
The rear end often appears slightly darker due to soil visible through the body wall.
If the larvae are not C-shaped, lack legs, or are very thin and wormlike, you're probably looking at something else. Earthworms are segmented and have no head capsule. Fly larvae are typically more elongated and lack legs entirely.
Count only the C-shaped ones with leg pairs. Those are the true white grubs that cause the damage patterns we've discussed.
Grub Count Thresholds: When to Act and When to Walk Away
Here's where the decision gets concrete. Different turf situations have different tolerance levels.
Few grubs, under 5 per square foot. Most home lawns can handle this level without treatment. Healthy turf tolerates moderate feeding pressure. Keep monitoring the following year.
Moderate infestation, 5 to 10 per square foot. Treatment is warranted, especially on high-visibility lawns, golf courses, or athletic fields. This range also calls for action if the turf has other stressors.
Severe infestation, more than 10 per square foot. Treatment is strongly recommended. At this density, you can expect significant turf loss without intervention. Immediate curative treatment is the right call.
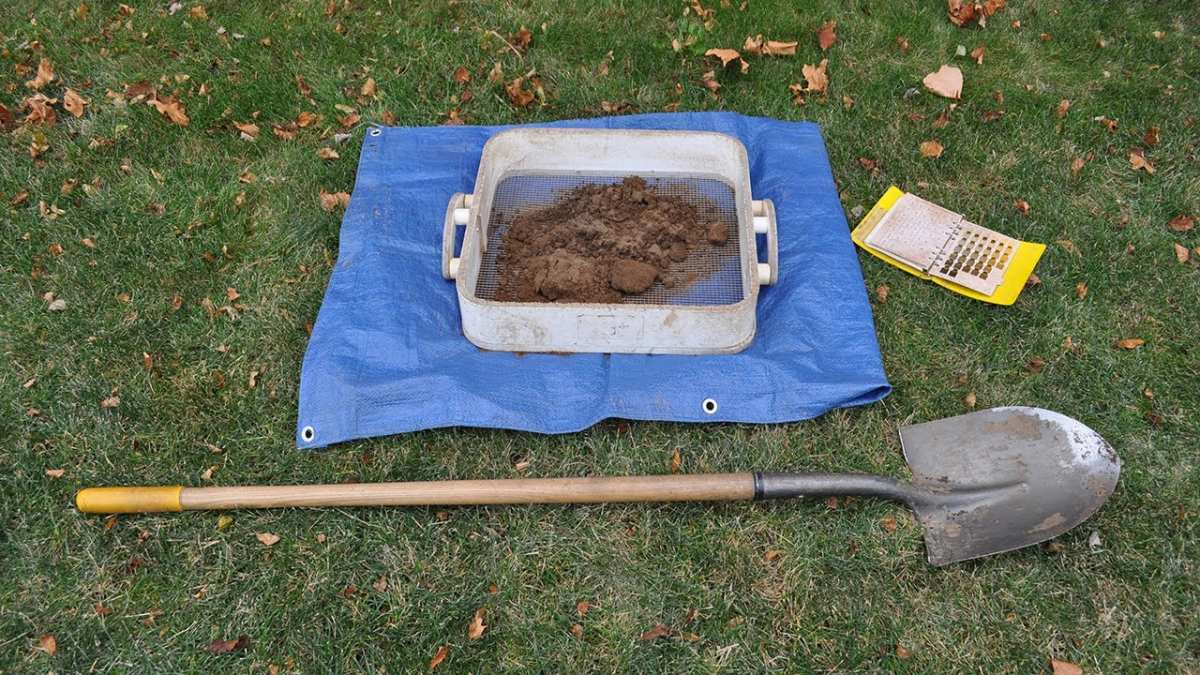
Image source: Bing (Web (fair-use with source credit))
Which Grub Species Do You Have? (It Matters for Treatment)
Identifying the species isn't strictly necessary for basic management. But it helps you time treatment correctly and choose the right product.
Japanese Beetle Grubs
Japanese beetles are the most common species across the Northeast and Midwest. The adults are metallic green and copper-colored, roughly half an inch long. Their grubs are white with a distinct V-shaped raster pattern on the underside of the last body segment.
The raster pattern is a series of tiny spines on the abdomen. You need a magnifying glass to see it clearly. Japanese beetle grubs form an open V or Y shape.
That detail matters because it distinguishes them from look-alikes.
Japanese beetles have a one-year lifecycle. Adults emerge in early summer, feed on ornamental plants, and lay eggs in turf by midsummer. Peak grub damage occurs in late summer through fall.
Spring feeding is modest because the grubs are nearly done developing by then.
Preventive treatments targeting Japanese beetle eggs and newly hatch larvae should go down in late June through July. Curative treatments work best in August and September when the grubs are small and vulnerable.
European Chafer Grubs
European chafers are common across the Northeast and Great Lakes region. The adults are smaller and lighter brown than Japanese beetles. Their grubs are similar in appearance but have a different raster pattern.
The European chafer raster pattern is parallel rows of spines that form an open straight line. Unlike the V-shape of Japanese beetles, the lines both end at the same distance from the body. A hand lens is again helpful for confirmation.
European chafers have a slightly shorter lifecycle in some regions and can cause damage earlier in summer. They don't need as much moisture for egg survival, so establishment can happen during drier conditions compared to Japanese beetles.
Green June Beetle Grubs
Green June beetles are a southern favorite, common in the Southeast and Gulf states. The adults are large, greenish, and often seen flying erratically in spring. Their grubs are significantly larger than Japanese beetle or chafer grubs.
Mature ones can reach nearly 2 inches.
The large size makes them harder to treat with preventive products. And the adult beetles themselves cause nuisance problems, feeding on ripening fruit and gathering on warm surfaces in early spring.
Spring is when green June beetle damage typically appears. The overwintered grubs feed heavily before pupating. That spring window is your best opportunity for curative treatment.
Species Identification Cheat Sheet
| Feature | Japanese Beetle | European Chafer | Green June Beetle |
|---|---|---|---|
| Adult size | 1/2 inch | 1/2 inch, lighter brown | 1 to 1 inch, green |
| Raster pattern | V-shaped | Parallel lines | Different pattern |
| Peak damage timing | Aug–Oct | July–Sept | March–May |
| Geographic range | NE, Midwest | NE, Great Lakes | Southeast |
| Typical preventive timing | Late June–July | June–July | Not usually preventive |
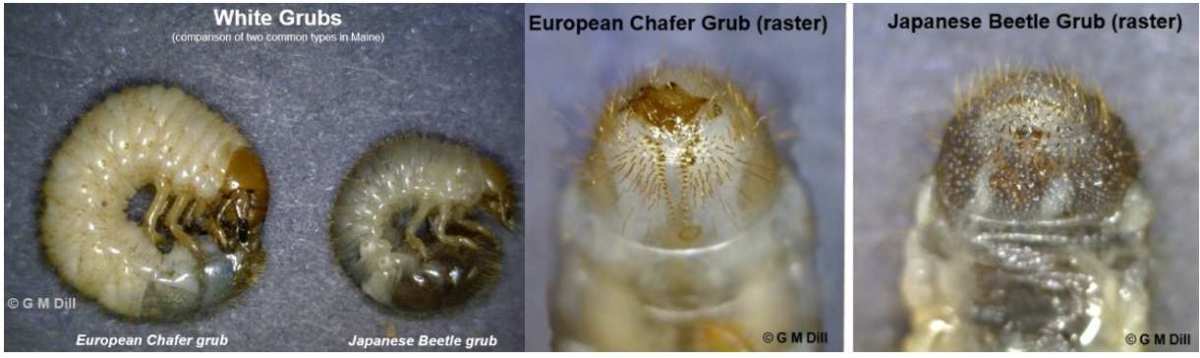
Image source: Bing (Web (fair-use with source credit))
Timing: When to Check and What You'll Find
Scouting effectiveness depends on knowing when grubs are near the surface and actively feeding. Miss that window and even a good sample can come up empty.
Best Time of Year to Sample
The ideal scouting window is late August through October. That's when grubs are actively feeding near the root zone and are large enough to spot easily. Spring sampling works less consistently because the grubs may be deep in the soil or already pupating.
In most northern regions, August and September yield the most reliable counts. Transition zone states like Kentucky or North Carolina can start sampling as early as late July. Further south, June or July checks may also be warranted for certain species.
Check after a rain if possible. Moist soil makes digging easier and grubs are more likely to be near the surface. Dry, compacted clay is a pain to dig and can give you false negatives because grubs have burrowed deeper.
What Happens If You Wait Too Late
Delaying until November or beyond creates two problems. First, the grubs may have already moved to overwintering depth of 4 to 8 inches. A 2-inch shovel sample won't reach them.
Second, even if you find them, the damage is already done for the season.
Late-season treatment on mature grubs is often less effective. Mature insects have hardened exoskeletons and slower metabolisms. They're just tougher to kill than the half-inch larvae you'd find in September.
If you detect heavy pressure in early fall, get a curative treatment down as soon as possible before the grubs grow beyond one inch in length. Grubs under that size are the prime target for most curative products. After that point, you're fighting uphill.
How Bad Is Bad Enough? Treatment Thresholds Explained
Knowing the grub count is one thing. Knowing whether it justifies action is another. These thresholds come from university turf programs nationwide and are based on years of field research.
Low Problem (Under 5 Grubs per Square Foot)
Below five grubs per square foot, most lawns recover on their own. The root system has enough capacity to compensate. Treatment is rarely cost-effective at this density.
Skip the chemicals. Focus instead on cultural practices. Adequate watering, proper fertilization, and aeration all help turf outgrow moderate feeding pressure.
Revisit scouting next year if you want peace of mind.
There isn't a single product that eliminates risk entirely, so your best strategy is supporting overall soil and turf health to buffer against feeding stress. Before you reach for a treatment, always consider what else might be stressing the grass.
Moderate Problem (5–10 per Square Foot)
This is the gray zone. Lawns with other stressors like drought, shade, or compaction warrant treatment. High-maintenance turf may also justify intervention at the lower end.
If the lawn is already struggling, the added root feeding can push it over the edge. Mature turf may handle five grubs fine but fifteen can cause significant damage. It's the total stress load that matters.
Curative insecticides like trichlorfon (Dylox) work well in this range on actively feeding grubs. These products act fast, which matters because damage is already occurring. Check product labels for application rates and watering instructions, as efficacy is highest when watered in immediately after spreading.
Severe Problem (Over 10 per Square Foot)
No question, treat. Grubs at this density are actively destroying the root system. Without intervention, you're looking at large areas of dead turf by hard freeze.
Curative insecticide is the best immediate step. Follow up with seeding or sodding once the grubs are controlled. Also address whatever conditions made the lawn vulnerable in the first place.
Sometimes severe infestations result from years of high beetle pressure combined with favorable conditions. The lawn's root system may already be severely reduced. Keep realistic expectations.
Even if you kill every grub, the grass needs weeks to months to fully recover.
What to Do Next: Your Decision Guide Based on What You Found
You've checked the symptoms. Possibly ran a soap flush or shovel test. Maybe you counted grubs from a square-foot sample.
Now the question becomes straightforward. Do you treat or not? This decision tree walks you through it.
Few grubs, under 5 per square foot. Healthy turf with no animal digging? Skip treatment for now. Keep the lawn well-watered and fertilized to help it outgrow the feeding pressure.
Revisit with another shovel test next August.
Moderate count with clear damage. Your lawn has brown patches and a spongey feel, and you're finding 5 to 9 grubs per square foot. A curative insecticide like trichlorfon (Dylox) works on contact. Apply it according to label directions and water it in right away.
Severe pressure with years of damage. You're seeing more than 10 grubs per square foot, and damage keeps returning to the same areas. A two-pronged approach is best. Apply curative insecticide now to stop active feeding.
Then plan for preventive treatment next June or July with a product like chlorantraniliprole (Acelepryn) applied before beetles lay eggs.
Spring discovery of grubs. You dug in April and found large C-shaped larvae near the surface. These are mature grubs that have overwintered. They'll pupate within weeks, so treatment is rarely effective at this stage.
Instead, note the location. Plan to apply preventive control in early summer when the next generation of eggs is hatching.
In every scenario, accurate identification leads to smarter action. Treating for grubs when you actually have chinch bug damage wastes money and leaves the pest unchecked. The diagnosis step is the one people skip, and it matters more than any product you'll ever apply.
Common Mistakes People Make When Checking for Grubs
Most missteps are small, but they add up to wasted effort or a lawn that keeps struggling.
Testing only one spot. Grubs cluster unevenly. A single shovel sample can miss hot spots entirely. Always sample at least three areas where damage is most obvious.
Digging too deep or too shallow. Grubs are typically found 1 to 3 inches down in late summer. Going 6 inches collapses the soil layer and makes sifting painful.
Confusing billbug larvae with grubs. Billbug larvae lack legs and don't have a C-shaped body. They cause similar-looking damage, but the treatment timing and product choice differ.
Waiting until November for a curative treatment. Once soil temperatures drop below 50°F, grubs head deep for winter. Products become far less effective at that point. Aim for early fall when they're still near the surface.
Watering before a soap flush. Saturated soil keeps the soapy solution from penetrating. That gives you a false negative. Choose a dry day and skip irrigation for at least 24 hours beforehand.
Skipping a follow-up check after treatment. A successful product knocks down the population, but a small number can survive. Scout again a couple of weeks later to be sure.
Each of these mistakes is easy to make. They're also easy to avoid once you know they exist.
When to Call a Professional vs. Handle It Yourself
If your lawn is small and the infestation is straightforward, a curative insecticide applied according to label instructions will likely solve the problem. Renting a spreader is simple, and most granular products are easy to calibrate.
Larger properties or recurring infestations are a different story. If you've treated for two consecutive years and still find more than 10 grubs per square foot, there may be underlying conditions keeping your lawn vulnerable. A local extension agent or professional turf manager can assess soil health, drainage, and species composition.
They can also confirm species by examining the grub's raster pattern under a specialty lens.
Athletic fields with mixed grass species and heavy foot traffic make visual inspection tricky. A professional can take multiple subsamples across the field and compile a population map. Golf course superintendents use this approach to cut costs and target only the areas that need treatment.
In short, DIY works for most homeowners. If you've got a persistent problem or a big stakes surface, bringing in an expert is a smart investment. Either way, the diagnosis you did this fall gave you the data you need for a productive conversation.
Frequently Asked Questions
Can I just water more to fix grub damage?
Watering helps healthy turf tolerate mild feeding pressure. It won't help once grubs have severed a large portion of the roots. If you're finding C-shaped larvae in the soil, watering alone won't solve the problem.
How long does it take a treated grub population to die off?
Curative insecticides can kill grubs within 24 to 72 hours. You may see a reduction in feeding immediately, but dead larvae remain in the soil for a week or more. Focus on the overall trend, not individual carcasses.
When is the best time to sample for grubs?
Late August through early October is the sweet spot for most regions. At that time, grubs are large and still feeding near the surface. Spring sampling is less reliable because the grubs may already be pupating or deep in the soil.
Can grub damage spread to a neighbor's lawn?
It's not likely in the short term. Adult beetles can fly a few miles and lay eggs in new turf, so next year's egg distribution may shift. But established grubs don't crawl far.
An outbreak stays where the adults laid their eggs, unless heavy equipment moves infested soil.
What if my lawn already has brown patches but no grubs?
If your diligence finds no grubs after multiple samples, the problem is probably something else. Chinch bugs, drought stress, and root diseases can look identical to grub damage. Spot-treat the irrigation or check for chinch bugs with a flush test.
You may need a soil test to identify a fungal issue.
Do skunks and raccoons make grub damage worse?
They do, but they're also a sign you already have a problem. Animals cause secondary damage by tearing up turf to reach the grubs. Control the grubs first, and the foraging will usually stop.
Final Recommendation
Our recommendation comes down to thoroughness. Take the few minutes this autumn to inspect your lawn with a simple shovel test and a basic soap flush. Dig in at least three spots, count what you find, and check your count against the treatment thresholds.
If you're under five grubs per square foot on a healthy lawn, hold off on chemicals and keep building better soil. If you're in the moderate to severe range, a curative application in early fall followed by a preventive plan next year is the most efficient path.
What matters most is that you act on evidence. Grub problems don't solve themselves, and every year of unchecked feeding weakens the root system further. With accurate diagnosis, you'll spend less money on treatments that don't matter and more time on the ones that deliver a thick, healthy lawn.