Spreading lime on your lawn is essential for maintaining healthy soil and vibrant grass. This guide provides a comprehensive, step-by-step approach to applying lime effectively, ensuring your lawn receives the nutrients it needs for optimal growth. You’ll learn how to test your soil, choose the right lime, and apply it correctly for the best results.
A lush, green lawn is the envy of any neighborhood. But sometimes, despite your best efforts with watering, mowing, and fertilizing, your grass just doesn’t seem to thrive. One of the most common reasons for this is incorrect soil pH. If your soil is too acidic, it can prevent your grass from accessing the nutrients it needs, leading to a weak, unhealthy lawn. This is where spreading lime on your lawn comes in.
Lime is a soil amendment that helps to neutralize acidity and bring your soil’s pH level into the ideal range for healthy grass growth. It’s not a fertilizer, but it’s crucial for making sure the fertilizers you do use are effective. This comprehensive guide will walk you through everything you need to know about spreading lime on your lawn, from understanding why it’s important to how to do it correctly for a healthier, more vibrant yard.
- Understand Soil pH: Lime is used to raise the pH of acidic soil, making essential nutrients more available to grass.
- Test Your Soil: Before applying lime, conduct a soil test to determine your lawn’s current pH level and identify any nutrient deficiencies.
- Choose the Right Lime: Select from different types of lime, such as granular, pelletized, or powdered, based on your preference and spreader type.
- Timing is Key: The best times to spread lime are in the fall or early spring, avoiding periods of extreme heat or when the lawn is actively growing or dormant.
- Proper Application: Use a spreader to ensure even distribution, following the recommended application rates based on your soil test results.
- Watering is Crucial: Water your lawn after applying lime to help it dissolve and penetrate the soil, activating its benefits.
Why Spread Lime on Your Lawn?
Before we dive into the “how,” let’s understand the “why.” Soil pH is a measure of how acidic or alkaline your soil is, ranging from 0 (highly acidic) to 14 (highly alkaline), with 7 being neutral. Most grass varieties prefer a slightly acidic to neutral pH, typically between 6.0 and 7.0.
When your soil’s pH drops below this ideal range, it becomes acidic. Acidic soil can:
- Lock Up Nutrients: Essential nutrients like nitrogen, phosphorus, and potassium become less available to grass roots.
- Release Toxic Elements: Aluminum and manganese can be released in toxic amounts, hindering grass growth.
- Reduce Beneficial Microorganisms: Soil microbes that help break down organic matter and make nutrients available are less active.
- Promote Weed Growth: Some weeds, like clover and crabgrass, actually thrive in acidic conditions.
Spreading lime on your lawn counteracts these issues by raising the soil pH. This makes nutrients more accessible, reduces the risk of toxic element buildup, supports beneficial soil life, and creates an environment less favorable for many common weeds.
Step 1: Test Your Soil
This is arguably the most important step. You wouldn’t take medication without knowing what’s wrong, and the same applies to treating your lawn. A soil test will tell you your lawn’s current pH and can often provide information about nutrient deficiencies.
How to Conduct a Soil Test
- Obtain a Soil Test Kit: You can purchase DIY soil test kits from garden centers or hardware stores. For more detailed and accurate results, it’s highly recommended to send a sample to your local cooperative extension office. They often offer free or low-cost testing.
- Collect Your Sample: Use a clean trowel or soil probe. Collect several samples from different areas of your lawn, at a depth of about 4-6 inches. Avoid areas with recent fertilizer application or obvious signs of disease.
- Mix and Prepare: Combine all the samples in a clean bucket or bag, mixing them thoroughly. If using a DIY kit, follow its specific instructions for preparing your sample. If sending to an extension office, they will provide packaging and instructions.
- Send Off or Analyze: Mail your sample to the extension office or analyze it yourself using the kit.
The results will typically tell you your soil’s pH level. If the pH is below 6.0, liming is likely beneficial. The report may also suggest specific nutrient needs, which can help you choose the right type of lime and a suitable fertilizer later on.
Step 2: Choose the Right Type of Lime
Visual guide about How to Spread Lime on Lawn
Image source: plantforsuccess.com
Once you know your soil needs lime, you need to select the right kind. The most common types of lime for lawns are:
- Agricultural Lime (Ground Limestone): This is the most common and affordable type. It contains calcium carbonate. It’s effective but can be slow to react with the soil.
- Dolomitic Lime: This type contains both calcium and magnesium carbonates. If your soil test indicates a magnesium deficiency, dolomitic lime is a good choice.
- Hydrated Lime (Quicklime): This is a highly reactive form of lime and can burn your lawn if applied incorrectly. It’s generally not recommended for DIY lawn care.
- Pulverized Lime: This is finely ground agricultural lime. It acts faster than coarser grinds but can be dusty and harder to spread evenly.
For most homeowners, **pelletized agricultural lime** is the easiest and safest option. It’s less dusty, easier to spread evenly with a broadcast spreader, and works effectively without being too aggressive.
Step 3: Determine the Right Amount of Lime
This is where your soil test results are crucial. The amount of lime needed depends on your soil’s current pH, its texture (clay, loam, sand), and the target pH you want to achieve.
Reading Your Soil Test Report
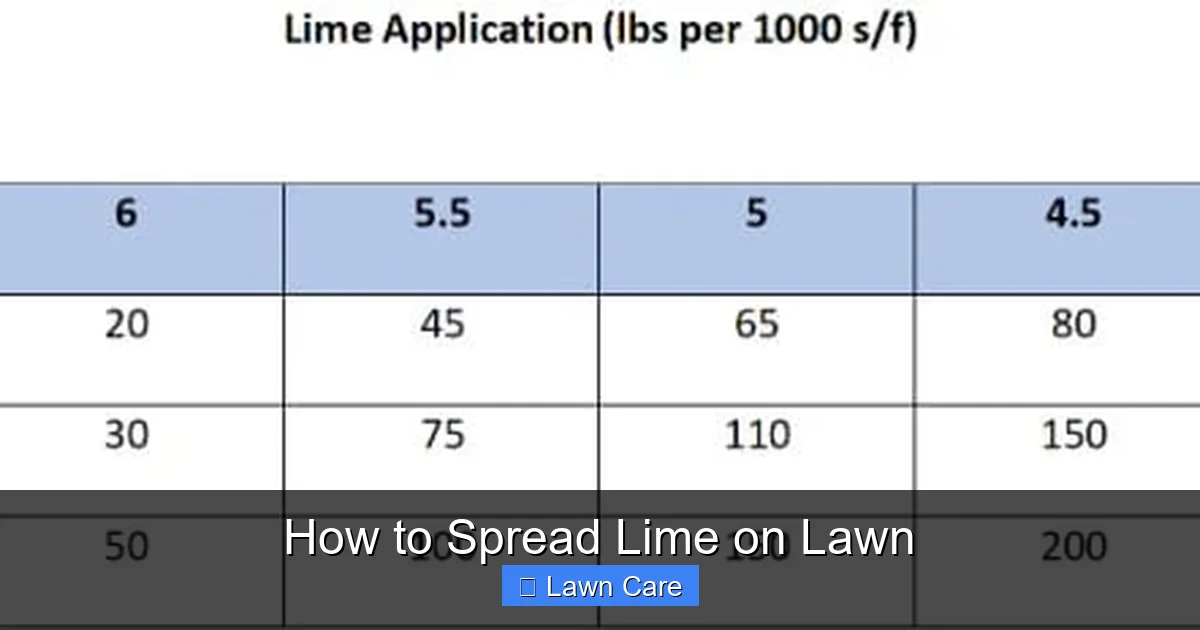
Your soil test report will usually provide a recommendation for the amount of lime to apply per 1,000 square feet. It might be expressed as pounds of lime per 1,000 sq ft. If your test doesn’t give a specific recommendation, you can generally follow these guidelines:
- For sandy soils: These soils have a lower capacity to hold nutrients and require less lime.
- For clay or loam soils: These soils have a higher capacity and need more lime to raise the pH.
General Guidelines (always consult your soil test for precise amounts):
- If your pH is between 5.5 and 6.0, you might need 50-100 lbs of pelletized lime per 1,000 sq ft.
- If your pH is between 5.0 and 5.5, you might need 100-150 lbs of pelletized lime per 1,000 sq ft.
- If your pH is below 5.0, you might need 150-200 lbs or more of pelletized lime per 1,000 sq ft.
Important Note: It’s better to apply lime in smaller, multiple applications over time rather than one large dose. Applying too much lime at once can shock your lawn.
Step 4: Choose the Best Time to Apply Lime
Timing is essential for effective lime application.
When to Spread Lime
- Fall: This is often considered the ideal time. The cool, moist conditions allow the lime to gradually break down and begin working its magic over the winter months.
- Early Spring: Before the growing season kicks into high gear is another good time. It can help prepare the soil for optimal nutrient uptake as the grass begins to grow.
- Avoid Peak Growing Season: Try to avoid spreading lime when your grass is under stress from heat or drought, or when it’s actively growing vigorously and needs consistent moisture.
It’s also important to note that lime takes time to work. You won’t see immediate results, but the benefits are long-term.
Step 5: Prepare Your Lawn and Equipment
Before you start spreading, a little preparation goes a long way.
Getting Ready
- Mow the Lawn: Mow your grass a day or two before applying lime. This helps ensure the lime granules fall to the soil surface, not get caught in the grass blades.
- Check Your Spreader: Whether you’re using a broadcast spreader (walk-behind or tow-behind) or a drop spreader, ensure it’s in good working order. Clean any debris from it. If you’re using a riding mower, you might be looking at instructions on how to change belts or adjust components, but for spreading lime, a well-maintained spreader is key.
- Calibrate Your Spreader: Most spreaders have a chart or settings that correspond to different types of lawn products. Consult the lime bag and your spreader’s manual to set the correct opening for your chosen lime product. This ensures you apply the right amount.
Step 6: Spread the Lime
This is where the physical work begins. Even application is crucial for best results.
Application Techniques
- Using a Broadcast Spreader:
- Fill the spreader hopper with the recommended amount of lime for your lawn area. Do not overfill.
- Start at one edge of your lawn and walk at a steady, even pace.
- Overlap your passes slightly (about one wheel width) to ensure complete coverage.
- Turn off the spreader when you reach the end of a row and when you turn around to avoid dumping excess lime in one spot.
- If your spreader has an edge guard or pattern control, use it to avoid spreading lime onto sidewalks, driveways, or garden beds.
- Using a Drop Spreader:
- This type of spreader drops material directly in a narrow band.
- Start at the edge of your lawn and walk in straight, parallel lines.
- Overlap each pass by about half the width of the spreader to ensure no gaps are missed.
- This method requires more precision to ensure even coverage.
- Using a Spreader on a Riding Mower:
- Ensure your mower is set to a slow, consistent speed. Many riding mowers have settings for spreader application.
- Follow the same pattern as a walk-behind broadcast spreader, overlapping passes to ensure even coverage.
- Be mindful of turning, as you don’t want to dump too much lime in a single turn.
Practical Tip: It’s often easier to divide your lawn into smaller sections and calculate the amount of lime needed for each section. This helps prevent over-application.
Step 7: Water Your Lawn
After the lime has been spread, watering is the final, crucial step.
Why Watering Matters
Water helps the lime to dissolve and begin working its way into the soil. It moves the calcium and magnesium into the root zone where they can neutralize acidity.
- Water Thoroughly: After spreading, water your lawn deeply. This will help wash any remaining lime off the grass blades and into the soil.
- Timing: Water within 24-48 hours of application.
Step 8: Follow Up and Reapply
Lime doesn’t work overnight, and its effects can last for several months to a year or more, depending on your soil type and conditions.
Monitoring and Reapplication
- Re-test Your Soil: It’s a good practice to re-test your soil pH about six months to a year after your initial application to see if it has reached your desired level.
- Reapply as Needed: Based on your soil test results and the pH readings, you may need to reapply lime periodically. For most lawns, this is done once every one to two years. Avoid applying more than 50 lbs of lime per 1,000 square feet at a single time to prevent potential issues. If your soil requires a significant pH adjustment, it’s best to do it in stages over a couple of years.
Troubleshooting Common Issues
* Uneven Application: If you notice splotchy areas or streaks, it’s likely due to uneven spreading. Ensure your spreader is calibrated correctly and you’re overlapping passes.
* **Lime on Hard Surfaces:** If you accidentally spread lime on sidewalks or driveways, sweep it up immediately and return it to your lawn or the bag. Lime can stain concrete.
* **No Visible Results:** Remember that lime works slowly. If you haven’t seen improvements after a few months, consider re-testing your soil. Other factors like poor watering, incorrect mowing, or nutrient deficiencies could also be at play. If you’ve been struggling with lawn maintenance, you might find our guides on [how to adjust cutting height on a riding lawn mower](https://lawnhelpful.com/how-to-adjust-cutting-height-on-craftsman-riding-lawn-mower-2/) or [how to change oil on a self-propelled lawn mower](https://lawnhelpful.com/how-to-change-oil-on-craftsman-self-propelled-lawn-mower/) helpful in identifying other potential issues.
Conclusion
Spreading lime on your lawn is a fundamental step in achieving and maintaining a healthy, vibrant green carpet. By understanding your soil’s pH, choosing the right type and amount of lime, and applying it at the correct time and with proper technique, you can significantly improve your lawn’s ability to absorb nutrients and resist common problems. Don’t underestimate the power of healthy soil – it’s the foundation for a beautiful lawn. So, grab your spreader, follow these steps, and get ready to see your lawn thrive!