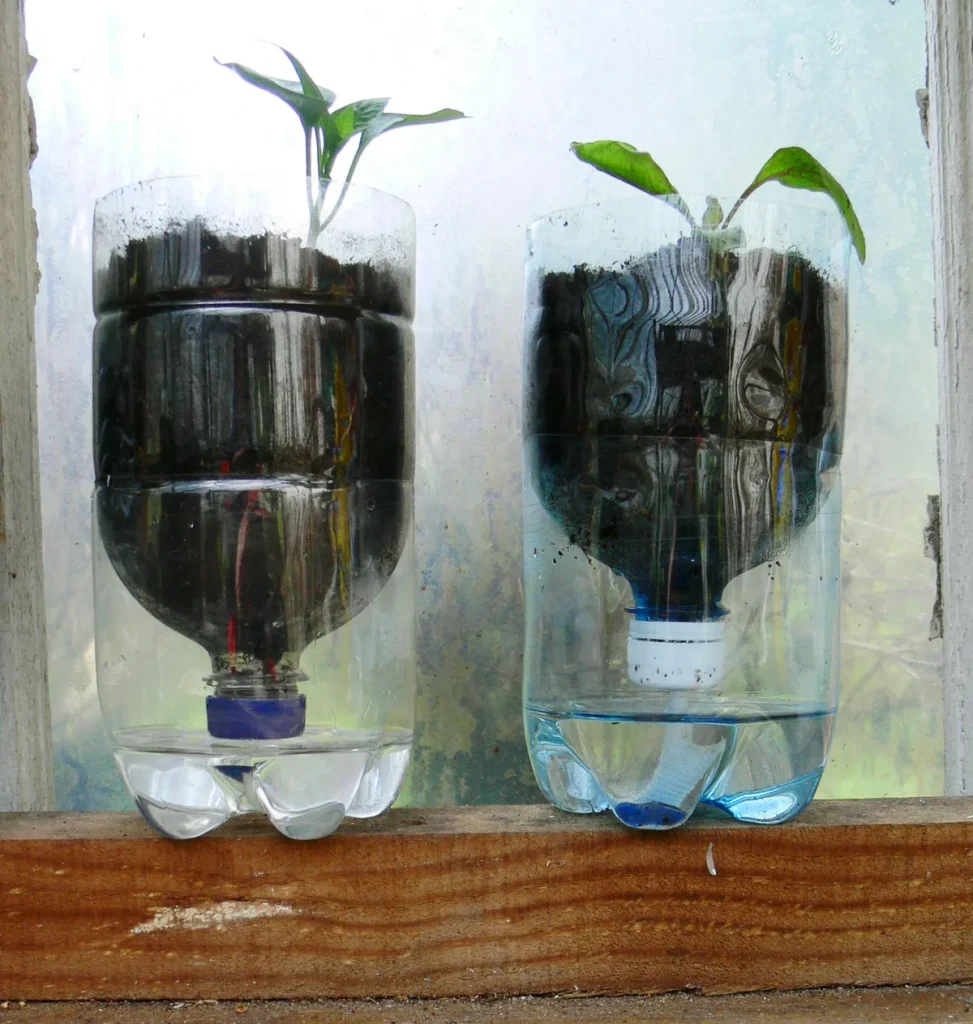
Worried your plants will struggle while you're away? You're not alone. The answer to how to make a self waterer for plants? is surprisingly simple, and it costs almost nothing if you reuse what's around the house.
Capillary action does the heavy lifting. A wick or porous clay pulls water from a reservoir into dry soil as the plant needs it. As of 2026, a 2-liter plastic bottle using this principle can keep a medium houseplant hydrated for up to two weeks.
We'll break down the methods, the visual details, and the mistakes to dodge.

Image source: Bing (Web (fair-use with source credit))
Quick Answer
To make a self waterer for plants, fill a plastic bottle with water. Thread a cotton wick through the cap. Push the wick into the soil.
Invert the bottle and let wicking moisten the pot. This keeps soil consistently damp while you're away.
Why a Self-Waterer Changes Everything (and Who It's For)
Plants don't need a constant stream of water. They need consistent moisture. That's where a self-waterer shines.
The science is simple. A fabric wick or porous clay creates a bridge between a water reservoir and your pot's soil. Water moves through that bridge by capillary action.
It travels upward, fighting gravity, because the soil keeps pulling more as the top dries out.
This makes a huge difference for real-world plant care. If you water once a week, this system gives your plant a safety buffer. If you travel often, it turns a plant-killing trip into a no-drama stretch.
If you tend to forget houseplants under a grow light, a reservoir works as your backup memory.
The best part? It doesn't require electronics, timers, or anything fancy. A plastic bottle, a length of wick, and ten minutes of setup get you there.
Who Benefits Most
- Frequent travelers. A 1-liter bottle can cover a long weekend. A 2-liter bottle can cover a longer vacation.
- Office plant owners. You're not there every day, and nobody wants to water your desk fern.
- New gardeners. This setup smooths out mistakes during the early learning curve.
- Anyone with a busy schedule. It automates one less daily task.
If you've also got patchy turf outside, that's a separate puzzle worth solving. Spotting the difference between underwatering and grub damage early keeps a bad problem from getting worse.
Before You Build: What You'll Need and Why the Visuals Matter
This project is visual-first. The bottle angle, the wick depth, and the water flow all matter more than the exact materials. A photo or diagram shows you what "right" looks like in a way descriptions alone can't.
Here's the core lineup.
| Material | Best Option | Why It Matters |
|---|---|---|
| Plastic bottle | 1 to 2 liters, food-grade | Holds enough water for days or weeks |
| Wick | Cotton or nylon rope, about half an inch wide | Moves water steadily through capillary action |
| Bottle cap | Original cap, no punctured spout | Keeps the seal controlled |
| Terracotta stake | Cone-shaped watering stake | Releases water without wick rot |
| Wine bottle | Standard 750 ml bottle | Offers a no-wick alternative |
A few things to keep in mind before you cut anything.
- Use food-grade plastic. Old soda or juice bottles work well. Clean them thoroughly and let them dry.
- Remove the label completely. Adhesive residue collects dust and bacteria over time.
- Start with a clear bottle. You'll be able to check the water level without poking or guessing.
- Watch the first 24 hours. Sunlight, temperature, and plant type all affect how fast water drains from the reservoir.

Image source: Bing (Web (fair-use with source credit))
Take a few minutes to observe how your setup behaves on day one. Soil that's already saturated will absorb less water. Very dry, chunky soil will drink faster than you expect.
That first observation tells you more than any specifications chart.
Build Method 1: The Plastic Bottle Wick System
This is the most popular DIY method, and for good reason. It uses materials you already have, and it works across a wide range of plants. The key is building a reliable wick portal in the bottle cap.
What You'll Need
- A clean plastic bottle with its cap
- A cotton or nylon wick, roughly half an inch thick
- A drill, nail, or screwdriver
- Scissors
- A pot with drainage and well-aerated soil
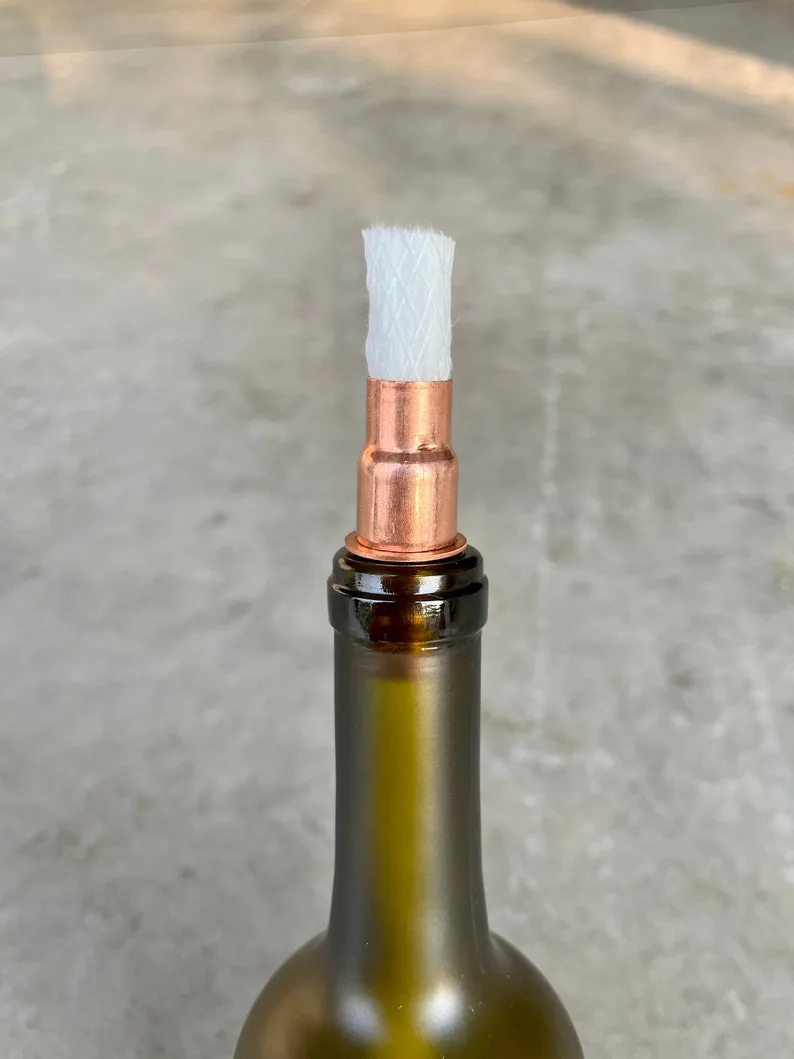
Image source: Web (Bing) / etsy.com (Web image (fair-use with source credit))
Step-by-Step Setup
- Clean and dry the bottle. Remove the label and any sticky residue with warm soapy water.
- Cut a hole in the cap. The hole should be just wide enough for the wick to slide through snugly. Too loose, and water will gush out too fast.
- Thread the wick through the cap. Leave a few inches inside the bottle. That part touches the water reservoir. The other end goes into the soil.
- Position the wick in the pot. Push the wick a few inches deep, close to the root zone. Don't let it coil on the surface, or moisture will stay shallow.
- Fill the bottle with water. Screw on the cap, then invert the bottle quickly. Set the neck into the soil so the wick is buried and the bottle stands upright.
That last step feels awkward at first. Hold your hand over the opening or screw the cap over the wick before flipping, and you'll limit spills.
How to Test Whether You Built It Right
This is where the if/then thinking pays off.
- If water drips freely right away, the hole is too big or the wick is too thin. Swap in a thicker wick or start over with a fresh cap.
- If water doesn't move at all after a few hours, the wick may be packed too tightly. Loosen the cap slightly or widen the hole.
- If the soil feels damp but not soggy after 24 hours, you nailed it.
Aggregate reviews of DIY wicking setups report one common failure: the wick drying out on the surface. Bury the wick deep enough, and that problem mostly disappears.
Good for Many Plants, Not for All
This method works beautifully for pothos, spider plants, philodendrons, and most leafy houseplants. It's less ideal for succulents and cacti, which prefer soil to dry out completely between waterings. If you do use it for those, make the wick very thin or reserve it for short stretches only.
And if grubs are damaging your lawn at the same time, don't apply any insect control blindly. Check the soil for actual damage and time treatments carefully so you don't waste product or harm beneficial insects.
Build Method 2: The Wine Bottle Waterer
The wine bottle method is the elegant cousin of the plastic bottle trick. No wick, no cutting, no cap modifications. You use the bottle itself as the reservoir, and the soil creates the seal.
Why It Works
The physics are different from a wick system. When you invert a full bottle into moist soil, the water stays inside because air can't enter. As the soil dries, tiny gaps open around the bottle neck.
Air bubbles rise, and a small amount of water escapes to moisten the soil. Then the soil swells slightly, resealing the bottle.
That creates a stop-start rhythm that's perfect for consistent moisture.
Setup Steps
- Clean a wine bottle and soak off the label.
- Fill it to the brim with tap water. Let it sit for a minute so the water reaches room temperature.
- Press the opening with your thumb. Invert the bottle over the pot.
- Push the neck into the soil until the bottle stands upright. The soil should cover the rim completely.
- Wait 24 hours and check how much water left the bottle.

Image source: Web (Bing) / storage.googleapis.com (Web image (fair-use with source credit))
Who This Method Suits Best
The wine bottle waterer works great for larger pots with dense enough soil to grip the neck. Standard 750 ml bottles provide enough water for about three to five days on a medium houseplant, and up to a week in cooler rooms. If you're leaving for a long weekend, this is a low-effort insurance policy.
It's less reliable in very loose, fast-draining mixes. In those, water can trickle through too quickly. If you're using a chunky potting mix, compact the soil around the neck firmly before inserting the bottle.
The Look of It
This method wins on aesthetics. A clean wine bottle looks intentional in an entryway, on a shelf, or near a sunny window. That matters if your plants live in visible spaces rather than a basement grow station.
Just remember that an empty bottle gives you no warning. You can't see the water level once it's inverted. Mark a line on the side or check by lifting it slightly after a few days.
Build Method 3: Terracotta Stake Waterer
The terracotta stake is the most reliable low-tech option in this list. It uses a porous clay cone that slowly weeps water into soil. Because the clay breathes, this method doesn't have the same wick-rot problem as fabric or rope.
Why Terracotta Is Different
Terracotta is a porous ceramic. When you soak the stake, water fills tiny channels in the clay. As the surrounding soil dries, moisture is drawn through those channels into the root zone.
When soil is already wet, the clay releases almost nothing.
In other words, it adapts. That makes it forgiving for plants that like a more moderate watering cycle.
How to Set It Up
- Soak the stake in water for 30 minutes. This primes the pores so it moves water immediately.
- Fill a clean bottle with water. Most terracotta stakes are designed to attach directly to a standard bottle neck.
- Invert the bottle onto the stake. Use the fit or included gasket to create a seal.
- Push the clay cone into moist soil. Keep the cone fully buried so it contacts the root zone.
- Check the bottle level after 48 hours. You'll get a sense for how long the reservoir lasts.
How Long It Lasts
A 750 ml bottle connected to a terracotta stake can last anywhere from five days to two weeks. Plant size, light, and temperature drive the range. A big fern in a bright, warm room drinks faster than a small succulent in a cool corner.
The Trade-Off
Terracotta costs more than a recycled bottle. A single stake runs a few dollars, and premium versions sit on the pricier side. You're also adding one more object to each pot.
But it's durable. Clean it with vinegar, rinse it, and it works for years. If you have a collection of houseplants, you can move the stakes from pot to pot as plants change or grow.
That durability also makes it the smart choice for long-term plant setups. Once the system is in place, the only real maintenance is refilling the bottle and occasionally flushing out mineral deposits.
How to Test Your First Build Without Killing a Plant
Before you trust your plants to a DIY system, test it. A quick trial run saves you the heartbreak of a thirsty fern or a drowned pothos.
The 24-Hour Test
- Build your chosen setup and place it in a spare pot with fresh potting mix.
- Fill the reservoir and note the water level.
- Wait 24 hours, then check the soil moisture at the root zone.
- Lift the reservoir to see how much water left the system.
That tells you the flow rate. You'll know exactly how long a full reservoir will last in your environment.
How Much Water Should It Release?
A healthy wick system releases roughly 30 to 60 milliliters per day for a small plant. A wine bottle setup might release 100 to 200 milliliters daily in warm, bright rooms. Those numbers depend heavily on soil type, humidity, and plant size.
The Finger Test Rule
The soil should feel like a wrung-out sponge. Damp to the touch, but not dripping when you squeeze a handful. If water pools on the surface or runs out the bottom tray constantly, the system is too aggressive.
When Things Go Wrong
If your test fails, don't panic.
- Too fast: Replace the wick with a thinner one or use a smaller bottle.
- Too slow: Widen the wick hole or move the wick deeper near the roots.
- No flow at all: Resoak the wick before reinserting it. Dry cotton takes time to absorb water.
A failed first test is normal. Adjust one variable at a time, and you'll dial it in within a couple of days.
University extension resources back up this general advice: consistent moisture at the root zone beats alternating droughts and floods. The USDA and cooperative extension offices have published practical watering guides that confirm this approach for years.
Common Mistakes and How to Sidestep Them
Even a simple system has failure points. Here's what usually goes wrong and how to avoid it.
Overwatering and Root Rot
The number one mistake is assuming more water is better. If the soil stays soggy, roots suffocate. Fruit flies and fungus gnats show up within days.
The fix: Use a wick that's thinner than you'd guess. Check the soil daily for the first week. Adjust if it feels clammy below the surface.
Algae and Stagnant Water
Clear bottles sitting in bright light grow green algae fast. That slime looks gross, and it can clog your wick or discolor the soil.
The fix: Use an opaque bottle, or wrap a clear one in fabric. Empty and refill the reservoir weekly. Clean it with vinegar and warm water between refills.
Mosquito Larvae
Any standing water that sits for a week or more becomes a mosquito breeding ground in warm climates. University extension offices consistently warn about this risk.
The fix: Never leave reservoirs open. The inverted bottle design naturally blocks mosquitoes, but check any exposed water weekly. Rinse and replace standing water before it sits too long.
Salt and Mineral Buildup
Fertilizer salts gather at the wick tip and the soil surface over time. White crusty residue is the sign. That buildup eventually slows water movement.
The fix: Flush the soil with plain water once a month. Let the excess drain completely before reconnecting the reservoir. Clean terracotta stakes with vinegar water.
Label Residue and Bacterial Slime
Old bottle labels leave a sticky glue that traps dust and bacteria. In a humid room, that residue turns gunky fast.
The fix: Remove labels with warm soapy water or a citrus-based cleaner. Give bottles a thorough wash before their first use.
The Wick Drying Out
A wick that isn't touching the water reservoir loses its capillary action completely. The soil dries, the plant droops, and the wick looks untouched.
The fix: Make sure the wick extends well into both the bottle and the soil. Bury it deep, at least three to four inches, and keep a generous loop inside the reservoir.
How to Refill, Clean, and Keep It Running Long-Term
Self-waterers aren't set-and-forget. They need a little attention to keep working smoothly, but the maintenance is far lighter than daily watering.
Refill Schedule That Makes Sense
Different setups need different intervals.
| Setup | Typical Refill Interval | Best For |
|---|---|---|
| 500 ml bottle wick | 3 to 5 days | Small pots, succulents, short trips |
| 2-liter bottle wick | 10 to 14 days | Medium to large houseplants |
| Wine bottle | 3 to 7 days | Weekend trips, medium pots |
| Terracotta stake | 5 to 14 days | Large pots, long stays |
Check the reservoir after 48 hours when you first set up a new system. That tells you whether your intervals will be shorter or longer than these averages.
The Monthly Cleanup
Every four to six weeks, give the whole system a reset.
- Empty any remaining water.
- Wash the bottle with warm soapy water.
- Soak wicks in a diluted vinegar solution for 30 minutes.
- Rinse terracotta stakes under running water and air-dry.
- Flush your plant's soil with clean water to wash away salts.
That routine prevents algae, mineral buildup, and bacterial slime before they become problems.
Seasonal Adjustments
Indoor plants drink less in winter. Lower light and cooler temperatures slow photosynthesis. Your reservoir will last longer, and refill intervals stretch out.
In summer, heat and brighter light drive faster evaporation. Check levels more often during heat waves. You might need to swap a small bottle for a bigger one to bridge the gap.
Replacing Worn Components
Cotton wicks eventually break down. They get brittle, stained, or thin at the cap opening. Replace them every couple of months.
Nylon wicks last longer and don't rot as quickly.
Terracotta stakes last for years if you don't drop them. If the clay chips badly, replace it. Cracks alter the water flow and make the stake unreliable.
DIY vs. Buying a Self-Waterer: What's Actually Worth It
The internet is full of DIY self-watering hacks, and plenty of commercial options look tempting at the garden center. Here's how they stack up.
The Cost Comparison
| Option | Cost | Lifespan | Reliability |
|---|---|---|---|
| Recycled bottle with wick | Under $2, often free | 2 to 4 months before wick needs replacing | Good, with trial and error |
| Wine bottle | Free to $5 | Indefinite if handled carefully | Moderate, depends on soil |
| Terracotta stake | $5 to $15 each | Years | High |
| Commercial self-watering planter | $20 to $80+ | Years | Very high |
| Drip irrigation system | $30 to $100+ | Years | Very high |
DIY wins on price. Commercial wins on consistency and polish.
When DIY Makes Sense
DIY is perfect for a quick fix, a vacation setup, or experimenting with a new plant. If you have an empty bottle and a piece of rope, you're already 80 percent of the way there.
It's also great for testing whether your plant likes bottom watering before investing in a fancy planter.
When to Just Buy One
If you have a large plant collection, buying self-watering pots one by one isn't practical. A commercial system with a water-level indicator saves you time and guesswork.
If you're gifting a plant, a commercial self-watering pot looks intentional. A repurposed soda bottle, as clever as it is, doesn't deliver the same impression.
If you live in a hot, dry climate and travel regularly, a proper self-watering planter with a larger reservoir outlasts any bottle hack.
The Honest Middle Ground
Terracotta stakes are the sweet spot. They look good, cost less than a full planter, and work with bottles you already own. That mix of affordability and reliability is hard to beat.
Who It's Best For: Matching the Method to Your Lifestyle
Choosing a self-watering method isn't about picking the most advanced option. It's about matching the setup to how you actually live.
If You're a Frequent Traveler
Go with a 2-liter bottle wick system or a terracotta stake. Both give you a solid buffer of water. For trips under two weeks, a large bottle keeps most houseplants satisfied.
If You Have a Large Plant Collection
You need efficiency. Terracotta stakes let you monitor dozens of pots with a single glance at each reservoir. Standardized bottles also help, since you can swap filled bottles between plants without reconfiguring anything.
If You're a Balanced, But Busy, Plant Parent
A wine bottle waterer fits your lifestyle. It's charming, it's lazy, and it's perfect for long weekends. You're not looking to automate everything, just buy yourself some slack.
If You're Growing Herbs or Vegetables
Use a wick system for individual pots. It maintains the steady moisture that basil, chard, and peppers thrive on. Just watch for salt buildup since edibles appreciate a clean soil flush.
If Your Plants Spend Time Outdoors
Choose a terracotta stake or a dedicated self-watering planter. Outdoor humidity and drying winds change the equation. Bottle hacks can blow over or fry in direct sun.
Real-Life Scenarios: What You Can Expect
Numbers give you a starting point. Real situations show you what to actually plan for.
The Two-Week Vacation Test
A reader left their pothos with a 2-liter bottle wick system in early June. The bottle sat on a shelf with indirect light. Nine days later, the wick was still pulling water, and the soil felt cool and damp.
The plant looked completely relaxed.
A succulent in the same setup with a thicker wick wasn't as lucky. The soil stayed too moist, and the roots started to soften. That's why testing each plant before you leave matters.
Setting Up a Weekend Escape
A wine bottle waterer on a large ficus covered a four-day trip. The bottle emptied by day three, but the soil held enough moisture for another day. That's a successful outcome for a project that took two minutes to assemble.
Long-Term Herbs on a Balcony
Terracotta stakes win for outdoor herbs. Water fills a 1-liter bottle, and the stake drips just enough to keep basil, mint, and thyme moist between refills. Once a week, the bottles get topped up.
The whole setup took under fifteen minutes to install.
The Work-Desk Fern
A small plastic bottle wick system keeps a maidenhair fern alive through the workweek. Refills happen on Monday, and the reservoir stays half-full by Friday. That steady evaporation is exactly what ferns love.
Frequently Asked Questions
Will the Water Last Through My Vacation?
A 2-liter bottle wick system usually lasts 10 to 14 days for a medium houseplant. A 750 ml wine bottle lasts 3 to 7 days. Terracotta stakes with 1-liter bottles can last up to two weeks in moderate conditions.
Test the setup at home for 48 hours before leaving.
Can I Add Fertilizer to the Reservoir?
You can, but you probably shouldn't. Fertilizer salts build up in the soil and on the wick over time. They can also clog terracotta pores.
If you want to feed your plants, apply fertilizer top-down while flushing the system with clean water.
Do I Need Different Self-Waterers for Different Pots?
Yes. Small pots dry out faster and need smaller reservoirs with thinner wicks. Large pots benefit from terracotta stakes or multiple wicks.
Succulents need almost no wick at all. Match the system size to the pot and the plant's natural watering needs.
How Do I Stop Algae From Growing?
Use an opaque bottle or wrap a clear one in dark tape or fabric. Change the water every one to two weeks. Keep the setup out of direct sunlight whenever possible.
If algae appears, clean the bottle with a vinegar rinse before putting it back into service.
What's the Best Wick Material?
Cotton rope and nylon cord are the two most common options. Cotton absorbs faster but rots after a few months. Nylon lasts longer and resists decay.
Half an inch wide is a good starting point for most houseplants.
Does This Work for Outdoor Plants?
Yes, but with adjustments. Choose a terracotta stake for larger pots, and use a heavier bottle that won't blow over. Check more often in hot, dry weather since evaporation runs higher outdoors.
Final Verdict: The Best Self-Waterer for You
There's no single perfect self-waterer. But there is a best choice for your situation.
- For a quick, free fix: Use a plastic bottle with a cotton wick. It works, and it costs nothing.
- For a weekend trip: Use a wine bottle. Two minutes of setup, zero maintenance.
- For long-term consistency: Use terracotta stakes. They're reliable, adaptable, and built to last.
- For large collections: Use standardized bottle wick systems so you only manage one refill routine.
- For succulents and cacti: Use a thin wick or skip DIY entirely. These plants prefer staying dry.
Start simple. Build one bottle wick system, test it, and watch how your plant responds. Once you see the soil hold steady moisture for days at a time, you'll wonder why you didn't try this sooner.