You just dropped a few hundred dollars on a shiny new gas grill. You're already picturing burgers, ribs, maybe a whole chicken. Before any of that happens, there's one thing you need to do: learn how to inspect a new gas grill before first use.
This is not optional. It's a 20-minute safety ritual that protects you from gas leaks, grease fires, and a brand-new grill that never quite cooks right.
Think about what happens in shipping and manufacturing. Burner tubes get bumped. Regulators get jostled.
Insects crawl into venturi openings looking for a warm home. Factory oils and packing dust coat the firebox. The Consumer Product Safety Commission tracks gas grill fires and carbon monoxide incidents every year, and a surprising number trace back to improper first-time setup.
So let's walk through it together. By the time we're done, you'll have every step locked down.
Quick Answer
Inspect your new gas grill before first use. Check the fuel type matches your tank or line. Remove all packing materials from the firebox.
Inspect every burner tube for blockages. Connect the regulator and hose, then test for leaks with soapy water. Run a 15-to-30-minute burn-off with the lid open before cooking.
Why You Can't Skip a First-Use Inspection on a New Gas Grill
Factory assembly lines move fast. Parts get torqued by machines, not careful hands. Shipping trucks bounce over potholes for hundreds of miles.
Your grill's first test happens in your backyard, not at the factory.
That's the honest truth. Most grills arrive in fine shape, but some don't. Hose fittings can loosen in transit.
A venturi tube can slide off its valve. A spider can build a web inside a burner in the warehouse before the box is even sealed. If you skip the inspection, you're trusting luck with a machine that holds pressurized gas and creates open flames.
Here's what a pre-flight check actually does for you. It catches shipping damage before you light your first fire. It clears the manufacturing oils, plastic film, and metal shavings that can ruin food and cause flare-ups.
And it confirms that every gas connection is airtight. The whole process takes about 20 minutes. Skipping it can cost you thousands in property damage, or worse.
Image source: Bing (Web (fair-use with source credit))
The Real Risks: Gas Leaks, Shipping Damage, and Factory Film
Let's get specific about what can actually go wrong.
First, gas leaks. A loose fitting at the regulator or valve connection allows propane to escape. Propane is heavier than air, so it pools at ground level where it can ignite suddenly.
The National Fire Protection Association recommends checking connections with a soapy water solution every time you reconnect a tank. That's not paranoia. That's the standard.
Second, shipping damage. Burner tubes bend. Igniter wires disconnect.
The grease tray can be jarred out of alignment. When you open the box, you're seeing a snapshot of how the grill survived a truck ride, not how it performed at the factory. A dented burner tube creates an uneven flame pattern that ruins temperature control.
Third, factory film. During manufacturing, metal parts are coated with oils and lubricants to prevent corrosion. When heated, these oils produce smoke and chemical smells that can transfer to your food.
Many grills also use plastic wraps on stainless steel surfaces. One guy posted in a grilling forum about melted plastic drips baked onto his cooking grates because he didn't peel the film off the firebox walls. That's a first cook ruined before it starts.
Then there's carbon monoxide. Never, ever ignite a grill in an enclosed space like a garage or covered porch. It's not just dangerous, it's also illegal in many municipalities for good reason.
Before You Touch a Valve: Unboxing, Packing Materials, and the Owner's Manual
Stop. Put down the pliers. Your first job is not assembly.
It's cleanup.
Remove the grill from its box, and then remove every single thing from inside the grill. Cardboard inserts, foam blocks, plastic bags, zip ties, user manuals, packets of screws. Check the firebox thoroughly.
Check the grease tray slots. Check the side shelves. Manufacturers pack odds and ends wherever they fit.
Next, find the owner's manual. Every grill ships with one, and it's genuinely important. It tells you the fuel type requirements, the regulator style, the recommended leak test procedure, and the burn-off time.
If the manual says run the grill on high for 15 minutes with the lid closed, follow that instruction. If it says 30 minutes with the lid open, follow that. As of 2026, almost every major manufacturer includes this information.
The details vary, and you want the details for your specific model.
One more thing while the box is open. Do a full parts inventory. Lay out every component and compare it against the manual's parts list.
If anything is missing, stop. Do not attempt to assemble or use the grill. Contact the manufacturer's support line.
Missing hardware is annoying, but a missing heat deflector or grease tray is a safety issue.
Fuel Type First: Propane vs Natural Gas, and Why a Mix-Up Is Dangerous
This is the mistake that quietly ruins grills. It's also the easiest one to overlook.
A propane grill is built for liquid propane. It comes with a regulator and a hose that connects to a refillable propane tank, usually a 20 lb standard BBQ cylinder. A natural gas grill is built differently.
It connects directly to your home's natural gas line through a quick-disconnect or a rigid metal line, and it uses a different regulator and larger orifice jets.
If you plug a propane grill into a natural gas line, you get almost no flame. Natural gas supplies about half the energy of propane during combustion, so the burners run cool and weak. If you do the reverse, hook a natural gas grill to a propane tank, you create a fire hazard.
Propane pushes through undersized jets, producing a huge, sooty, dangerous flame. Both scenarios are bad. One is a nuisance, the other is a risk to your property.
So before you assemble anything, check the stickers. Gas grills in the U.S. and Canada carry a certification label from ANSI Z21.58 or CSA 4.8. That label lists the fuel type.
It will say "LP" or "Natural Gas" right on it. If you moved the grill from a previous home or bought it secondhand, check again. And if you want to convert a grill from one fuel type to another, don't just buy a random conversion kit.
You need the manufacturer's specific kit for your exact model.
This is also the moment to think about where the grill will live. A natural gas grill must stay near an existing gas line. A propane grill can move anywhere, but it needs enough clearance from walls, railings, and overhangs.
More on that later.
The Full Walkaround: Burner Tubes, Firebox, Grates, and Ignition System
Once the box is cleared and the manual is read, it's time to get hands-on.
Checking the firebox for debris and packing residue
The firebox is the big metal chamber that holds the burners. Take a flashlight and inspect every inch. You're looking for packing foam, plastic shavings, screws, staples, or anything else that shouldn't be there.
Manufacturing leaves behind metal shavings and dust. That's normal. A quick wipe-down with a damp cloth takes care of it.
Inspecting burner tubes and venturi openings for blockages
Now get low. The burner tubes sit horizontally in the firebox. Each tube has a small opening called a venturi at the end near the gas valve.
This opening pulls in air to mix with fuel. It's the perfect size for a spider to block or a wasp to nest in.
Look through each venturi from the front of the grill. Shine a flashlight inside the burner tube to confirm it's clear. If you see webs or debris, use a pipe cleaner or a narrow bottle brush to clear it.
Do not use a metal skewer to poke through small gas orifices. You can widen the hole and ruin the fuel-air mixture.
Testing the ignition system before connecting gas
Before you hook up any fuel source, test the igniter. With the lid open, push the ignition button and look carefully at the electrodes near each burner. You should see a visible spark jump across the gap.
No spark means a wiring problem, a dead battery, or a misaligned electrode. Here's a common fix for a push-button piezo igniter: simply rotate the knob slowly past the "Ignite" mark while pressing. Sometimes dragging the trigger generates a better spark.
On battery-powered systems, remove the battery cover and confirm the wire connections are snug. Shipping can loosen a spade connector.
If you're standing there pressing the igniter and seeing nothing, do not connect the gas. An unlit burner will flood gas into the firebox, and one delayed ignition can cause a flashback of flames. Fix the spark first.
This walkaround takes ten minutes and catches most problems. When you're done, you can move on to the gas connection, the soapy water leak test, and finally the burn-off.
The Soapy Water Leak Test: Where to Spray and What Bubbles Actually Tell You
This is the step that keeps you from turning your patio into a fireball. Skip the needless risk and test every gas connection before you ignite anything.
The test is simple. Mix a small amount of dish soap with water until it's sudsy. Then apply it to the fittings with a spray bottle or a clean brush.
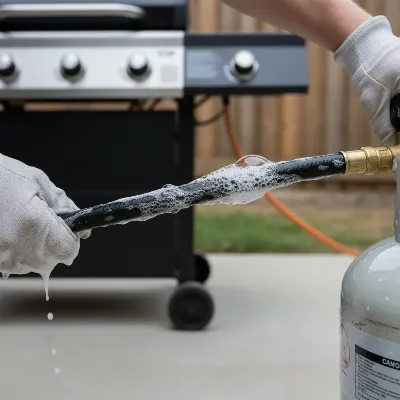
Image source: Bing (Web (fair-use with source credit))
Start at the tank connection. On a propane grill, that's where the regulator meets the tank's valve. The fitting is usually a QCC1 type, so hand-tighten it until it stops.
Then give it a gentle extra quarter-turn if it has a collar or handwheel. Do not use a wrench on a plastic handwheel. You'll strip it.
Open the tank valve slowly and listen. A hissing sound means you have a leak, and it's time to fix things before you test anything else. If it's quiet, spray the soapy water directly onto the connection and watch closely.
Bubbles forming means gas is escaping. Large, growing bubbles are bad. Tiny foam that stays still is fine, since that's just the soap drying.
If you see active bubbling, shut the tank valve, disconnect the fitting, inspect the threads for damage, and reconnect it firmly. Then test again.
Spray every connection along the gas path. That includes where the regulator meets the hose, where the hose connects to the manifold inside the grill, and each valve fitting near the control knobs. The National Fire Protection Association recommends the same soapy-water method in its outdoor appliance safety guidance.
It's the industry standard for a reason.
One side note for natural gas grills. Your test happens at the line connection, not the tank. Shut off the supply valve before you disconnect anything, then apply the soap and water to the fitting.
If bubbles show up, turn off the gas, tighten the connection, and retest.
The First Burn-Off: Time, Lid Position, and What's Normal vs Concerning
Your grill's first real heat is called a burn-off. It burns away factory oils, curing compounds, and any remaining dust from assembly. This is not the moment to throw on burgers.
Here's how to do it right. Make sure the lid is open before you touch the gas. Turn on the tank valve, then slowly open one burner knob to high.
Press the igniter. If the burner lights, repeat for each remaining burner.
Once every burner has a flame, turn them all to high and leave the lid open. Most manuals call for 15 to 30 minutes of burn time. Some manufacturers instruct you to close the lid during the burn.
When in doubt, follow the manual for your specific model. As of 2026, most brands still recommend an open-lid burn-off for the first run.
What you'll see is normal. A light haze of smoke. A faint oily smell.
Maybe some steam coming off the grates. That's the factory residue releasing. After the burn, let the grill cool and wipe down the grates and interior with a clean rag.
Here's what's not normal. Thick black smoke billowing out constantly. A sharp chemical smell that doesn't fade after ten minutes.
Flames climbing up the sides of the firebox. Any of those means you left packing material inside, or a burner is heavily clogged. Shut off the gas immediately, let it cool, and inspect everything again.
Reading the Flames: Blue Notes, Yellow Tips, and the Wobble That's a Red Flag
After the burn-off, you can read your grill's health by looking at the flames. It's a skill that takes two minutes to learn and saves you a headache later.
A healthy gas flame is mostly blue with soft yellow tips. It's steady, quiet, and roughly one to two inches tall. That blue indicates a clean burn with the right mix of fuel and oxygen.
Yellow or orange lazy flames are a warning sign. They mean incomplete combustion. The usual culprits are a clogged venturi, a dirty orifice, or a burner tube that's misaligned.
And if the flame is leaving black soot on your grates, shut it down and inspect the burner path.
A flame that "wobbles" or lifts off the burner is another problem. That can signal the regulator is delivering too much pressure, or the air shutters are open too wide. Controlled flicker in a breeze is fine.
Continuous lifting is not.
And here's the one that stops the party: a loud roar from the burner zone, especially paired with a flame that shoots out through the venturi. That's a dangerous backflow condition. Turn the tank valve off immediately.
Re-seat the burner tubes so they lock onto their valves, then light it again from the start.
The Regulator Bypass: Why a New Grill "Won't Light" When the Tank Is Full
This might be the most common new-grill complaint we see. You connect a fresh tank, turn the knob, press the igniter, and nothing. Yet the tank is clearly full.
What gives?
Your regulator has a safety bypass built in. That small device is designed to limit gas flow if it detects a sudden surge. But the surge can happen just from opening the tank valve too quickly, or from having the burner knobs open while the gas is turned on.
When the bypass trips, gas flow drops to a trickle, so you get no flame or a tiny flicker.
If you were doing the leak test from the previous section, there's a good chance you triggered this without realizing it. That's why many owners panic and think they got a broken grill.
The fix is easy and doesn't require tools. Close the tank valve completely. Make absolutely sure every burner knob on the grill is in the "Off" position.
Then slowly open the tank valve, waiting a few seconds for the pressure to equalize before you light a burner. This resets the regulator's internal safety.
If it still won't light after a proper reset, turn everything off and check the gas hose for kinks. A pinched hose looks fine on the outside but restricts flow. If the hose is clear and the reset didn't help, you may have a defective regulator.
At that point, contact the manufacturer for a replacement part before you do anything else.
First-Use Mistakes: Melted Plastic Film, Over-Tightened Fittings, and Seasoning Too Early
By now, you've done the inspection, run the leak test, and burned off the grill. Before you crack open your first burger, let's review the mistakes that quietly ruin new grills.
Leaving plastic film on metal parts. This is the one that causes the most regrets. Manufacturers wrap grates, firebox walls, and stainless steel shelves in film. If you miss a strip, it melts and burns onto the surface.
It's a pain to scrape off and can ruin your first cookout.
Skipping the inside-the-box check. We said it in the unboxing section, but it's worth repeating. Remove every cardboard insert and foam block from the firebox before lighting. Some grills ship with the grease tray wrapped in plastic inside the drip channel.
Over-tightening connections. More force is not better. Hand-tighten fittings, then give them a modest nudge. Crank them with adjustable pliers and you risk cracking a brass valve or stripping the regulator threads.
That turns a five-second tightening job into a parts replacement.
Seasoning the grates before the burn-off. Seasoning a gas grill usually means coating grates in oil and heating them. If you do that before the first burn, the oil mixes with factory residue and bakes into a sticky mess. Burn first.
Cool. Wipe. Then season if you want.
Lighting with the lid closed. This doubles your risk of a flashback. Always open the lid before turning on the gas. It takes one second and keeps a pocket of propane from igniting in your face.
Treating the tank valve like a light switch. You already know the drill from the regulator section. Open the tank valve slowly. Quick, cranked-open valves are the top cause of a tripped bypass on a brand-new grill.
Skipping the manual because "a grill is a grill." Manufacturers set specific burn-off times, leak-test procedures, and clearance requirements for each model. The manual is not a suggestion. It's the difference between a grill that lasts ten years and a warranty claim in week one.
Take the extra twenty minutes. Your grill, your deck, and your dinner guests will thank you.
Red Flags That Mean Call a Pro or Demand a Replacement
Persistent gas bubbles, dented burner tubes, or a leaking regulator require a replacement part, not a DIY fix. Contact the manufacturer before use.
Placing the Grill Safely: Clearance, Local Codes, and Carbon Monoxide Rules
Keep grills at least 10 feet from structures and never use them in enclosed spaces where carbon monoxide can accumulate.
The 10-Minute Recheck After Your First Real Cookout
After your first cook, cool the grill, empty the grease tray, wipe grates, and recheck gas connections if you moved the unit.
Frequently Asked Questions
How long does the full pre-first-use inspection take?
The full process takes 20 to 30 minutes for most models.
Do I really need to do a burn-off before the first cook?
Yes, it burns off factory oils and residue that cause off-flavors and excess smoke.
What if my new grill smells like paint during the burn-off?
A faint smell is normal for 10 minutes, but shut off the gas if it persists after 20 minutes and check for leftover packing material.
Can I use my new gas grill right away after inspection?
Yes, once the burn-off is complete and the grill cools, it's ready for normal cooking.