You've finally got the grill home, ripped open the box, and now you're staring at a pile of metal parts, wheels, and a bag of bolts that looks bigger than the actual grill. If you're wondering how to assemble a gas grill after purchase, take a breath. It's completely normal to feel overwhelmed.
The good news is that gas grill assembly follows a predictable pattern, and once you understand it, the whole process feels a lot less intimidating.
As of 2026, most standard 3-burner grills ship with 30 to 60 components and a manual that expects you to identify them all without breaking a sweat. Manufacturer specifications indicate that a single person can typically finish the job in 45 to 90 minutes, depending on the brand and how organized you are. The secret isn't brute force or guessing.
The secret is knowing what to look at first, and that's exactly what we're going to walk through.
Image source: Bing (Web (fair-use with source credit))
Quick Answer
How to assemble a gas grill after purchase comes down to four core steps. Lay out and identify every component. Build the cart and attach the wheels.
Install the burners, heat plates, and grates. Finally, connect the gas tank and perform a soapy water leak test.
Why Visuals Make or Break a Gas Grill Assembly
Gas grill manuals are rarely works of art. They're dense line drawings with arrows, dotted lines, and tiny letters pointing to sections of the grill you've never seen before. Most assembly mistakes happen when someone tries to interpret those drawings too quickly and guesses wrong.
That's why a visual approach matters. Every grill has a left panel and a right panel, and those two pieces are often mirror images. Mixing them up forces you to take the whole cart apart.
The same goes for burner tubes. They only seat correctly into the valve openings when the tapered end faces the right direction. A photo or diagram showing the correct orientation saves you twenty minutes of frustration.
The first thing to do, before anything else, is to look at the manual's overall diagram. Get a mental picture of how the finished frame looks. Then isolate the part codes.
In our research, we've seen countless build logs where the most common error is attaching the axle brackets backward. That's not a skill issue. It's a visual interpretation issue.
What You Need Before Opening the Box: Tools, Space, and a Plan
Don't start unpacking until you've set up a real workspace. A clear patio table, a garage floor, or the back of an SUV works. You want enough flat area to spread out the larger panels, plus a small tray or bowl for the small hardware.
You also need the right tools. Most budget grills include a basic wrench, but it's usually flimsy. A proper set makes a big difference.
| Tool | Why You Need It |
|---|---|
| Phillips screwdriver | For most screws and the ignition module cover |
| Adjustable wrench | For tightening regulator connections and larger bolts |
| Socket set (10mm and 8mm) | For the frame bolts that hold the cart together |
| Needle-nose pliers | For cotter pins and small retaining clips |
| Rubber mallet | For tapping stubborn panels into alignment |
| A second person (optional) | For lifting the firebox onto the cart |
Plan for time, too. Set aside about two hours on your first build. Even if the manual says 45 minutes, the first few steps always take longer while you're sorting parts.
And keep the packaging materials nearby in case you need to return a damaged component.
How to Read the Assembly Manual Without Getting Lost
The manual is your friend, even when it looks like it was translated by three different people. The trick is to understand the numbering system.
Most grills label each part with a letter and a number. A1 might be the left frame panel. B3 could be the axle. These codes match a parts list at the front of the manual. Before you do anything, cross-check every part code against that list.
Make sure nothing is missing. Many manufacturers also stamp a code directly onto the actual part. If you're unsure whether you're holding A1 or A2, the stamp settles it.
Diagrams use a few standard visual cues.
- Solid arrows show where a part slides or inserts.
- Dashed lines show where a part sits after assembly.
- A circled area with a letter shows a close-up view of a tricky connection.
- The "exploded view" diagram at the start of the manual shows every component floating in space, roughly in its final position.
Spend two minutes studying that exploded view before you pick up a screwdriver. It gives you the big picture. Then when you reach a confusing step, zoom in on the close-up callout rather than trying to guess from the full-frame drawing.
One thing we've learned from aggregate reviews: the biggest source of confusion is the phrase "hand tighten only." Manuals write that when a bolt has to be adjusted later. Learn to recognize which bolts need to stay loose during the early steps. Usually, they're the ones that attach the wheels or the foldable shelves.
Tightening them too early makes it impossible to align the frame later.
Step-by-Step Visual Assembly Guide
Now it's time to actually build. We're going to work through the process in the order that most grill manufacturers intend, and we'll call out the visual cues that prevent common mistakes.
Laying Out Parts and Sorting Hardware
Open every box and remove all protective wrapping. This is the moment to check that all the parts you identified in the manual are actually in front of you. Manufacturers sometimes pack hardware in separate small bags, don't assume every bolt is in one place.
Sort the hardware by size and label each group. You can use a muffin tin, a plastic egg carton, or a set of small cups. The goal is simple.
When a step says "use four 10mm bolts," you can look at your sorted pile and grab them in five seconds. You'll also spot missing pieces early, which is far better than discovering a gap halfway through the build.
Building the Cart Frame: Wheels, Axles, and Crossbars
The cart is the foundation, and the wheels go on first. Attach the wheel brackets to the two side panels before flipping the cart upright. Place the locking caster on the front and the non-locking wheel on the back, unless your manual says otherwise.
Here's where a visual check matters. Look at the axle holes on the bottom of each panel. The side that has a notch or a pre-drilled guide is usually the front.
When in doubt, test-fit the wheel bracket without tightening the bolts. If the wheel spins freely and the bracket sits flush, you've got the right orientation.
Once the wheels are on, connect the crossbars at the bottom and the top of the cart. Don't fully tighten everything yet. Remember, the frame needs a little flex for the firebox to drop in cleanly.
Finger-tighten the bolts or use your wrench just until they hold, then move on.
Mounting the Burner Tubes and Firebox
This is the most critical step in the entire build. The burner tubes sit inside the firebox, and each tube has a small opening at one end that slips over the gas valve. If that opening doesn't seat fully onto the valve, gas can leak, or the burner will light unevenly.
Place the burner tubes so the larger holes in the tube face upward. The shallow indentation on the bottom should rest on the burner support brackets. You'll feel a soft click when the tube slides over the valve opening.
Don't force it. If it doesn't seat easily, pull it back and rotate the tube slightly. The manual's close-up diagram shows the correct alignment clearly which is exactly what a diagram helps with.
Once all the burners are seated, lower the firebox onto the cart. Align the bolt holes on the firebox rim with the holes in the cart's top frame. Push the securing bolts through and tighten them to the specified torque.
If you over-tighten, the aluminum can strip. Snug, plus a quarter turn, is usually enough.
Connecting the Regulator, Hose, and Propane Tank
Before you connect anything, inspect the hose along its full length. Look for kinks, cuts, or areas where the rubber has crimped. This is a common shipping damage point.
The regulator connects to the propane tank with a threaded fitting. Most modern tanks use a Type 1 connection, which is a large black nut with an internal thread. Right it by hand until it engages, then tighten it maybe a half turn with a wrench.
The valve on the tank should be fully closed before you attach it.
Now, check the hose routing. The manual will show a specific path for the hose, usually through a notch or under a shelf. If it's pressed against the frame, it can chafe over time.
Align it exactly as the diagram shows. Per the Consumer Product Safety Commission, a damaged gas hose is one of the leading causes of grill fires. So this step isn't just about assembly, it's about safety.
Attaching the Lid, Side Shelves, and Grease Tray
The lid is heavy, and it's easiest with a second person. Place the lid on the firebox so the hinge brackets align on both sides. Insert the hinge pins or bolts, but delay tightening them until the lid is aligned.
You want an even gap between the lid and the firebox all the way across. Adjust it before you lock the hinge down.
Side shelves are next. They attach with two or three bolts each. If your shelf folds, make sure the locking lever faces outward.
Then install the grease tray, it slides into a slot below the firebox rim. The tray should catch the drip opening, and the disposable grease cup snaps into the tray's center hole. If the cup doesn't sit level, it will overflow unevenly during your first cook.
At this point, you've completed the physical build. The grill should stand solidly, the lid should close flat, and the wheels should roll straight. In the next part of the article, we'll walk through leak testing, first burn-off, and the inevitable troubleshooting that happens when something feels off.
Key Identifiers: Burner Tubes, Left/Right Panels, and Hardware Codes
The most frustrating part of assembly is when two panels look identical but aren't. Here's how to tell them apart fast.
How to Tell a Left Panel from a Right Panel
Lay the panel flat and study the stamped holes and notches. The left panel usually has an opening for the fuel gauge or hose guide. The right panel typically has the ignition module pre-attached.
If neither panel looks different, compare the bolt hole pattern to the manual's top-down drawing.
Matching Lettered Bags to the Right Bolts
Each hardware bag is lettered to match a specific step. Don't tear open every bag at once. Keep the letters visible as you work, and verify the part count before you start each step.
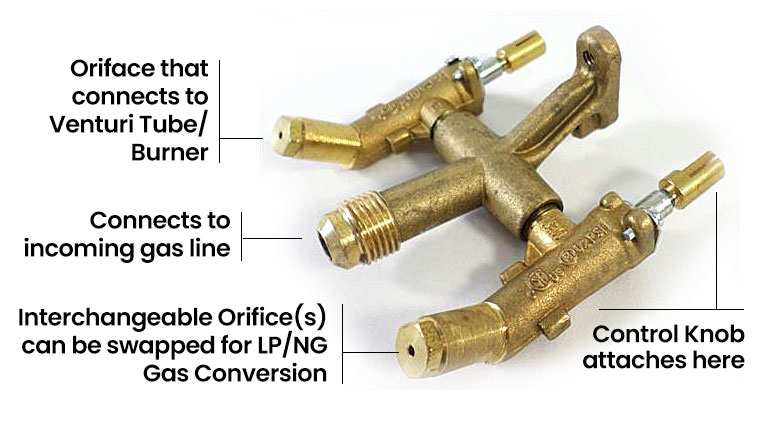
Image source: Bing (Web (fair-use with source credit))
The 6 Most Common Visual Assembly Mistakes (and How to Spot Them)
Even careful builders slip up. These are the errors we see in aggregate reviews, plus the visual cues that expose them.
Misaligned Burner Tubes vs. Valve Openings
The burner tube has a collar that slides over the gas valve nozzle. If the collar doesn't seat fully, the burner won't light. Check the gap between the tube and valve.
It should be closed. If you can see air, the tube isn't seated.
Pinched or Kinked Gas Hoses
A kinked hose restricts flow. A pinched hose can leak. Run your hand along the entire hose after assembly.
The manual shows a clip that keeps the hose away from sharp edges, so don't skip it.
Wheels Installed on the Wrong Sides
The front wheel has a brake tab. The rear wheel is usually larger. If you're unsure, look at how the bracket mounts.
The brake tab must face forward.
Ignition Wires Pinched Under the Firebox
If the ignition wire gets trapped under the firebox, the burners won't spark. Clip the wire into its retaining tabs while the firebox is still slightly raised.
Lid Hinge Bolts Too Tight
The lid needs a little play. Fully torqued hinge bolts make the lid bind. Back them off a half turn so the lid closes easily.
Grease Tray Inserted Backward
The grease tray has a raised lip that directs drippings into the cup. If the lip faces the wrong way, grease pools and burns. Match the tray to the manual's side view.
How to Leak-Test Your Gas Grill Before First Use
Never skip this step. A gas leak is rare, but it's not worth the risk.
Soap and Water Method: What to Look For
Mix one part dish soap with three parts water in a spray bottle. Turn the tank valve off, attach the regulator, then open the valve fully and close it again to pressurize the line.
Spray every connection: the tank, the regulator nut, the hose ends, and the manifold under the burners.
Bubbles mean a leak. If you see bubbles, turn off the gas, tighten that connection, and test again. If bubbles still show, the part may be damaged.
Don't light the grill until it's resolved. As of 2026, every ANSI-certified grill passes a factory leak test, but shipping can shift parts.
First Burn-Off: What the Flame Pattern Should Tell You
Your first cook is a burn-off, not a steak. The grill picks up machine oil and packing residue during assembly.
Turn all burners to high and close the lid. Let it run for 15 to 20 minutes. Watch the flames through the lid gap.
Healthy flames are blue with yellow tips. Lazy orange flames mean a blocked burner tube. You'll see a little smoke during burn-off, which is normal.
Heavy smoke is not.
While you're outside waiting, you'll probably have drinks in hand. Keeping them cold isn't hard if your cooler holds ice well.
Troubleshooting: When Parts Don't Fit, Ignition Fails, or Flames Are Uneven
The bolt won't align. Loosen the two or three bolts around it. The frame needs to flex so the holes line up. Then re-tighten from the center outward.
The ignition clicks but doesn't spark. Check both ends of the ignition wire. Reconnect the electrode. Make sure the battery is fresh.
The flame is too high or too low. Check the regulator connection to the tank. A loose fit creates pressure issues. Per the National Fire Protection Association, the regulator should be hand-tight plus a quarter turn.
The lid won't close flat. The rear heat plates may be sitting too high. Seat them fully into their slots.
If you're still stuck, photograph your assembly and compare it to the manual's exploded view. That photo also helps if you contact support.
DIY vs. Professional Assembly: Time, Cost, and Effort Comparison
You've got two paths to a standing grill: doing it yourself or paying a store crew.
| Option | Time | Typical Cost | Best For |
|---|---|---|---|
| DIY assembly | 45 to 90 minutes | $0 plus your time | People who want to learn their grill's anatomy |
| Store professional assembly | 2 to 4 days wait | $50 to $120 | People with limited mobility or no workspace |
Honestly, store assembly is the smarter choice for budget grills with thin metal parts that strip easily. But if you plan to maintain your own grill, one DIY build teaches you a lot. Just remember that pre-assembled grills still need a leak test after delivery.
Post-Assembly Maintenance: Grease Tray Alignment, Rust Prevention, and Storage
Once the grill is built, a few habits keep it working all season.
Clean the grease tray after every few cooks. Built-up grease catches fire, and that's the main cause of flare-ups.
Prevent rust on the cart and grates. Wipe the grates after each use and apply high-heat paint to any scratched frame sections. Coastal or humid climates need extra attention, so check the bolts and wheels every few months.
Warm weather grilling brings pests, too. Fruit flies love the smell of marinade and leftover grease. Having a dedicated fruit fly spray on hand keeps them off your prep surfaces.
When the season ends, latch the lid and use a waterproof cover. If you're storing the grill indoors, disconnect the propane tank and keep it outside in a cool, shaded spot. While you're winterizing, don't forget your walkways.
Stocking up on rock salt for snow prevents slips before the first storm.
Frequently Asked Questions About Gas Grill Assembly
How long does assembling a gas grill take?
A standard 3-burner grill takes most people 45 to 90 minutes, per manufacturer instructions. First-timers should budget closer to two hours. The extra time goes into sorting parts and reading diagrams.
Can I use my own tools instead of the included wrench?
Yes. A socket set and a Phillips screwdriver are more reliable than the stamped wrench in most boxes. Hand-tighten the bolts, then give each one a half turn with your wrench to secure it without stripping the frame.
What if a part is missing or broken?
Contact the manufacturer's support line with the serial number and the part code from the manual. Most grills ship with a warranty card. Order the replacement through the brand's official site.
Don't substitute hardware from the hardware store unless the manual allows it.
Why does my grill smell like gas after assembly?
A gas smell usually means a connection isn't sealed. Turn the tank valve off immediately and run a soapy water leak test. Check the regulator nut, the hose ends, and the valve openings under the burners.
Do I need to leak-test before every cook?
No. A full leak test is only necessary after assembly or after disconnecting the tank. Do a quick visual check of the hose and regulator each month.
Is it normal for the grill to smoke the first time?
Yes. The first burn-off always produces smoke because machine oils and packing residue are burning off. Let it run 15 to 20 minutes before adding food.
Pre-First-Cook Final Assembly Check
Run this quick check before your first cook. The cart sits level, wheels lock, and the lid closes flat. All gas connections are tight, and the leak test showed no bubbles.
Fix any issue before lighting the grill.
Seasonal Storage and Winter Grill Care
Disconnect the propane tank and store it outdoors in a shaded spot. Cover the grill with a waterproof cover that fits snugly. Remove the cooking grates and wipe them with a light coat of cooking oil to prevent rust.
When to Contact Manufacturer Support
If parts are missing or damaged, reach out within 30 days of delivery. Have your serial number and order receipt ready. Most brands ship free replacements under warranty for original owners.
Common Post-Assembly Performance Fixes
Uneven heat usually means a clogged burner tube. Clear it with a wire brush. Low flame points to a kinked hose or loose regulator connection.
Tighten the fitting and test again.
Long-Term Grill Maintenance Schedule
Wipe cooking grates after every use. Deep clean the firebox and burners every 3 months. Check all gas connections annually before the grilling season starts.
Pre-Cook Leak Test Confirmation
Run the soapy water test on every gas connection one last time. Open the tank valve slowly and watch for bubbles. No bubbles means you're clear to light the grill.
First Burn-Off Protocol
Light all burners on high, close the lid, and run for 20 minutes. This burns off factory oils and packing residue. Light smoke is normal, heavy smoke means a clogged burner.
Common First-Use Fixes
If a burner won't light, check the ignition wire connection first. If flames are uneven, clear burner ports with a paperclip. Never use a match on a broken igniter.
Seasonal Storage Best Practices
Disconnect the propane tank and store it outdoors in shade. Cover the grill with a snug weatherproof cover. Wipe grates with cooking oil to prevent off-season rust.
When to Call a Professional
If you smell gas after multiple leak tests, stop using the grill immediately. Contact the manufacturer for a regulator or hose replacement. Do not attempt DIY repairs on natural gas lines.