Understanding Grub Damage: Signs, Diagnosis, and Treatment
If you've noticed irregular brown patches spreading across your turf, you're probably wondering about the most common underground culprit. You're not alone in this, and the signs are often misunderstood. Let's walk through exactly how to confirm whether these pests are the real problem before you spend money on treatments you might not need.
White grubs are the larval stage of scarab beetles, and they feed on grass roots below the surface where you can't see the damage happening. University extension research notes that treatment thresholds typically start around 6 to 10 grubs per square foot for cool-season grasses. That means a few grubs here and there usually won't warrant action.
The key is learning to distinguish actual grub activity from drought stress, fungal disease, or other issues that produce similar surface symptoms.
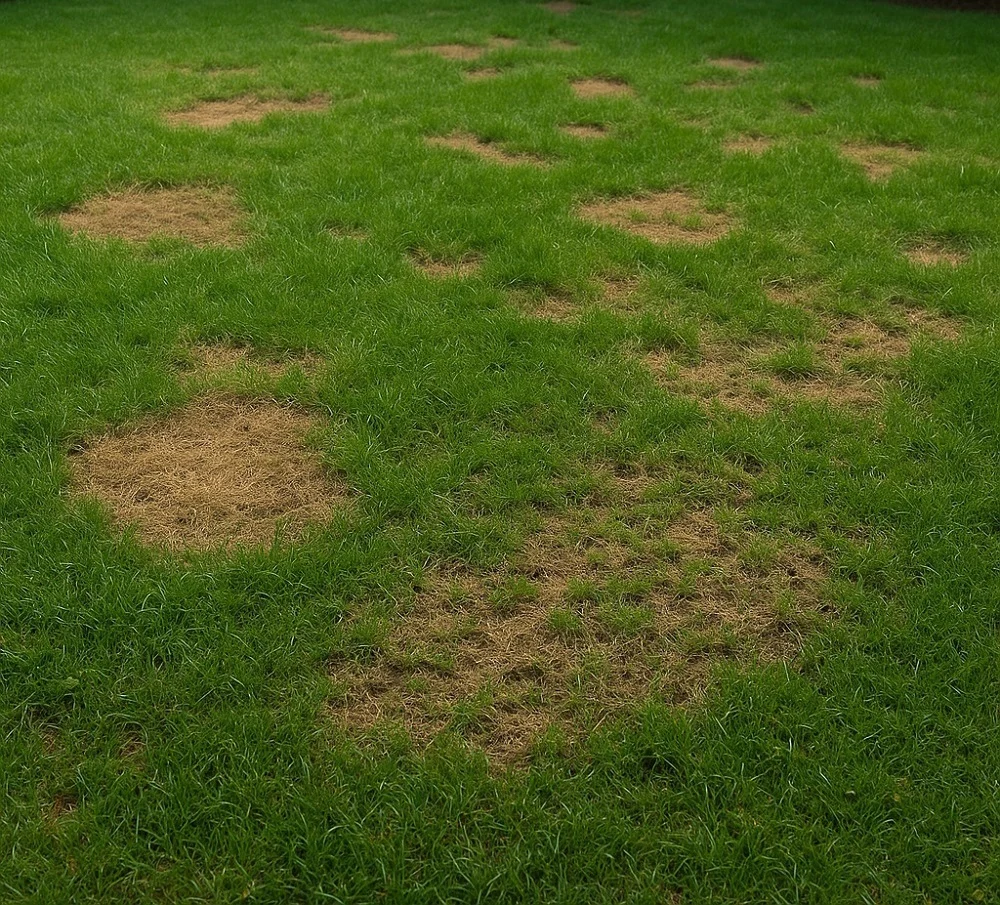
Image source: Bing (Web (fair-use with source credit))
Quick Answer
Look for brown, irregular patches that feel spongy underfoot. The tug test reveals if turf lifts freely from the soil because roots have been severed. Cut a square foot of sod and peel it back to count the grubs directly.
If you find more than 6 to 10 grubs per square foot, treatment is warranted. Confirm the species if possible to choose the right product and timing.
Why Your Lawn Looks Dead (And Why It Might Actually Be Grubs)
Dead-looking grass doesn't automatically mean you have a pest problem. Drought stress, fungal diseases, fertilizer burn, pet urine spots, and poor soil compaction all produce brown patches that can look remarkably similar at first glance. Grub damage specifically causes irregular, spreading patches because the larvae move through the root zone unevenly as they feed.
The affected turf often feels spongy or loose underfoot because the roots have been severed from the soil.
Here's where it gets tricky. Grub damage frequently shows up in late summer and early fall, which is exactly when many lawns also experience heat and drought stress. This overlap causes a lot of people to misdiagnose the problem completely.
If you've been watering regularly and the brown areas keep expanding anyway, that's a strong signal something is actively destroying the root system rather than just heat stress.
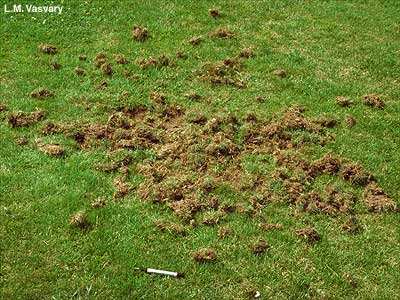
Image source: Bing (Web (fair-use with source credit))
Secondary damage from animals is another telltale clue. Skunks, raccoons, birds, and armadillos dig through turf specifically to feed on white grubs beneath the surface. If you're finding small cone-shaped holes or larger patches of torn-up sod, especially overnight, animals are responding to a grub population below ground.
University Cooperative Extension publications consistently list animal digging as one of the most reliable indicators that a grub problem exists, even before the turf itself turns brown.
The damage pattern also differs from uniform issues like fertilizer burn or dog urine. Grub damage creates an irregular, spreading patch edge rather than a defined circular spot. The affected area expands outward as larvae continue feeding through a zone.
If your brown patches have a ragged, almost map-like boundary rather than clean edges, grubs are higher on the suspect list.
The Fast Way to Tell If You Have a Grub Problem Right Now
Before you grab a shovel, start with the simplest diagnostic check available. Walk across the suspect areas and press down with your foot. Spongy or loose turf that feels like a carpet sitting on top of the ground, rather than anchored into soil, suggests root damage below.
Next, grab a handful of the brown grass and pull upward gently. If the turf lifts away easily, almost like pulling up a corner of a rug, the roots have been largely severed. Healthy grass, even when stressed or drought-damaged, resists being pulled because the root system is still intact and anchored in the soil.
This tug test takes seconds and immediately separates root-damaging pest activity from surface-level stress.
Check the pattern across your lawn. Grub damage typically appears in scattered patches that grow and merge over time, rather than uniform browning across the entire yard. If one section is devastated while an adjacent area with the same sun exposure looks healthy, that patchy distribution points toward a localized root-feeder like grubs rather than broad environmental stress.
Finally, think about the timing. Grubs feed most aggressively from mid-summer through early fall in most climates. If your lawn was performing well in spring and early summer but declined sharply in August or September, the damage timeline matches peak grub feeding activity.
Drought stress, by contrast, often correlates directly with hot, dry periods and improves quickly with rainfall or irrigation.
What Grub Damage Looks Like vs. Everything Else That Mimics It
Getting the diagnosis right matters because the treatment for grubs is completely different from the treatment for fungal disease or drought. Here is how to tell the main mimics apart.
| Condition | Visual Pattern | Turf Texture | Seasonality |
|---|---|---|---|
| Grub damage | Irregular, spreading patches | Spongy, lifts easily | Late summer through fall |
| Drought stress | Uniform thinning, wilting | Firm, roots intact | Mid-summer heat waves |
| Fungal disease (brown patch) | Circular spots, sometimes with "smoke ring" border | May feel damp or matted | Warm, humid nights |
| Dog urine spots | Small, defined circles with dark green outer ring | Firm, roots intact | Year-round, random spots |
| Fertilizer or herbicide burn | Sharp borders matching application pattern | Firm, roots intact | Appears shortly after application |
The tug test is the single best way to separate grub damage from every other condition on that list. Drought-stressed grass, diseased grass, and chemically burned grass all remain firmly rooted. Only grub-damaged turf pulls up with minimal resistance because the underground larvae have destroyed the root structure connecting the grass to the soil.
Pay attention to color progression too. Grub-damaged turf typically turns a dull tan or straw-brown and fails to respond to watering. Drought-stressed grass, by contrast, often shows a blue-gray or purple-gray tint before browning, and it greens up within 24 to 48 hours once moisture returns.
If you water thoroughly and the patch shows zero improvement after three to four days, something more than drought is going on.
The presence of other pests can also cause confusion. Chinch bugs, billbugs, and sod webworms all damage turf but in distinct ways. Chinch bugs cause damage that looks similar to drought but typically starts in the sunniest, hottest areas near pavement or south-facing walls.
Billbugs leave a sawdust-like frass plug inside the stem. Sod webworms create small, irregular brown patches with visible silken tunnels near the thatch layer and surface-feeding activity at night. None of these involve root severing, so the tug test stays negative for all of them.
The Tug Test: Five Seconds to Rule In or Rule Out Grubs
This is the fastest no-tools diagnostic step you can perform, and it reveals more about what's happening below ground than almost anything else. Walk to the edge of a brown patch where the damaged turf meets healthier green grass. That transition zone is where you'll see the most useful difference.
Grab a clump of grass at the patch boundary with moderate force and pull straight up. Healthy grass resists and the blades may tear, but the turf pad stays rooted in the damaged zone. Grub-affected turf, by contrast, rolls back and lifts off almost like a piece of carpet.
You'll see bare soil underneath with little to no root mass remaining, and that exposed surface is where you'll find the grubs themselves if you look.

Image source: Bing (Web (fair-use with source credit))
The tug test works because white grubs feed exclusively on grass roots. They don't touch the above-ground blades, which is why the turf can look almost normal on the surface for days or even weeks while the root system is hollowed out underground. By the time the tops turn brown, the damage below is already severe.
If the turf lifts freely, you have confirmed active root feeding and grubs are the most likely cause.
Test multiple spots across the patch. Grub populations cluster unevenly, pulling up several areas gives you a better picture of how widespread the infestation is. If only one or two small spots lift freely while the rest of the lawn stays firmly rooted, the problem may be early-stage or limited in scope.
A full shift to loose, lifting turf across multiple patches signals a significant population that warrants further counting.
How to Dig, Count, and Actually Confirm What's Living Under Your Grass
The tug test tells you something is wrong. The sod cut tells you exactly how bad it is. This is the step most homeowners skip, and it's the step that separates guesswork from a real diagnosis.
Use a sharp spade to cut a square, roughly 1 foot by 1 foot, through the turf at the edge of a damaged patch. Dig down about 2 to 3 inches and peel the sod flap back like opening a book. Exposed underneath will be the top layer of soil and root zone where grubs live and feed.
Count every visible grub in that square foot of exposed soil and root mat. Look carefully because small larvae can hide in soil crevices and thatch. Flip the sod back down and repeat the test in three to four additional spots across the general area to get a reliable average.
Here is a practical threshold guide based on common university extension recommendations.
| Grubs per sq ft | Grass Type | Recommended Action |
|---|---|---|
| 0 to 5 | Cool-season (fescue, Kentucky bluegrass, ryegrass) | Monitor, no treatment typically needed |
| 6 to 10 | Cool-season | Consider curative treatment, especially if turf is stressed |
| 10+ | Cool-season | Treatment advisable |
| 0 to 4 | Warm-season (bermudagrass, zoysia, St. Augustine) | Usually tolerates this level |
| 5 to 8 | Warm-season | Treatment likely beneficial if damage is visible |
| 8+ | Warm-season | Treatment recommended |
Warm-season grasses often tolerate slightly higher grub populations because their aggressive root systems and stolon/rhizome growth help them recover faster. Cool-season grasses, especially in regions where they're already heat-stressed in late summer, have less ability to outgrow damage and warrant a lower treatment threshold.
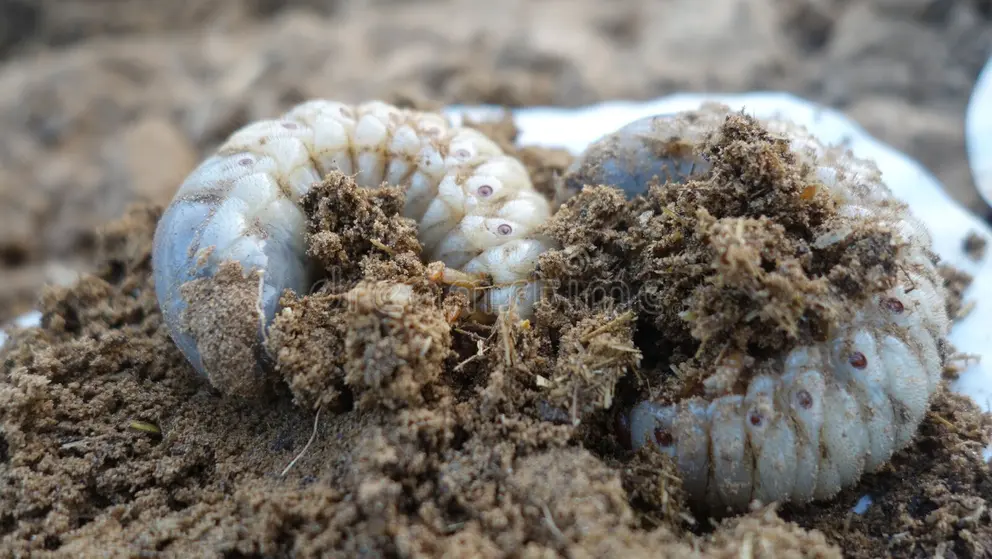
Image source: Bing (Web (fair-use with source credit))
White grubs are cream to white-colored with a distinct brown head capsule and three pairs of visible legs just behind the head. They curl into a characteristic C-shape when exposed to light or disturbed. Size ranges from about ¼ inch for newly hatched larvae up to over a full inch for mature grubs.
If you find small, white, C-shaped larvae with legs in the root zone at the brown patch margin, you have confirmed grub activity beyond any doubt.
Eliminating mimics is the final piece of this diagnosis. Only pull up multiple squares across several damaged areas. Consistently finding grubs in the rooted soil at damaged patches, combined with the texture change and surface browning, rules out drought, fungal disease, or chemical injury as the primary cause.
Once you know the population count, you can decide on treatment based on the thresholds above.
How Many Grubs Is Too Many? Understanding Treatment Thresholds by Grass Type
Finding a few grubs doesn't automatically mean you need to treat. Healthy turf with a deep root system can tolerate a low-level grub population without showing visible damage. The question is how many grubs your specific grass type can handle before the feeding causes real harm.
Cool-season grasses like tall fescue, Kentucky bluegrass, and perennial ryegrass generally have a lower tolerance. University extension programs across the Northeast and Midwest commonly cite 6 to 10 grubs per square foot as the point where treatment becomes worthwhile. Below that range, the grass can usually outgrow the root damage, especially if you're watering and fertilizing appropriately.
Warm-season grasses like bermudagrass, zoysiagrass, and St. Augustinegrass are more resilient. Their aggressive stolon and rhizome growth lets them recover from root feeding faster.
Thresholds for these species often sit around 5 to 8 grubs per square foot, though high-value turf or already-stressed lawns may warrant action at lower counts.
Consider your lawn's overall health when deciding. A thick, well-maintained lawn with good soil can handle more grubs than a thin, compacted, or drought-stressed one. If your turf is already struggling from other factors, even a moderate grub population can push it over the edge.
What Do the Grubs Look Like When You Find Them?
White grubs share a consistent body plan across species, which makes identification straightforward once you know what to look for. They have a cream to white-colored body, a distinct brown or tan head capsule, and three pairs of visible legs clustered just behind the head. Their body curls into a tight C-shape when disturbed or exposed to light.
Size varies by species and age. Newly hatched larvae are tiny, roughly ¼ inch long. Mature grubs of larger species like Japanese beetles and European chafers can reach 1 inch or more by late summer.
Smaller species like the black turfgrass ataenius stay closer to ½ inch even when fully grown.
Species-level identification requires examining the raster pattern, a group of tiny spines and hairs on the underside of the abdomen near the rear end. This pattern differs between species and is the reliable way to tell them apart. For most homeowners, though, confirming that you have white grubs at all is enough to make a treatment decision.
Species identification matters more if you're choosing between preventive products, since some are more effective against certain beetle types.
Preventive vs. Curative Treatment: Timing That Makes or Breaks Your Effort
Treatment timing is arguably more important than product choice. Apply at the wrong time and even the best product will underperform.
Preventive treatment targets young, small grubs that are just beginning to feed. The window for this approach runs from late June through July in most regions, depending on when adult beetles lay eggs. Products containing chlorantraniliprole or imidacloprid are commonly used for prevention.
They work best when applied before or just as eggs hatch, giving the chemical time to be present in the root zone when larvae start feeding.
Curative treatment handles an existing infestation that you've already confirmed. The window here is narrower and later, typically August through early September, when grubs are small and actively feeding near the surface. Products containing trichlorfon or carbaryl are standard curative options.
They act fast but require the grubs to be small enough that the chemical can effectively reach them.
Once grubs grow larger in late fall and move deeper into the soil to overwinter, neither approach works well. If you're finding large grubs in October or November, treatment is usually not recommended. Focus instead on supporting turf recovery and consider a preventive application the following summer.
Biological Options: Milky Spore, Nematodes, and Other Non-Chemical Approaches
Not every situation calls for synthetic insecticides. Biological control methods offer an alternative, especially for homeowners managing lawns where children and pets play regularly.
Beneficial nematodes, specifically Heterorhabditis bacteriophora, are microscopic roundworms that seek out and kill grubs in the soil. They're applied as a liquid drench and need consistent soil moisture to survive and move through the root zone. Nematodes work best when soil temperatures are above 60°F and grubs are present and actively feeding.
Timing and proper application are critical, nematodes are living organisms and won't survive if the soil dries out or if they're applied in direct sunlight.
Milky spore disease, caused by the bacterium Paenibacillus popilliae, specifically targets Japanese beetle grubs. It's applied as a powder and establishes in the soil over time, potentially providing control for several years once established. However, it's less effective against other grub species and takes one to three seasons to build up sufficient levels in the soil.
It works best in regions with established Japanese beetle populations and consistent soil temperatures.
Both biological options are slower-acting than synthetic insecticides and work best as part of a longer-term management strategy rather than a quick fix for an active infestation. They're most effective when applied preventively or at the very early stages of grub activity.
The Mistakes Everyone Makes When Diagnosing Grub Damage
The most common mistake is treating without confirming. Applying grub control product based on brown patches alone, without doing the tug test or sod cut, wastes money and may address the wrong problem entirely. Fungal disease, drought, and grub damage require completely different responses.
Another frequent error is treating too late in the season. By October in most regions, grubs have grown large and moved deep into the soil. Curative products struggle to reach them at that stage, and the damage for that year is already done.
If you're going to treat an active infestation, August and early September are the months that matter.
Overlooking animal damage as a secondary sign is another missed opportunity. If skunks or raccoons are tearing up your lawn nightly, that's strong indirect evidence of grubs even before the turf turns brown. Addressing the grub problem stops the animal digging, treating the animals themselves without addressing the food source below ground just invites new ones.
Finally, many people apply preventive grub product every single year regardless of whether grubs are actually present. If your lawn has never had a confirmed grub problem and you're not seeing animal digging, annual preventive treatment may be unnecessary. Spot-checking with the tug test and occasional sod cuts gives you the data to make that call rather than guessing.
Costs, Seasonal Timing, and Regional Differences That Affect Your Plan
Grub treatment costs vary based on lawn size, product choice, and whether you DIY or hire a professional. A typical curative granular product runs $15 to $30 for enough material to treat 5,000 square feet. Professional lawn care services often charge $50 to $100 per application for the same area.
Timing shifts by region. In the Northeast and Midwest, adult Japanese beetles lay eggs in July, so preventive applications go down in late June through early July. Curative treatments target August and early September.
In the Southeast, the grub-active season extends longer due to warmer soil temperatures, sometimes into October. Your local Cooperative Extension office provides region-specific timing maps that are more precise than general national advice.
Frequently Asked Questions
Can my lawn recover from grub damage on its own?
Yes, if the grub population is low and the grass has a healthy root system remaining. Cool-season grasses can recover in fall when temperatures cool and growth resumes. Watering and light fertilization help speed recovery.
What time of year should I check for grubs?
Late August through September is the most reliable window in most regions. Grubs are present and actively feeding near the surface, making them easy to find with the sod cut method.
Are grub treatments safe for pets when used according to the label?
Most labeled grub products are safe for pets once the material has been watered in and the turf has dried. Always read the specific product label for reentry intervals and application instructions.
How do I know if I need preventive treatment next year?
If you confirmed grubs this season, a preventive application the following summer is a reasonable step. If you've never had a confirmed problem, spot-checking annually is sufficient.
The Bottom Line: What to Do Based on What You Find
Start with the tug test. If the turf doesn't lift freely, grubs are unlikely and you should investigate drought, disease, or other causes. If the turf lifts easily, cut a square foot of sod and count what's underneath.
Fewer than 6 grubs per square foot on cool-season grass? Monitor and support turf health with proper watering and fertilization. More than 10?
Plan a curative treatment for August or early September while grubs are still small and reachable. If you've had grubs before and want to stay ahead of them, a preventive application the following summer eliminates the guesswork entirely.
The key takeaway is simple. Confirm before you treat. A five-minute sod cut saves you from wasting money on the wrong solution and gives you the confidence that whatever you do next is actually addressing the real problem.