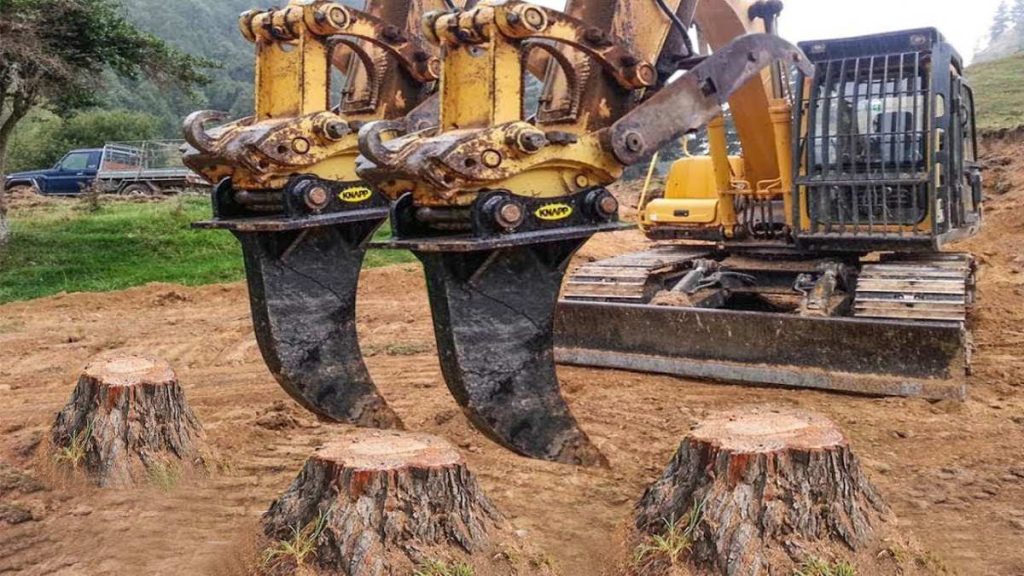
If you've ever walked past a construction site and seen nothing but bare dirt where trees and brush used to be, you've seen grubbing in action. It's one of those terms that gets thrown around on job sites but rarely gets explained to people outside the industry. Understanding what grubbing in construction actually involves helps you see why it matters for everything that comes after.
Grubbing is the process of removing vegetation, roots, stumps, and organic topsoil from a site before any real building or grading work begins. Per ASTM D2487 soil classification standards, organic-rich soils are generally considered unsuitable as bearing material for foundations and fill. That's why grubbing isn't optional on most projects.
It's a deliberate step that sets the stage for stable ground.

Image source: Wikimedia Commons / Kresspahl (talk) 12:37, 30 January 2012 (UTC) (CC BY-SA)
Quick Answer
Grubbing in construction is the removal of trees, brush, roots, stumps, and organic topsoil from a site. It happens after initial clearing and before rough grading. The goal is to expose stable mineral soil or subgrade.
This prevents future settlement under foundations, roads, and other structures. Most specifications require grubbing to a depth of 4 to 12 inches below existing grade.
What Grubbing Actually Means on a Construction Site
Grubbing goes beyond simply knocking down trees or mowing over brush. When a crew clears a site, they're handling the above-ground stuff. Grubbing is what happens when you dig into the ground and pull out everything that would decompose or shift over time.
Think of it this way. Clearing takes care of what you see. Grubbing takes care of what's hiding below the surface.
That includes root systems that can extend several feet beyond the original tree line, buried stumps from old growth, layers of leaf litter and decomposed organic matter, and the dark topsoil layer that's full of humus.
The reason this matters is straightforward. Organic material breaks down. When you leave roots, stumps, and rich topsoil under a foundation or beneath compacted fill, that material slowly decomposes.
Over months and years, it creates voids. Those voids lead to settlement, cracking, and structural problems that are expensive to fix.
On most commercial and residential projects, the grubbing depth runs between 4 and 12 inches below the existing ground surface. The exact depth depends on local soil conditions and what the project's geotechnical engineer specifies. Some sites with deep organic layers, like former wetlands or heavily wooded areas, require going even deeper.
Why Getting Grubbing Wrong Costs You Later
Skipping grubbing or doing it halfway is one of those decisions that looks smart on a budget sheet and turns into a nightmare a year after completion. The problems don't show up immediately, which is what makes this mistake so tempting and so costly.
When organic material gets trapped under fill or beneath a slab, it creates what engineers call a "compressible layer." As that material decomposes, the ground above it sinks. You'll see this as uneven settlement in concrete slabs, cracking in foundation walls, pavement that dips or heaves, and utility lines that break as the soil around them shifts.
Fixing these issues after construction is brutally expensive. We're talking about mudjacking or full slab replacement, foundation underpinning, repaving, and utility repairs. On a residential project, that can run into five figures easily.
On commercial or infrastructure work, the numbers climb into six and seven figures fast.
There's also the schedule problem. If a geotechnical inspector finds organic material in a fill area after compaction has started, they'll likely require removal and rework. That means tearing out work that's already been done, hauling in new material, and compacting again.
It's the kind of delay that ripples through an entire project timeline.
What Gets Removed During Grubbing (and What Stays)
The scope of grubbing is pretty specific, and understanding what comes out versus what stays helps you see why this step requires the right equipment and some judgment in the field.
What gets removed:
- All stumps and root balls, typically to a depth specified in the project documents
- Brush, logs, and woody debris that clearing left behind
- The organic topsoil layer (the dark, humus-rich upper layer)
- Any buried organic material encountered during excavation
- Root systems extending beyond the original tree or brush line
What typically stays:
- Clean mineral subgrade (clay, sand, gravel, or rock with low organic content)
- Existing fill that's been tested and approved by the geotechnical engineer
- Topsoil that's been deliberately stockpiled for later landscaping use
That last point trips people up sometimes. Not all topsoil gets hauled away. On many projects, the good topsoil gets stripped and stockpiled separately so it can be spread back over the site for final landscaping.
The grubbing operation removes the organic material from areas that will receive structures or fill, while preserving usable topsoil for later.
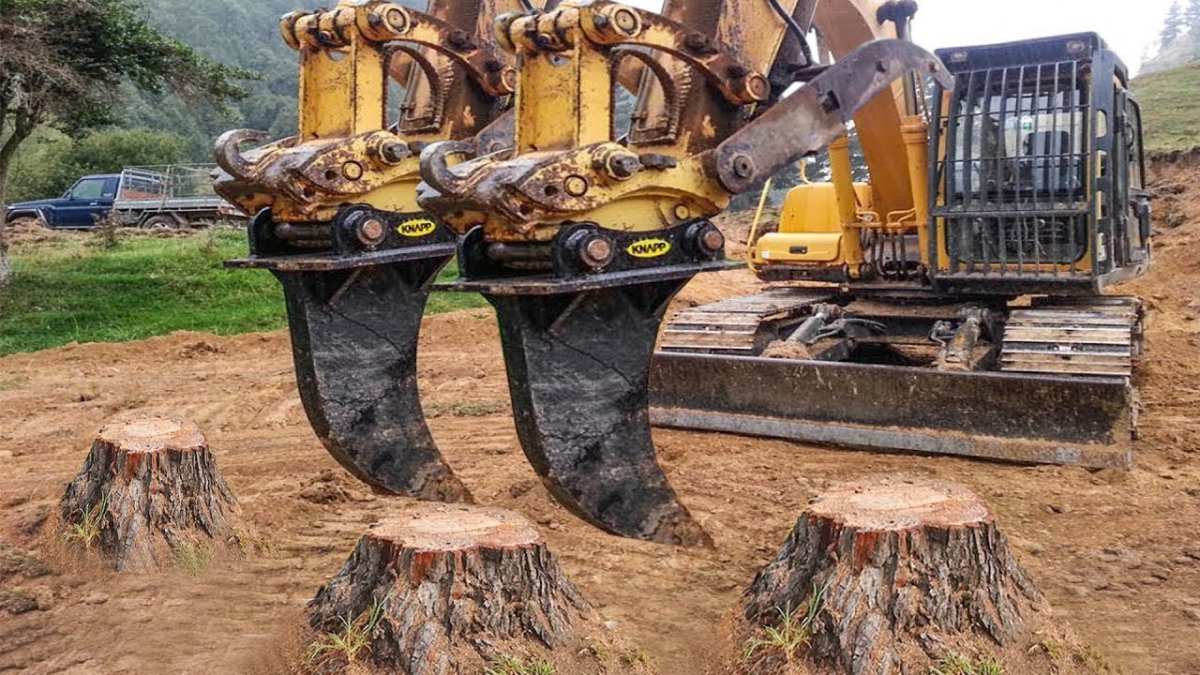
Image source: Bing (Web (fair-use with source credit))
The photo above shows what root extraction looks like in practice. You can see how the excavator is pulling root material from well below the surface, not just scraping the top layer. That depth is what separates proper grubbing from a surface-level cleanup.
How Grubbing Differs From Clearing and Stripping
These three terms get used interchangeably on job sites, but they describe distinct operations with different scopes and purposes. Mixing them up can lead to scope gaps in contracts and confusion in the field.
| Operation | What It Covers | Typical Depth | Equipment |
|---|---|---|---|
| Clearing | Removal of trees, brush, and vegetation above ground | Surface level | Chainsaws, bulldozers, mulchers |
| Grubbing | Removal of stumps, roots, and organic topsoil | 4–12 inches below grade | Excavators, bulldozers with root rakes |
| Stripping | Removal and salvage of topsoil for reuse | Varies, often 4–6 inches | Scrapers, dozers, excavators |
Clearing is always first. You can't grub what you can't reach. Once the above-ground material is out of the way, grubbing exposes the root zone and organic soil layer.
Stripping, when it's part of the scope, usually follows grubbing and focuses on salvaging usable topsoil from areas that won't be built on.
Some project specifications use "clearing and grubbing" as a combined line item, which makes sense since they're sequential steps in the same phase. Others break them out separately, especially on larger sites where the scale of each operation justifies individual tracking.
The key takeaway is that clearing without grubbing leaves the real problem in the ground. You might have a site that looks clean from the surface, but all that buried organic material is still there, waiting to cause trouble under whatever gets built next.
The Equipment That Does the Job
Grubbing isn't a one-machine-fits-all operation. The equipment you need depends on the size of the site, the type of vegetation, and how deep you're going.
Hydraulic excavators are the workhorses for most grubbing jobs. A machine in the 20- to 35-ton range with a thumb attachment can pull stumps, rip out root balls, and strip organic soil efficiently. The thumb gives the operator grip on irregular material that a standard bucket would struggle with.
Bulldozers with root rakes handle larger sites where the vegetation is lighter. The root rake mounted on the front blade catches stumps and roots while pushing soil. This setup works well for clearing brush and small trees across open ground.
Skid steer loaders with forestry mulcher attachments are useful for smaller residential sites or selective grubbing where you're working around existing structures or utilities. They're nimble but limited in depth and power.
Stump grinders come in after the heavy equipment has done the bulk removal. They handle individual stumps that are too large or too deep for the excavator to extract cleanly.
On larger commercial or infrastructure projects, you'll often see a combination approach. A dozer knocks down and pushes the big material, an excavator handles the deep root extraction, and a grinder cleans up what's left. The key is matching the equipment to the scope so you're not overpaying for capacity you don't need.
What a Properly Grubbed Site Looks Like
When grubbing is done right, the site looks almost bare. You're seeing mineral soil, not the dark, rich topsoil that was there before. The surface should be relatively uniform, with no visible stumps, root masses, or chunks of organic debris.
A properly grubbed site has no soft spots when you walk across it. The ground feels firm and consistent. There's no spongy give that would indicate buried organic material.
Any standing water should drain rather than pooling in depressions left by removed root balls.
The grade at this stage isn't final. Grubbing exposes the subgrade, but the actual shaping and compaction come during rough grading. What you're looking for is a clean starting point.
No wood, no roots, no topsoil in areas that will receive fill or structures.
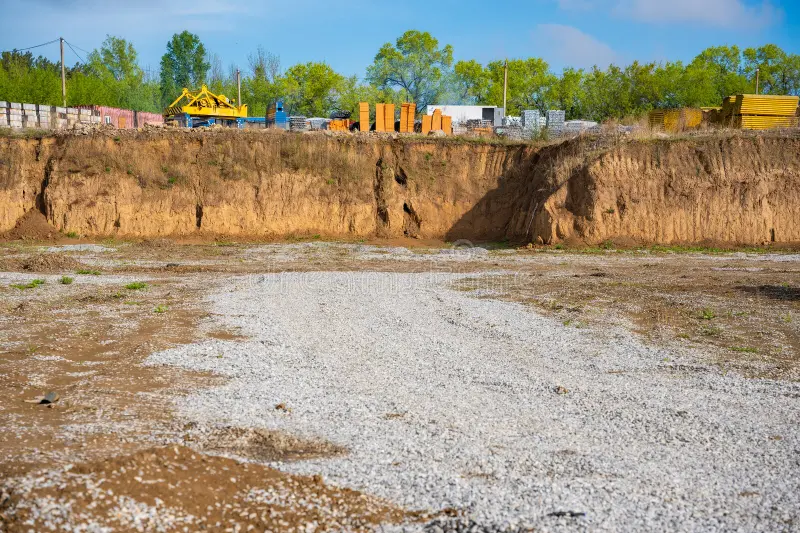
Image source: Bing (Web (fair-use with source credit))
This image shows what that clean starting point looks like. Notice the uniform surface with no visible organic material. That's what the grading crew wants to see before they start moving fill around.
Step-by-Step: How Grubbing Fits Into Site Preparation
Grubbing doesn't happen in isolation. It's one phase in a sequence, and the order matters.
Step 1: Survey and staking. The site gets surveyed and the grubbing limits are staked. This defines exactly where grubbing stops and begins, which is critical near property lines, easements, and tree preservation zones.
Step 2: Utility locates. Before any digging happens, utility locates are completed. Root extraction can easily damage buried lines, so knowing what's below the surface is non-negotiable.
Step 3: Clearing. Trees and brush are cut and removed. This opens up access for the grubbing equipment.
Step 4: Root and stump extraction. The excavator or dozer pulls stumps and root balls from the ground. Material gets loaded into trucks for hauling or pushed to a designated stockpile area.
Step 5: Topsoil removal. The organic topsoil layer is stripped from areas that will receive fill or structures. Usable topsoil may be stockpiled separately for later landscaping.
Step 6: Inspection. A geotechnical engineer or inspector checks the exposed subgrade. They're looking for any remaining organic material, soft spots, or unsuitable soil that needs additional removal.
Step 7: Proof rolling. The site gets proof rolled with a heavy compactor or loaded truck to reveal any soft areas that weren't visible during inspection.
Step 8: Transition to rough grading. Once the subgrade passes inspection, the site moves into rough grading where fill is placed and compacted to design elevations.
Skipping any of these steps creates risk. Moving straight from clearing to fill placement without proper grubbing and inspection is how organic material gets buried and forgotten until it causes problems later.
Common Mistakes That Lead to Settlement and Rework
Even experienced crews make mistakes during grubbing. Some of the most common ones show up repeatedly across project types.
Not going deep enough. If the specification calls for 8 inches and the crew only goes 4, that remaining organic layer is still there. It's still going to decompose. It's still going to cause settlement.
Leaving root fragments behind. Small root pieces might seem harmless, but they add up. A site littered with root fragments has enough organic content to compromise the subgrade over time.
Grubbing in wet conditions. Working saturated soil tears up the subgrade and creates a muddy mess that's hard to inspect and even harder to compact properly. Sometimes waiting a few days for things to dry out saves weeks of rework.
Mixing topsoil back into grubbed areas. If stockpiled topsoil gets accidentally spread back over a grubbed building pad, you've just recontaminated the area. Keeping stockpiles clearly separated and marked prevents this.
Skipping proof rolling. Visual inspection alone won't catch every soft spot. Proof rolling reveals problems that you can't see from the surface. It's a quick step that catches expensive issues.
Poor debris management. Leaving grubbed material piled on site without a disposal plan creates delays and can violate stormwater permits. Have your hauling and disposal arranged before the equipment starts running.
How Much Grubbing Costs Per Acre
Grubbing costs vary widely based on site conditions, but having a realistic range helps with budgeting.
| Site Condition | Typical Cost Per Acre | Notes |
|---|---|---|
| Light brush, minimal roots | $2,000 – $5,000 | Open ground, small vegetation |
| Medium trees and brush | $5,000 – $10,000 | Requires excavator with thumb |
| Heavy timber, deep roots | $10,000 – $15,000+ | Large equipment, more hauling |
| Wet or difficult access | $12,000 – $20,000+ | Slower production, dewatering |
These figures cover the grubbing operation itself: labor, equipment, and hauling. They don't include clearing, which is typically a separate line item. Disposal fees at green waste facilities or landfills add another $30 to $80 per ton depending on your location.
Productivity rates give you another way to estimate. A mid-size excavator on a moderately wooded site might grub a quarter to half an acre per day. A dozer with a root rake on lighter ground can push that to a full acre or more.
Weather, access, and debris disposal logistics all affect the actual pace.
The biggest cost driver is usually hauling. The volume of material increases significantly when it's loosened and loaded. Expect a swell factor of 1.2 to 1.5 times the in-place volume.
That means every 100 cubic yards in the ground becomes 120 to 150 cubic yards in the truck.
When You Can Skip Grubbing (and When You Can't)
Grubbing isn't always required. Some sites have already been disturbed or never had significant vegetation. Knowing when you can skip it saves money, but skipping it when you shouldn't creates the problems we've already covered.
You can often skip grubbing when:
- The site is already cleared and graded from previous development
- Geotechnical investigation shows minimal organic content in the upper soil layers
- The project design calls for deep excavation that will remove the organic layer anyway
- The site is rock or clean fill with no vegetation history
You can't skip grubbing when:
- The site has existing trees, brush, or heavy ground cover
- Geotechnical reports identify organic soils or high organic content near the surface
- The project involves fill placement over existing ground
- Local building codes or project specifications explicitly require it
The decision should always be based on the geotechnical report and the project specifications. If there's any doubt, grubbing is the cheaper option compared to dealing with settlement later. Some projects use a hybrid approach where only building pads and roadways get grubbed while perimeter areas are left alone.
That works when the design accounts for potential settlement in those zones.
Erosion, Stormwater, and Compliance After Grubbing
Once you've exposed bare soil, you've created an erosion risk. Rain hits that unprotected subgrade and starts moving sediment fast. That's where stormwater compliance comes in.
The EPA Construction General Permit requires sites over one acre to have a Stormwater Pollution Prevention Plan in place. Most states have their own versions with similar requirements. After grubbing, you need erosion controls installed before the next rain event.
Key controls after grubbing:
- Silt fence along the perimeter and at any drainage points
- Temporary seeding or mulch on areas that won't be worked for more than 14 days
- Sediment basins or traps for larger sites
- Stabilized construction entrances to track less mud onto roads
- Temporary swales to direct runoff away from exposed areas
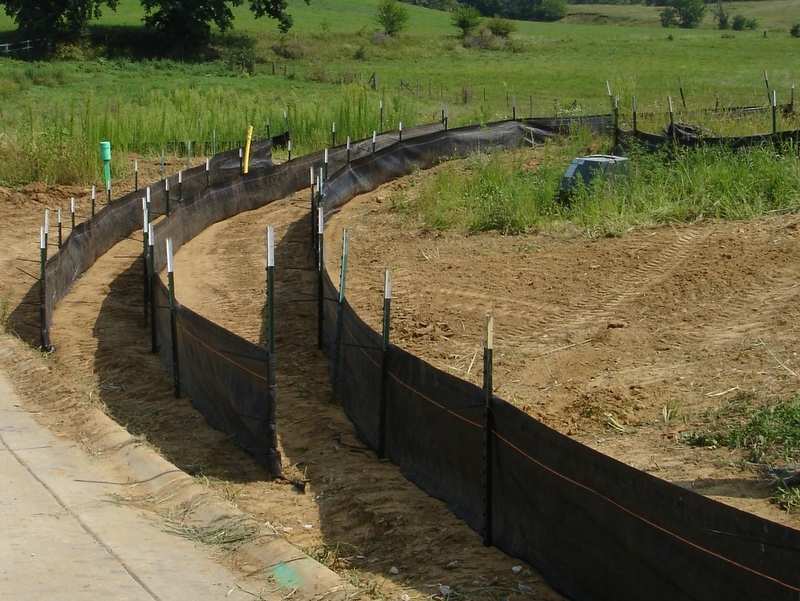
Image source: Bing (Web (fair-use with source credit))
The photo above shows a silt fence installation, which is the most common perimeter control after grubbing. It catches sediment before it leaves the site. Inspectors check these regularly, and a failed or missing silt fence can trigger violations and work stoppages.
Local municipalities may have additional requirements. Some require dust control measures on dry sites. Others restrict grubbing during certain seasons to protect wildlife habitat or prevent erosion during rainy periods.
Always check with your local permitting authority before scheduling the work.
Expert Tips From the Field
A few practical insights that come up repeatedly on job sites.
Schedule grubbing as close to grading as possible. The longer bare subgrade sits exposed, the more erosion risk you carry and the more likely you are to get hit with weather delays. Tightening the gap between grubbing and the next phase reduces both.
Document everything with photos. Before, during, and after. If there's ever a dispute about whether grubbing was completed to specification, dated photos are your best defense. Capture the depth of extraction, the condition of the subgrade, and the erosion controls in place.
Communicate with your disposal facility ahead of time. Green waste facilities have acceptance criteria. Some won't take material over a certain size. Others charge differently for clean wood versus mixed debris.
Knowing their rules before you start loading trucks prevents rejected loads and surprise fees.
Watch the weather forecast. Grubbing in dry conditions is faster, cleaner, and easier on equipment. If rain is coming, either accelerate the schedule or have your erosion controls ready to deploy immediately after the work is done.
Don't forget about buried debris. Old sites sometimes have buried stumps, construction waste, or other surprises below the surface. Budget a contingency for additional removal if the site history suggests anything might be hiding down there.
Real-World Scenarios: Grubbing on Different Project Types
The approach to grubbing shifts depending on what you're building.
Residential subdivisions typically involve full grubbing across the entire site, with topsoil stockpiled for later landscaping. The scale is manageable, and the equipment is usually mid-size. Utility coordination is critical since lots are tight and lines run close together.
Commercial building pads often use selective grubbing. Only the actual building footprint and surrounding graded areas get grubbed. Parking islands and landscape zones might be left alone if they're outside the structural fill area.
This approach saves money but requires clear staking to avoid over-excavation.
Road and highway projects involve linear grubbing along the corridor. The width is defined by the right-of-way and the limits of disturbance. Root extraction depth matters more here because pavement settlement creates safety issues.
State DOT specifications typically dictate the grubbing depth and inspection requirements.
Solar farm preparation has become a major grubbing application as of 2026. These sites are often large, open, and previously agricultural. The grubbing scope might be lighter than a wooded site, but the sheer acreage adds up.
Erosion control is especially important since solar sites often sit for months between grubbing and panel installation.
Pipeline and utility corridors require grubbing along a narrow strip. Access can be challenging, and the work often happens in phases as the corridor gets cleared in sections. Coordination with environmental permits is critical, especially near wetlands or sensitive habitats.
Frequently Asked Questions
How deep does grubbing typically go?
Most specifications require grubbing to a depth of 4 to 12 inches below the existing ground surface. The exact depth depends on local soil conditions and what the geotechnical engineer identifies as the organic layer. Sites with deep root systems or heavy organic soils may require going deeper.
Is grubbing the same as land clearing?
No. Land clearing removes trees and brush above the ground. Grubbing removes stumps, roots, and organic topsoil below the surface.
Clearing always comes first, and grubbing follows as a separate operation.
Who inspects the site after grubbing?
A geotechnical engineer or qualified inspector typically examines the exposed subgrade. They check for remaining organic material, soft spots, and compliance with the specified grubbing depth. Proof rolling is often part of this inspection.
Can grubbing be done in winter?
Yes, but frozen ground makes root extraction harder and slower. Equipment productivity drops, and fuel costs go up. In northern climates, some contractors prefer to grub in fall before the ground freezes and let the site sit through winter with erosion controls in place.
What happens to the material removed during grubbing?
Organic debris gets hauled to green waste facilities, composting operations, or landfills depending on local options. Clean wood may be chipped for mulch or biomass fuel. Usable topsoil is often stockpiled on site for later landscaping use.
How long does grubbing take?
A mid-size excavator on a moderately wooded acre might take one to two days. Larger sites with heavy timber can take a week or more. Weather, access, and disposal logistics all affect the timeline.