To replace the drive control cable on your Craftsman lawn mower quickly and safely, start by disconnecting the spark plug for safety, then locate and loosen the cable connections. Carefully remove the old cable, noting how it’s routed, and install the new one in the same manner before tightening everything back up. Test the mower to ensure smooth operation and proper engagement of the drive.
Replacing the drive control cable on your Craftsman lawn mower may seem daunting, but with a few simple tools and a clear step-by-step process, you can have your mower running like new in no time. This guide will walk you through the essential steps, from removing the old cable to installing the new one, ensuring your mower’s drive system works flawlessly again. Whether you’re an experienced DIYer or a beginner, this straightforward repair will save you time and money while getting your lawn mower back to peak performance.

How to Replace Drive Control Cable on Craftsman Lawn Mower
Understanding the Drive Control Cable and Its Importance
The drive control cable connects the handlebar to the mower’s engine, allowing you to engage the blades and control the mower’s movement. Over time, this cable can wear out or break, making it impossible to operate the mower properly. Knowing how to replace it ensures your lawn mower functions smoothly and safely.
Tools and Materials Needed for Replacement
Before starting, gather all necessary tools and parts to make the process easier and more efficient. These include:
- New drive control cable compatible with your Craftsman mower model
- Screwdrivers (Phillips and flat-head)
- Socket wrench set
- Pliers
- Needle nose pliers
- Work gloves for safety
- Owner’s manual for specific model instructions
Having these on hand will help prevent interruptions during the repair process.
Step-by-Step Process to Replace the Drive Control Cable
1. Prepare Your Workspace
Start by parking the mower on a flat surface. Turn off the engine and disconnect the spark plug wire to prevent accidental starting. Make sure your workspace is clean and well-lit for safety and ease.
2. Access the Drive Control Cable
Locate the drive control cable on your mower. It typically runs from the handlebar down to the transmission. Remove any covers or panels blocking access using screwdrivers or a wrench as needed. Take care not to damage surrounding parts.
3. Remove the Old Drive Control Cable
Trace the cable from the handle to the transmission, noting how it is routed. Loosen any cable clamps or clips holding it in place. Detach it from the handlebar lever by removing connectors or securing clips. Carefully pull the cable out from its routing path, noting its specific placement for reinstalling.
4. Examine the Old Cable and Connectors
Before installing the new cable, compare it closely with the old one. Check for any frayed ends, broken connectors, or corrosion. This step ensures you purchase the correct replacement and understand how the new cable will fit.
5. Install the New Drive Control Cable
Route the new cable along the same path as the old one. Secure it with clips and clamps at the same points. Attach one end to the handlebar lever, ensuring it clicks into place securely. Then, connect the other end to the transmission, following manufacturer specifications for proper attachment.
6. Adjust the Cable Tension
Proper tension is essential for effective control. Loosen or tighten the cable adjuster to achieve a firm but movable connection. Test the handlebar lever to ensure it engages and disengages the mower’s drive and blades smoothly.
7. Reassemble and Test the Mower
Replace any covers or panels removed earlier. Reconnect the spark plug wire. Start the mower and operate the handlebar controls to verify the new cable functions correctly. Make adjustments if necessary to improve responsiveness.
Tips for a Successful Replacement
– Always consult the owner’s manual for model-specific instructions.
– Take photos during disassembly to remember cable routing.
– Use new clips or connectors if the old ones are damaged.
– Double-check cable tension before finishing.
Common Problems and Troubleshooting
If the mower doesn’t respond after replacement:
- Check if the cable is properly connected at both ends.
- Ensure the cable is routed correctly without kinks or sharp bends.
- Adjust the tension to ensure smooth operation.
- Inspect for damaged or worn parts that might interfere with proper control.
Replacing a drive control cable can turn into a simple task when you understand the steps and tools needed. Regular maintenance and timely replacement keep your Craftsman lawn mower functioning efficiently and extend its lifespan.
Related Topics
How to Adjust the Drive Control on a Craftsman Lawn Mower
Proper adjustment of the drive control can prevent issues with gear engagement and improve mower handling. This involves fine-tuning the tension of the control cable and ensuring all connections are tight.
Signs a Drive Control Cable Needs Replacing
- The handlebar lever feels loose or doesn’t engage the drive or blades.
- You notice the cable is frayed or visibly damaged.
- The mower doesn’t respond when you pull the control lever.
- There is unusual noise during operation.
Maintaining Your Lawn Mower for Long-Term Performance
Regular checks of the drive control cable and other moving parts can prevent major repairs. Lubricate the cable as recommended and replace it at the first signs of wear to keep your mower running smoothly.
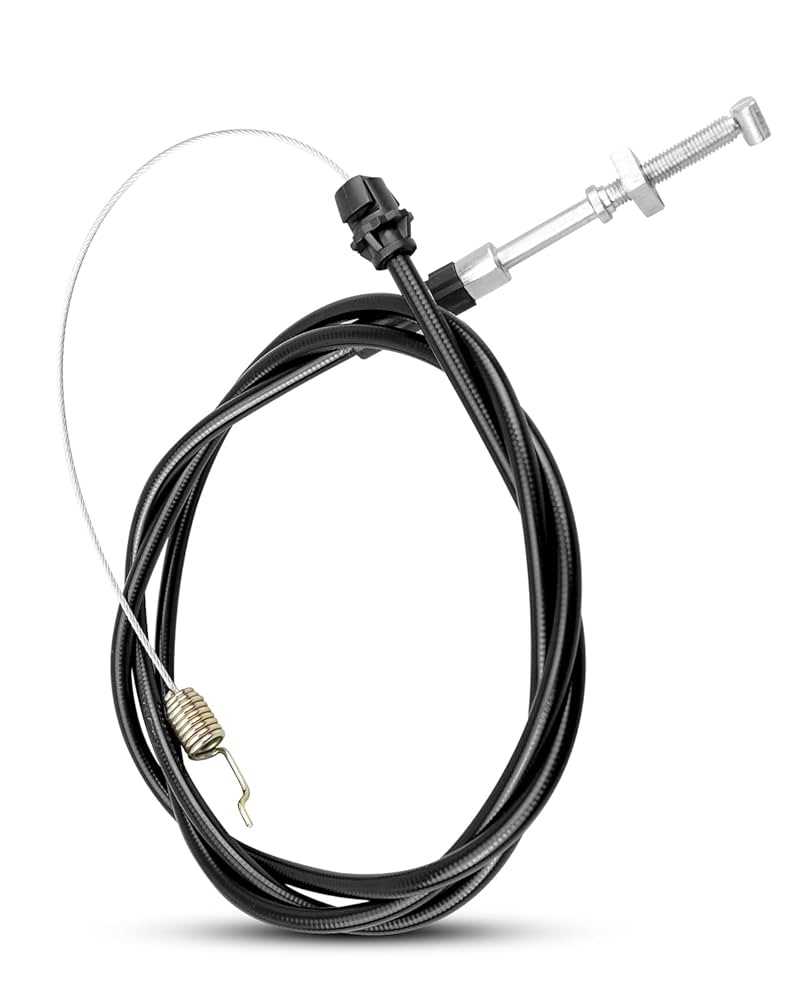
Craftsman Lawn Mower Control Cable Replacement #946-04661A
Frequently Asked Questions
What tools are necessary to replace the drive control cable on a Craftsman lawn mower?
You will need a set of pliers, screwdrivers (Phillips and flat-head), a socket wrench, and possibly a new drive control cable. Having gloves and safety goggles can also help protect your hands and eyes during the replacement process.
How do I access the drive control cable on my Craftsman mower?
Start by turning off the mower and disconnecting the spark plug for safety. Remove the grass catcher and any covers or panels that hide the drive control cable. You may need to tilt or turn the mower onto its side to access the underside, depending on your model. Carefully locate the cable connecting the handle to the drive mechanism.
What steps should I follow to detach the old drive control cable?
First, note how the cable is connected and take pictures if needed to remember the routing. Loosen any clips or brackets securing the cable. Disconnect the cable from the handle lever by removing the retaining clip or screw. Next, detach the cable from the drive mechanism, which might involve unscrewing or unclipping connectors. Be gentle to avoid damaging other components.
How do I install the new drive control cable correctly?
Start by routing the new cable along the same path as the old one. Attach it to the drive mechanism and ensure it moves freely without obstruction. Secure the cable with clips or brackets in their original positions. Connect the handle end to the control lever, making sure all screws or clips are tight. Test the operation before reassembling everything.
What should I verify after replacing the drive control cable?
After installation, engage and disengage the drive control lever several times to verify smooth operation and proper tension. Confirm that the mower moves forward when the control is engaged and stops when released. Reassemble all covers and safety panels, then do a brief test run to ensure everything works correctly.
Final Thoughts
To replace the drive control cable on a Craftsman lawn mower, first disconnect the spark plug for safety. Remove any panels covering the drive mechanism and locate the cable. Disconnect the cable from both the drive lever and the transmission.
Next, install the new cable by attaching it to the drive lever and routing it through the designated pulleys and guides. Secure all connections tightly and replace any panels removed.
In conclusion, understanding how to replace drive control cable on craftsman lawn mower simplifies maintenance. Proper installation ensures smooth operation and extends the mower’s lifespan.