If you're trying to figure out how to clean lawn mower gas cap vent without removing it, the good news is you can usually fix it in under 15 minutes with tools from your drawer. The frustrating part is that a blocked vent mimics carburetor problems almost perfectly, so many people waste money on the wrong repair first.
Gas cap vents are tiny, with most pinhole designs measuring between 0.5 and 1.5mm in diameter per manufacturer specifications from Briggs & Stratton and Honda Power Equipment. That's small enough for a single grass clipping or a film of ethanol residue to seal it shut. Here's what that blockage does to your engine and how to clear it properly.
Why a Blocked Gas Cap Vent Quietly Kills Your Mower's Engine
The gas cap vent is so small that most people never notice it until their mower starts misbehaving. But it's doing a critical job every time the engine runs.
As fuel drains down from the tank, something has to replace that lost volume. That something is air, and the vent is the only pathway in. When it's blocked, the tank develops negative pressure, a partial vacuum, and eventually fuel can no longer flow freely to the carburetor.
The result is a mower that starts fine, runs well for 15 to 30 minutes, then suddenly loses power or stalls. Restart it a few minutes later and it runs again, right up until the pressure builds back up and cuts the fuel flow off again.
This pattern is called vapor lock, and aggregate troubleshooting guides from small engine manufacturers consistently list a blocked fuel cap vent as one of the leading causes of intermittent stalling in walk-behind and riding mowers as of 2026. It costs nothing to fix if you catch it early.
How the Gas Cap Vent Actually Works (And Why It Matters)
The vent is a tiny pressure-equalization pathway built directly into the gas cap. Its job is straightforward: allow outside air into the fuel tank at the same rate that fuel exits toward the carburetor, keeping tank pressure equal to atmospheric pressure at all times.
Without that airflow, the inside of the tank becomes a partial vacuum. The fuel pump or gravity feed has to push against increasing resistance, and eventually it loses the fight. Most vented caps are engineered to pass air inward only, which prevents fuel vapors from escaping back out through the vent during storage or when the mower is tilted.
The vent location varies by manufacturer. It can sit on the side wall of the cap, on the underside, or inside a recessed channel. That exact position matters when you're cleaning it without pulling the cap off.
The Vapor Lock Test: Confirm the Vent Is the Problem Before You Touch Anything
Before cleaning anything, run a quick confirmation test. It takes about 30 seconds and tells you exactly whether the vent is the culprit.
Wait until the engine stalls or reproduces the cutting-out symptom, then turn the engine off. Loosen the gas cap about a half-turn so air can get in freely around the threads, then try restarting. If the mower fires up and runs normally with the cap loose, the vent is blocked. If the problem continues with the cap loose, the issue is elsewhere (fuel filter, carburetor, spark plug).
This works because loosening the cap bypasses the vent entirely. You're letting air in around the cap threads rather than through the vent hole itself.
A few things to keep in mind before running the test:
- Let the engine cool for at least 5 minutes before touching the cap
- Do the test in an open, ventilated area away from ignition sources
- Don't run the mower for extended periods with a loose cap because of fuel splash risk
If the mower passes the vapor lock test, you've confirmed the diagnosis. Move straight to cleaning.
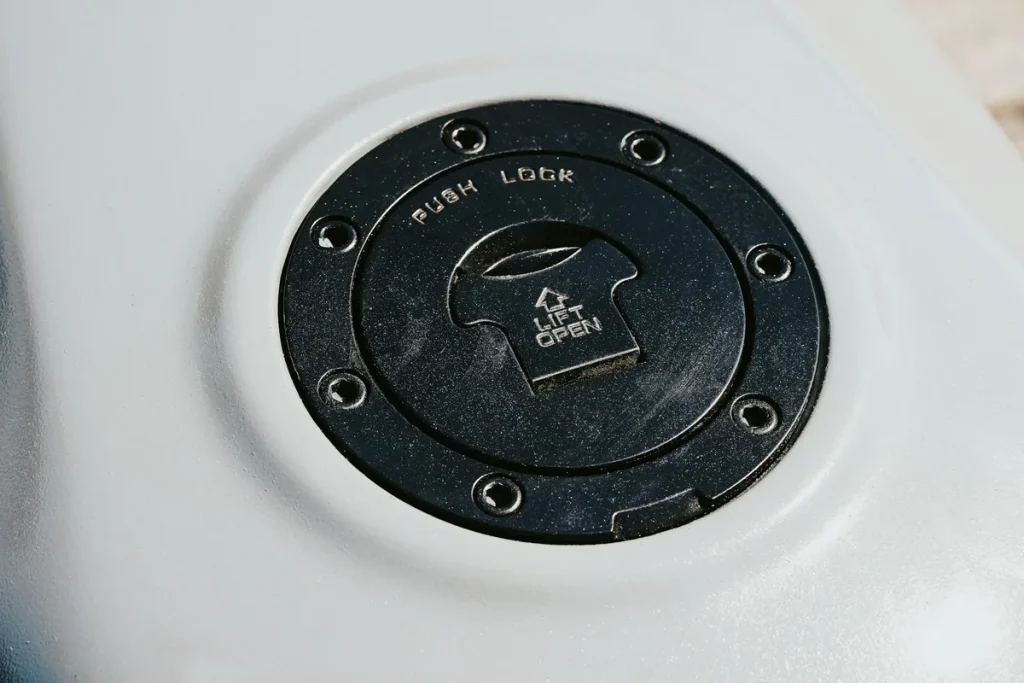
Know Your Cap: The Four Gas Cap Vent Designs and Where to Find Each One
Not all vented caps look the same, and the cleaning method changes depending on which design you're working with. A quick visual inspection before you start saves a lot of guesswork.

Pinhole Side-Wall Vents
This is the most common design on push mowers from Briggs & Stratton, Toro, and Craftsman. You'll find a single small hole, roughly 0.5 to 1mm across, punched into the cap's side wall near the base. It's easy to overlook until you rotate the cap slowly under light. Debris and ethanol gum collect directly in this opening.
Cross-Cut Slot Vents
Some caps, common on older Honda and Husqvarna models, use a cross-shaped or straight slot cut into the underside of the cap body. These slots are slightly larger and easier to clear with compressed air, though fine particles tend to pack along the slot edges.
Filter Mesh Insert Vents
Higher-end caps on commercial mowers and newer riding mower designs use a small filter element housed inside the cap body. You can often spot the mesh by looking down through the vent opening at an angle. These are more clog-resistant under normal conditions but are the hardest to clean in place once the mesh becomes coated with fuel varnish.
Rubber Gasket Vents
Some caps route airflow through small channels molded around the gasket perimeter rather than through a visible hole. The vent pathway isn't obvious here. On these designs, inspect the gasket channel for deformation, cracking, or debris packed into the groove rather than looking for a single puncture point.
Tools You'll Need (Most Are Already in Your Drawer)
You don't need specialized equipment. The most effective tools for this job are ordinary items from a typical garage or kitchen drawer.
- Compressed air can or small compressor with a blow gun nozzle
- Carburetor cleaner spray (a thin-stream extension tube is ideal for precision)
- Sewing needle, straightened paperclip, or 0.5mm-gauge stiff wire
- WD-40 or penetrating oil for varnish or light rust deposits
- Small stiff brush or old toothbrush for surface debris
- Clean rag or paper towels
- Safety glasses
One practical note on choosing your probe tool: the wire or needle should be thin enough to fit the vent hole without enlarging it. Forcing a tool that's too wide can permanently deform the opening, which turns a 10-minute cleaning job into a cap replacement. Check the vent diameter visually before picking your tool, and when in doubt, go thinner.
How to Clean a Lawn Mower Gas Cap Vent Without Removing It
Work through these steps in order. Skipping the early ones (especially cooling the engine) increases the risk of a fuel spill or flash ignition.
Step 1: Let the Engine Cool and Cut the Fuel Supply
Give the engine at least 10 minutes to cool after stalling before you do anything near the fuel tank. If your mower has an inline fuel shutoff valve (common on riding mowers and some Honda walk-behinds), close it now. This prevents fuel from weeping out around the cap threads while you work.
Step 2: Locate and Inspect the Vent Opening
Rotate the cap slowly under good light, checking the side wall, the underside rim, and any recessed channels. Use the design descriptions from the previous section to identify your cap type before picking a cleaning method. If you can't find the vent hole visually, try shining a phone light at a low angle across the cap surface.
Step 3: Clear Surface Debris Without Pushing It Deeper
Use a dry toothbrush or stiff brush to sweep away any loose grass clippings, dirt, or dried fuel residue from the cap surface and around the vent opening. Work outward from the hole, not into it. This step matters because compressed air or liquid cleaner can drive loose debris deeper into the channel if the surface isn't cleared first.
Step 4: Apply Compressed Air From the Outside In
Hold the compressed air nozzle about 1 to 2 inches from the vent opening and use short, sharp bursts. Don't press the nozzle directly against the cap. The goal is to push air through the vent from the outside in (the direction air naturally travels during normal operation), which forces debris out through the tank-side of the hole rather than packing it further in.
Three or four short bursts is usually enough for a light blockage. If the vent is still restricted, move to the next step.
Step 5: Use Carb Cleaner for Varnish or Ethanol Residue
Attach the thin-stream extension tube to a can of carburetor cleaner. Direct a short spray into the vent hole, let it soak for 60 seconds, then follow with another compressed air burst. Carb cleaner dissolves ethanol gum and light varnish deposits that compressed air alone won't shift.
For heavier varnish (common on caps exposed to stale fuel left over winter), apply a few drops of WD-40 or penetrating oil first, let it sit for 5 minutes, then follow with carb cleaner and compressed air in sequence.
Step 6: Use a Needle or Wire Only as a Last Resort
If airflow still feels restricted after the spray-and-blow cycle, carefully insert a sewing needle or 0.5mm wire into the vent hole and work it gently back and forth. Don't rotate or pry. The goal is to break up a compacted deposit, not to enlarge the opening. Follow immediately with another carb cleaner spray and compressed air burst to flush the loosened material out.
Step 7: Confirm Airflow Before You Restart
Hold the cap up to your lips and blow gently through the vent opening. You should feel air pass through with minimal resistance. If it still feels blocked, repeat steps 4 through 6. If it passes freely, the vent is clear.
Re-seat the cap on the tank, open the fuel shutoff if you closed it, and start the mower. Run it for 20 to 30 minutes to confirm the stalling issue is resolved.
What a Clear Vent Looks Like vs a Still-Clogged One
A clear pinhole vent will let you see a tiny point of light through it when you hold the cap up to a light source. With a slot or cross-cut vent, light passes through the slot cleanly with no cloudy or discolored obstruction visible inside.
The blow test described in Step 7 is the most reliable check. A clear vent offers very little resistance to a gentle breath. A partially clogged one feels tight, like blowing through a damp cloth. If you can't pass any air at all, the vent is still blocked and the mower will vapor lock again within 20 minutes of running.
Mistakes That Make the Blockage Worse (Or Damage the Cap)
A few common errors actually set you back rather than help.
Pushing debris inward. Applying compressed air from the tank-side of the cap (if you've partially removed it) forces debris deeper into the vent channel rather than out. Always direct airflow from the outside in.
Using an oversized probe. A straightened wire coat hanger or similar thick tool won't fit a 0.5mm pinhole vent without deforming it. Once the vent hole is widened, the cap vents too freely and fuel vapors escape. The only fix at that point is a replacement cap.
Spraying carb cleaner with the cap still on the mower. The solvent can run down into the tank threads or contact a hot engine surface. Remove the cap (or at minimum hold a rag behind it) before directing any spray at the vent.
Replacing a vented cap with a non-vented one. Non-vented caps are sold as replacements and are physically identical to vented designs in many cases. Installing one permanently blocks atmospheric equalization. Always confirm "vented" is listed in the replacement cap specification before buying.
When Cleaning Isn't Enough: Replace or Repair the Cap
Cleaning solves most blocked vents, but there are a few situations where replacement is the right call.
If your cap uses a filter mesh insert and the mesh is saturated with hardened varnish, compressed air and carb cleaner won't fully restore it. The filter element can't be replaced independently on most OEM designs, so the whole cap goes.
Cracks in the cap body, a deformed gasket channel, or a vent hole that's been visibly enlarged by an oversized probe all mean the cap can no longer seal or vent correctly. Running a mower with a cracked or non-sealing cap is a fire hazard.
Replacement caps are inexpensive. OEM caps for common Briggs & Stratton, Toro, and Craftsman mowers typically run between $5 and $15. Honda OEM caps sit toward the higher end, around $15 to $25. Aftermarket caps are widely available and generally reliable for standard residential mowers, though commercial and CARB-compliant equipment often requires an OEM match to meet emissions specifications.
When ordering, confirm the replacement is listed as vented and verify the part number against your mower's model and serial number. The Honda Power Equipment parts portal allows part lookup by model number, which removes the guesswork on compatibility.
Safety Rules You Cannot Skip When Working Near a Fuel Tank
Fuel vapors are heavier than air and collect low to the ground, where a spark or hot surface can ignite them without warning. These aren't theoretical risks.
- Work outdoors or in a garage with the door open, never in an enclosed space
- Keep all ignition sources (power tools, running engines, open flames) away from the work area
- Never work on a hot engine. Gasoline ignites at contact temperatures well below what a recently run engine surface reaches
- If fuel spills on the cap or surrounding area, wipe it away with a rag and let vapors dissipate for several minutes before any attempt to restart
- Dispose of fuel-soaked rags in a metal container outdoors, not a plastic bin or cardboard box
These precautions apply whether you're doing a 5-minute vent cleaning or a full fuel system service. The risk doesn't scale with the complexity of the job.
How to Stop the Vent From Clogging Again
Most repeat blockages come from one of two sources: ethanol-blended fuel left to degrade in the tank, or grass clippings packed against the cap during mowing. Both are easy to prevent.
Fuel habits that reduce vent buildup:
- Use a fuel stabilizer (such as Sta-Bil 360 or Sea Foam) any time the mower will sit for more than 30 days. Ethanol-blended fuels (E10 and E15) begin forming gum deposits within 60 days without stabilizer.
- Avoid E15 fuel in small engines where possible. Manufacturer documentation from Briggs & Stratton and Honda explicitly warns that E15 accelerates deposit formation in fuel system components, including vented caps.
- At end of season, either add stabilizer and run the engine for 5 minutes to circulate it, or drain the tank completely. A dry tank can't varnish a vent.
Storage and maintenance habits:
- Wipe the cap and surrounding tank area clean after every use. Grass clippings that dry against a side-wall pinhole vent compact into a firm plug over multiple mowing sessions.
- Inspect the vent visually at the start of each mowing season. A quick look with a phone light takes 30 seconds and catches early-stage buildup before it causes stalling.
- Store the mower with the cap facing away from dust accumulation where possible, particularly in shared garages where sawdust or fine debris is present.
A clean vent at the start of spring means you're unlikely to deal with vapor lock mid-season. It's one of those small checks that saves a frustrating breakdown at the worst possible time.
FAQs
Can I use WD-40 alone to clean a clogged vent?
WD-40 works as a pre-soak to soften varnish and light rust deposits, but it doesn't fully dissolve ethanol gum on its own. Apply it, let it sit for 5 minutes, then follow up with carburetor cleaner and compressed air for a proper clean.
How often should I clean the gas cap vent as routine maintenance?
Once per season is sufficient for most residential mowers running on E10 fuel with regular use. If you're using E15, storing the mower for extended periods, or mowing in dusty or debris-heavy conditions, check the vent twice a season.
What if my gas cap has no visible vent hole?
Two possibilities: the cap is a non-vented replacement that was installed incorrectly at some point, or venting happens through a separate fuel tank breather tube routed elsewhere on the mower. Check your mower's operator manual or the manufacturer's parts diagram to confirm which design your model uses.
Can a clogged vent actually damage the engine?
The blockage itself doesn't cause mechanical engine damage. The issue is fuel starvation under vacuum pressure, which makes the engine run lean and stall. Repeated stalling under load can stress the recoil starter over time, but the engine internals are not at risk from the vent problem alone.
My mower still stalls after cleaning the vent. What next?
If the vapor lock test (loosening the cap) no longer resolves the stalling, the vent isn't the cause. Check the inline fuel filter first (a blocked filter produces identical symptoms), then inspect the carburetor needle and seat for varnish buildup. A clogged fuel filter on most walk-behind mowers costs under $5 to replace and is worth swapping before moving to carburetor work.