To change riding lawn mower blades without removing the deck, safely tilt the mower to access the blades while keeping the deck attached. Start by disconnecting the spark plug to prevent accidental starting, and then carefully tilt the mower to reach the blades from underneath. Use the proper tools to remove the blades, flip or replace them, and reassemble everything securely.
The quickest way to change riding mower blades without removing the deck involves tilting the mower for easy access, disconnecting the spark plug for safety, and using the right socket or wrench to remove and replace the blades. This method saves you time and effort while ensuring the job is done safely and effectively.
If you’re tired of the hassle of removing the entire deck just to swap out your mower blades, don’t worry—there’s an easier way. By tilting your mower and working from underneath, you can replace or sharpen blades without the full removal process. This approach not only cuts down on work but also minimizes downtime, making lawn maintenance less of a chore. Just remember to always prioritize safety—disconnect the spark plug, secure the mower, and wear protective gloves to keep yourself safe while working underneath. With a little know-how, you’ll have your blades swapped out in no time, keeping your lawn looking pristine without the extra hassle.

How to Change Riding Lawn Mower Blades Without Removing Deck
Changing the blades on your riding lawn mower is essential for maintaining a healthy, even cut and prolonging the life of your equipment. Many people worry that they need to remove the entire deck to replace the blades, but with the right approach, you can do it without that hassle. This method saves time and effort, making mower maintenance more straightforward and less intimidating. Let’s explore the step-by-step process along with important tips to ensure safety and effectiveness.
Understanding Why You Can Change Blades Without Removing the Deck
Many modern riding mowers are designed with easy access points that allow you to replace blades without detaching the entire deck. This design helps to save effort and reduces the risk of damaging other parts during maintenance. Knowing your mower model and its specific features is crucial because some decks may require removal, but most standard models do not.
Preparing Your Equipment Before Changing Blades
Safety should always come first. Start by parking your mower on a flat, level surface, and engaging the parking brake. Turn off the ignition and remove the key to prevent accidental starting. Wear sturdy gloves to protect your hands from sharp blades and eye protection to guard against debris. Gather all necessary tools, including a socket set, wrench, and perhaps a rubber mallet.
Locating and Accessing the Blade Area
Most riding mowers have accessible panels or openings near the blade area. Depending on your mower model, you might need to tilt the mower deck slightly or access blades from the side. Carefully tilt the mower or lift the deck using built-in lift points, if available, to gain clear access.
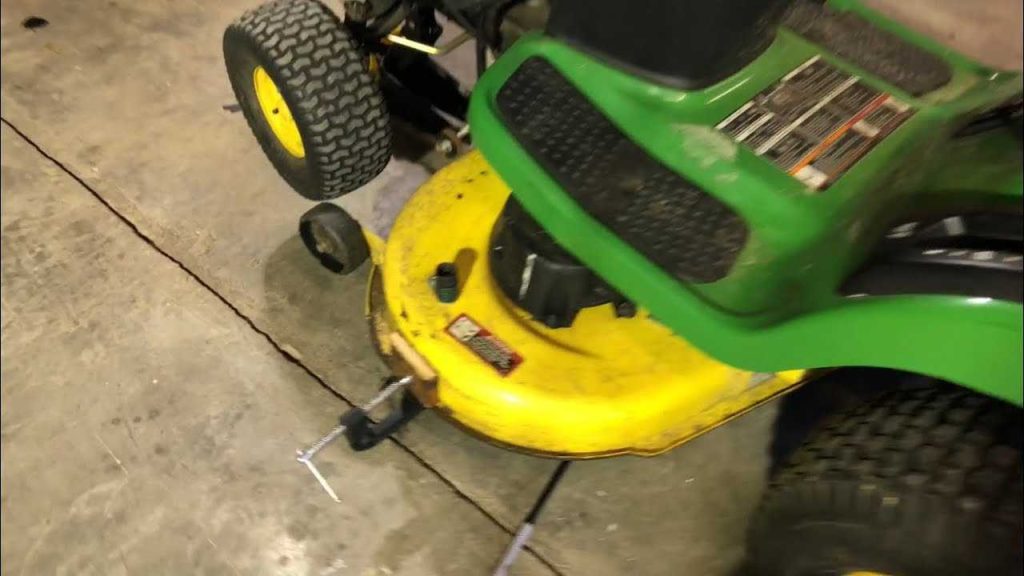
Safely Securing the Blade Before Removal
Before touching the blade, you must prevent it from turning. Insert a block of wood or a specialized blade holder between the blades and the mower deck to keep them stationary. Alternatively, use a wrench on the blade bolt to hold the blade in place while loosening the nut. This step is vital for your safety and to prevent damaging the blade or mower.
Loosening and Removing the Blade
Using a socket wrench, turn the blade bolt counterclockwise to loosen it. If the bolt is stubborn, apply penetrating oil and allow it to sit for a few minutes. Use a rubber mallet to gently tap if needed, ensuring not to damage the blade or the deck. Once the bolt is removed, carefully lift the blade away from the mower.
Inspecting the Blade and Surrounding Parts
While the blade is off, examine it for signs of damage such as dents, cracks, or excessive wear. Check the spindle, blade adapter, and mounting hardware for signs of rust or damage. Replace any worn or broken parts to keep your mower functioning efficiently and safely.
Choosing the Right Replacement Blade
Selecting the correct blade is essential for optimal cutting performance. Measure the length and width of your existing blade and note the type — whether it’s a standard, mulching, or high-lift blade. Consult your mower’s owner’s manual or the manufacturer’s specifications to ensure compatibility.
Key Points for Blade Compatibility
- Blade length and width
- Blade type (standard, mulcher, high-lift)
- Center hole size for mounting
- Number of mounting holes and their placement
Replacing the Blade Without Removing the Deck
Position the new blade carefully in place, aligning it with the mounting holes. Thread the bolt by hand to prevent cross-threading, then tighten it securely with a wrench. Use a torque wrench if specified by the manufacturer to avoid over-tightening, which can damage the blade or spindle.
Ensuring Proper Blade Alignment and Balance
Proper alignment is critical for smooth operation and safety. After tightening, check that the blade is centered and spins freely without wobbling. Balanced blades help prevent excessive vibration, which can damage the mower and affect cut quality.
Final Steps: Checking and Testing
Once the new blade is securely attached, remove any blocks or tools used to secure it. Lower the mower deck if it was tilted, and double-check all hardware for tightness. Turn on the mower briefly and observe the blade’s movement; listen for unusual noises or vibrations, which could indicate misalignment.
Maintenance Tips to Prolong Blade Life
Regularly sharpen your blades to ensure a clean cut and reduce strain on your mower. Replace blades when they become noticeably dull or damaged. Always perform blade maintenance when the mower is off and the blades are secured to prevent accidents.
Additional Tips and Tricks
- Keep your blades clean of grass and debris after each use to prevent corrosion.
- Use manufacturer-approved blades for best results and safety.
- Check your mower’s manual for any specific instructions or torque settings.
- Consider balancing blades with a blade balancing kit for optimal performance.
- Wear protective gloves and eye gear to prevent injuries from sharp blades or debris.
Common Mistakes to Avoid During Blade Replacement
Avoid these pitfalls to ensure your safety and prevent damage:
- Not securing the blade properly before loosening the bolt
- Over-tightening or under-tightening the blade bolt
- Using incorrect tools or incompatible blades
- Ignoring signs of damaged or worn-out parts
- Forgetting to check blade balance after installation
Benefits of Changing Blades Without Removing the Deck
Performing blade replacements without removing the deck saves significant time and effort, especially for those with limited strength or mobility. It reduces the risk of damaging other deck components and allows for quicker routine maintenance. Additionally, this method minimizes the need for complex tools or professional help in most cases.
Replacing riding mower blades without removing the deck is a practical skill that keeps your mower running smoothly and safely. Proper preparation, safety precautions, and attention to detail ensure a successful blade change. With the right tools and a bit of patience, you can maintain your mower efficiently and keep your lawn looking its best.
Change Your Riding Lawn Mower Blades Without Taking Off the Deck – Troy-Bilt Pony
Frequently Asked Questions
What tools do I need to change riding lawn mower blades without removing the deck?
To change your riding lawn mower blades without removing the deck, you need a socket wrench, a socket that fits the blade bolt, a breaker bar for extra leverage, and possibly a block of wood or jack stands to stabilize the deck. Some models may require a blade removal tool or wrench specific to your mower. Always ensure you have the right size tools to avoid damaging bolts or blades during the process.
How can I access the blades if I don’t remove the mower deck?
Many riding mowers allow you to tilt the deck or access blades through side panels. You can tilt the mower deck to a manageable angle, providing enough space to reach the blades. Some models feature removable side panels that give direct access to the blades without detaching the entire deck. Always check your mower’s manual for specific instructions on accessing blades without full removal.
What steps should I follow to safely change the blades without removing the deck?
Start by disconnecting the spark plug to prevent accidental starting. Engage the parking brake and elevate the mower using a jack if necessary, ensuring the mower is stable. Use the appropriate tools to loosen and remove the blade bolts, then slide the blades off carefully. Before installing new blades, inspect the spindle and surrounding components for wear or damage. Reinstall the blades securely, tighten the bolts properly, and lower the mower back to the ground. Always wear gloves and eye protection throughout the process.
Are there risks involved in changing blades without removing the deck, and how can I avoid them?
Changing blades without removing the deck can pose risks such as incomplete access to bolts, accidental injuries, or damaging components. To avoid these issues, ensure the mower is turned off, the spark plug is disconnected, and the mower is stable. Use the correct tools and follow manufacturer instructions carefully. If you feel uncomfortable, consider removing the deck for easier and safer access.
Can I replace blades on all riding mower models without removing the deck?
Not all riding mower models allow blade replacement without removing the deck. Some decks are designed for easy side access, while others require full removal for blade maintenance. Consult your mower’s manual or contact the manufacturer to determine if your specific model supports blade changes without removing the deck. For models that don’t, removing the deck is the safest and most straightforward method.
Final Thoughts
Changing riding lawn mower blades without removing the deck is straightforward with the right approach. First, disconnect the spark plug for safety. Use a block of wood to prevent the blade from turning, then loosen the bolt securing the blade.
Remove and replace the blade, ensuring it is oriented correctly. Tighten the bolt securely before testing your mower. Knowing how to change riding lawn mower blades without removing deck saves time and effort, making maintenance easier.