I've spent years helping homeowners and turf managers figure out what's actually killing their grass, and grub damage is one of the most misdiagnosed problems out there. If you're staring at brown patches and wondering what does grub lawn damage look like, you're not alone. The tricky part is that it mimics several other common lawn issues, so most people waste time and money on the wrong fix before they ever get to the real culprit.
The good news is that grub damage has a very specific set of visual and tactile clues once you know what to look for. In our research, university extension services consistently cite a treatment threshold of 5 to 10 grubs per square foot, depending on your turf species and overall lawn health. Let's walk through exactly what to check, step by step, so you can confirm whether grubs are the problem and decide what to do next.
Quick Answer
Grub lawn damage appears as irregular brown patches that feel spongy underfoot. The turf pulls up easily from the soil like loose carpet because the roots have been severed. You'll find C-shaped white larvae in the top 1 to 3 inches of soil beneath the damaged areas.
Secondary signs include skunks, raccoons, or birds digging into your lawn to feed on the grubs.
The Visual Signs of Grub Lawn Damage (And How to Spot Them Before It's Too Late)
Grub damage doesn't look like a neat, uniform problem. That's actually your first clue. Unlike fertilizer burn or dog urine spots, which tend to show up as distinct circular patches, grub damage creates irregular, spreading dead zones that don't follow any clean pattern.
The patches start small, maybe the size of a dinner plate, but they expand quickly. By late summer or early fall, several patches can merge into large swaths of dead or dying grass. The color progression matters too.
The grass typically turns a straw-brown or yellowish-tan, and it won't green up no matter how much you water it.
Here's what sets grub damage apart visually:
- Irregular shape: The edges are uneven and blend into surrounding healthy grass rather than forming a clean circle.
- Patch clustering: You'll often see multiple damaged areas scattered across the lawn rather than one isolated spot.
- Progressive spread: The damage gets noticeably worse over a 2 to 3 week period during peak feeding season.
- No response to watering: The brown areas stay dead even after a thorough soaking, which is a major red flag.
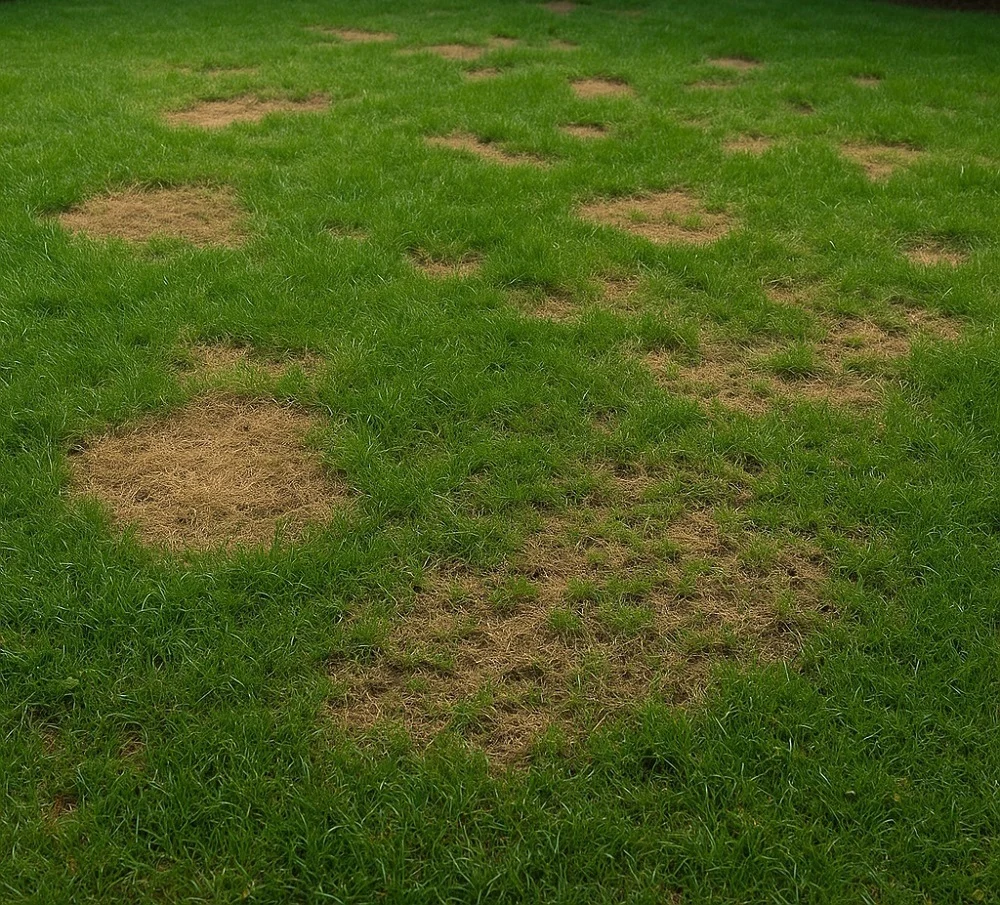
Image source: Bing (Web (fair-use with source credit))
The spongy feel is another dead giveaway. Walk across the damaged area and pay attention to how the ground feels under your feet. If it seems loose, bouncy, or almost marshy despite dry conditions, that's because the root system anchoring the turf to the soil has been chewed away.
The sod is essentially sitting on top of the ground with nothing holding it down.
What Grub Damage Actually Looks Like on Your Lawn
Let's get specific about what you're seeing at ground level. Grub-damaged turf has a distinct appearance that differs from almost every other lawn problem once you train your eye to spot it.
The grass in affected areas doesn't just turn brown. It thins out first, then dies in patches that look almost scraped or peeled away. When you get down to lawn level, you'll notice the individual grass plants have no root structure left.
They're just sitting in loose soil, barely anchored.
Key visual identifiers include:
- Detached sod: The turf separates from the soil with almost no resistance. You can grab a handful and lift it cleanly.
- Loose, crumbly soil surface: Without roots binding the top layer, the soil feels loose and granular under the dead grass.
- Wilted or dried grass blades: Even if the soil is moist, the grass looks drought-stressed because the roots can no longer transport water.
- Patch edges that peel back: The boundary between dead and living grass often looks like a carpet that's been partially rolled up.
The damage is most visible from August through October in most regions, though in warmer climates it can persist into November. That's because grubs do the heaviest feeding in late summer and early fall before they burrow deeper for winter. If you're seeing this pattern, grubs should be high on your suspect list.
The Simple Pull-Back Test (This Is Your Best Diagnostic Tool)
Forget expensive tests or guesswork. The pull-back test is the single most reliable way to confirm grub damage, and it takes about 30 seconds.
Here's how to do it:
- Choose a patch edge: Go to the border between the dead area and healthy grass. That's where grubs are most actively feeding.
- Grab a handful of the brown grass: Gently pull upward, like you're lifting a corner of carpet.
- Observe the resistance: If the turf lifts easily and cleanly, with little to no root attachment, that's a strong indicator of grub feeding.
- Check the exposed soil: Look for C-shaped white larvae in the top 1 to 3 inches of soil where the turf was anchored.
If the grass resists and you have to tug hard to pull it up, the roots are probably intact and your problem is more likely drought stress, disease, or a nutrient issue. Healthy turf with a solid root system won't budge easily.
A few tips for getting accurate results:
- Test multiple spots: Check at least 3 to 4 different damaged areas to confirm a pattern.
- Inspect the right depth: Grubs feed in the top few inches of soil, so you don't need to dig deep.
- Do it when the soil is slightly moist: Dry, hard soil makes the test harder to interpret.
This test works because grubs feed on grass roots. When enough roots are severed, the turf loses its anchor and essentially floats on the soil surface. No other common lawn problem produces this exact effect.
What to Look for Under the Soil: Identifying Grub Species
Once you've lifted the turf and confirmed something is down there, the next step is identifying what you're actually dealing with. Not all grubs are the same, and the species affects both the damage pattern and the treatment approach.
All lawn grubs share a few basic characteristics. They're C-shaped, creamy white to grayish in color, with a distinct brown head capsule and three pairs of legs near the head. Their size ranges from about half an inch to an inch and a half depending on the species and how mature they are.
Here's a breakdown of the most common species:
| Species | Size | Color | Key Identifier | Primary Region |
|---|---|---|---|---|
| Japanese beetle | Up to 1 inch | Creamy white with gray underside | V-shaped raster pattern on underside | Midwest, Northeast, Mid-Atlantic US |
| European chafer | 0.75 to 1 inch | Creamy white | Y-shaped raster pattern | Northeast, Great Lakes US |
| June bug (Phyllophaga) | 1 to 1.5 inches | Creamy white | Larger size, widespread | Most of US and Canada |
| Black turfgrass ataenius | 0.5 inch | White with dark hind end | Small size, dark abdomen visible | Northern US, Northeast |
| Northern masked chafer | 0.75 inch | Creamy white | Similar to European chafer | Northern US, southern Canada |

Image source: Wikimedia Commons / Tim Gage (CC BY-SA)
The raster pattern (the arrangement of hairs and spines on the grub's underside near the rear end) is the most reliable way to tell species apart, but you'd need a hand lens to see it clearly. For most homeowners, simply confirming that grubs are present and counting them is enough to make a treatment decision.
One important note: finding a few grubs doesn't automatically mean they're causing the damage. Grubs are present in most lawns at low levels. The question is whether the population has crossed the threshold where root destruction becomes visible.
How Grub Damage Differs From Drought Stress, Disease, and Other Lawn Problems
This is where most people go wrong. Grub damage gets misidentified constantly because it looks so similar to other common lawn issues at a glance. Here's how to tell the difference.
Grub damage vs. drought stress: Drought-stressed grass typically turns a uniform bluish-gray before browning, and it will recover after watering. Grub-damaged grass stays dead regardless of irrigation. Drought stress also affects the whole lawn or large sections evenly, while grub damage shows up in scattered, irregular patches.
The spongy, pull-up-easy test is the definitive differentiator.
Grub damage vs. brown patch fungus: Brown patch (caused by Rhizoctonia solani) creates roughly circular patches, often with a darker "smoke ring" border in the early morning when dew is present. The grass blades show individual leaf lesions. Grub damage lacks the circular pattern and the smoke ring, and the grass pulls up easily because the roots are gone.
Grub damage vs. chinch bugs: Chinch bugs cause damage that looks similar to drought stress, but the patches tend to appear first in hot, sunny areas near driveways or sidewalks. The grass doesn't pull up easily because the roots are intact. You'd need to inspect the thatch layer to spot the tiny black-and-white chinch bugs.
Grub damage vs. sod webworms: Sod webworms chew grass blades at the base, creating small, closely cropped patches. You might see the worms themselves or their silken tunnels in the thatch. The roots remain intact, so the turf doesn't lift easily.
Grub damage vs. dog urine: Dog urine creates small, concentrated dead spots, often with a darker green ring around the edge where the diluted nitrogen acts as fertilizer. The grass in the center is dead but the roots are fine, and the spot doesn't pull up easily.
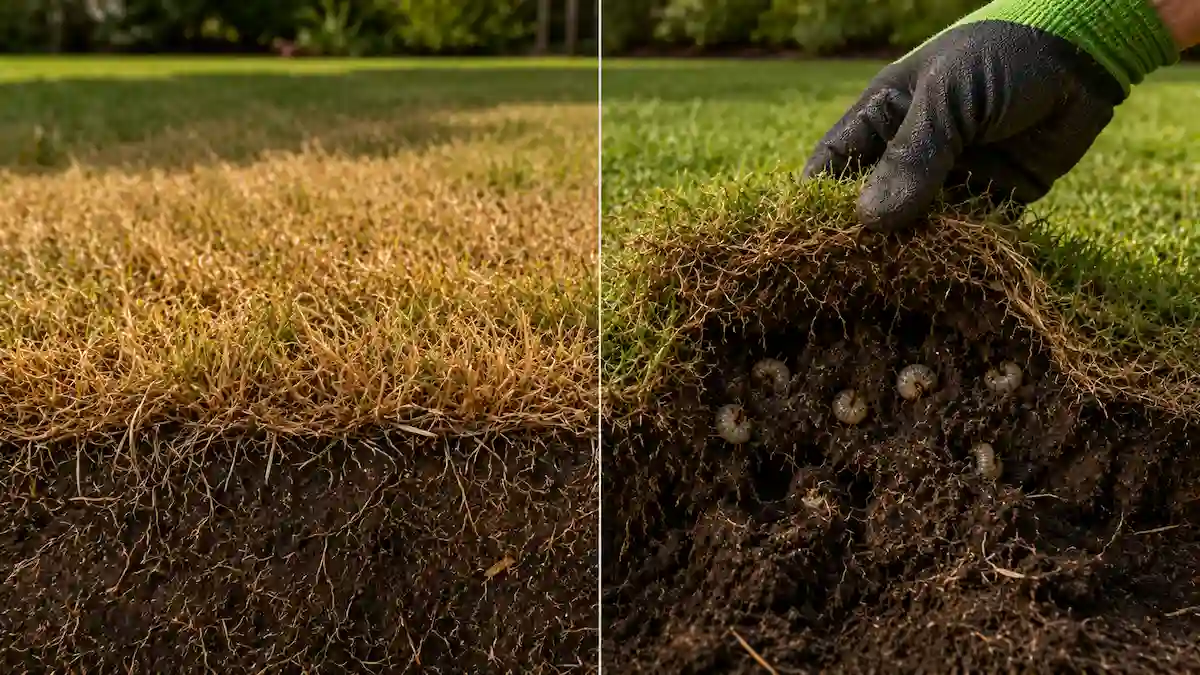
Image source: Bing (Web (fair-use with source credit))
The table below summarizes the key differences:
| Problem | Patch Shape | Pulls Up Easily? | Roots Intact? | Responds to Watering? |
|---|---|---|---|---|
| Grub damage | Irregular, spreading | Yes | No | No |
| Drought stress | Uniform, widespread | No | Yes | Yes |
| Brown patch | Circular with smoke ring | No | Yes | Partially |
| Chinch bugs | Irregular, sunny areas | No | Yes | No |
| Sod webworms | Small, close-cropped | No | Yes | Partially |
| Dog urine | Small, concentrated | No | Yes | No |
If your lawn fails the pull-back test and you're finding grubs in the soil, you've almost certainly found your answer. The other problems all leave the root system intact, which is the single most important distinction.
The Secondary Signs: Skunks, Raccoons, and Birds Uncover the Problem
Sometimes the animals find the grubs before you do. If you're waking up to torn-up sections of lawn, that's actually a strong clue pointing toward a grub infestation.
Skunks, raccoons, armadillos, and birds all feed on white grubs. They dig into the turf at night or early morning, peeling back sod to reach the larvae underneath. The damage they cause looks different from the grub damage itself.
You'll see scattered divots, flipped-over chunks of turf, or small cone-shaped holes across the lawn.
Skunks tend to peel back sod in neat strips. Raccoons go bigger, sometimes ripping up large sections in a single night. Birds leave behind smaller pecking holes but may visit repeatedly over several days.
If your lawn looks like something's been digging it up at night, don't just assume you have an animal problem. The animals are telling you something. Check the exposed soil for grubs using the pull-back method described earlier.
You'll almost always find them.
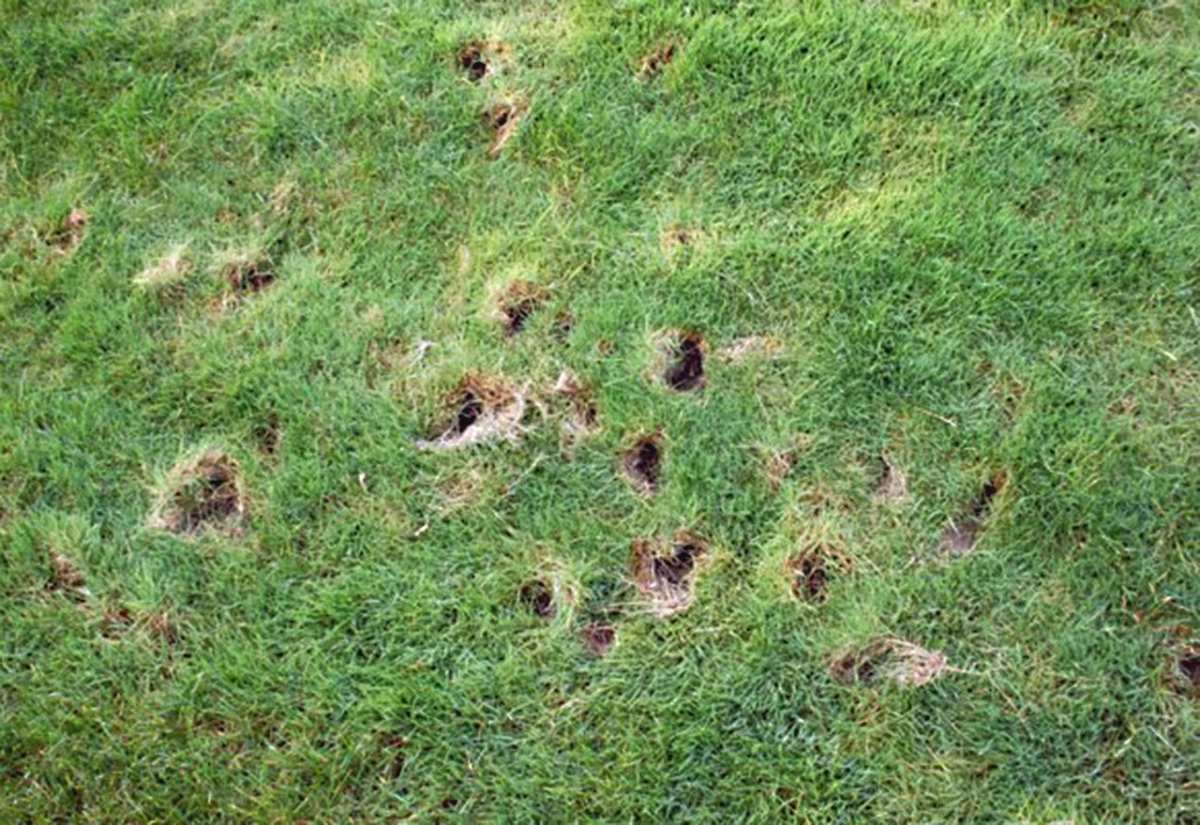
Image source: Bing (Web (fair-use with source credit))
Treating the animals without addressing the grub population is a temporary fix. They'll keep coming back as long as the food source remains. Solve the grub problem, and the animal digging typically stops on its own within a week or two.
When Grub Damage Is Worst: Seasonal Timing and Regional Differences
Grub damage follows a predictable seasonal pattern, but the exact timing depends on where you live and which species you're dealing with.
In most US regions, adult beetles lay eggs in mid to late summer. Japanese beetle adults are active from June through August, while European chafers peak in June and July. The eggs hatch within a few weeks, and the young grubs begin feeding on grass roots almost immediately.
The heaviest damage shows up from August through October. That's when the grubs are growing fastest and consuming the most root material. In warmer southern climates, feeding can continue into November.
In northern regions, grubs move deeper into the soil as temperatures drop in late fall, which reduces visible damage but doesn't kill them.
Spring damage is less common but can happen. Overwintered grubs resume feeding briefly before pupating, but they're usually deeper in the soil by then and cause less visible harm.
Region matters too. European chafers dominate the Northeast and Great Lakes states. Japanese beetles are most prevalent in the Midwest, Mid-Atlantic, and Northeast.
June bugs are widespread across most of the continental US. If you're in the Southeast, you might be dealing with multiple species at once, which can extend the damage window.
How Many Grubs Are Too Many? The Threshold That Tells You to Act
Finding grubs doesn't automatically mean you need to treat. The key is knowing how many per square foot actually warrants intervention.
University extension programs generally recommend treatment when you find:
| Grub Count (per sq ft) | Recommended Action |
|---|---|
| 0 to 4 grubs | Generally no treatment needed |
| 5 to 9 grubs | Consider treatment based on lawn health and species |
| 10+ grubs | Treat, damage is likely already visible or imminent |
A healthy, well-maintained lawn with deep roots can tolerate a few grubs without showing damage. The same count on a stressed lawn with shallow roots will cause visible problems much faster.
To count grubs properly, cut a 1-foot by 1-foot square of turf at the edge of a damaged patch. Peel it back and count the grubs you find in the soil underneath. Repeat this in at least three different spots to get an average.
Multiplying your counts gives you a solid estimate of the population across the affected area.
Cool-season grasses like tall fescue, Kentucky bluegrass, and perennial ryegrass tend to show damage at lower thresholds because their root systems are less aggressive. Warm-season grasses like Bermudagrass and zoysiagrass can sometimes tolerate slightly higher counts, but they're far from immune.
Preventive vs. Curative Treatment: Timing Changes Everything
The treatment approach you choose depends entirely on when you catch the problem and what you're trying to accomplish.
Preventive treatment targets eggs and newly hatched grubs before they can cause significant root damage. Products containing chlorantraniliprole or imidacloprid are applied in late spring to early summer, typically May through July depending on your region. The goal is to stop the next generation before it starts feeding.
Preventive products work best when applied just before or during peak egg-laying for the dominant beetle species in your area. They have residual activity in the soil that lasts several weeks, covering the vulnerable hatching period.
Curative treatment targets grubs that are already actively feeding and causing damage. Products containing trichlorfon or carbaryl are applied in late summer to early fall when grubs are small but feeding heavily. These work fast but have shorter residual activity, so timing is critical.
Here's the key difference:
| Factor | Preventive | Curative |
|---|---|---|
| Timing | Late spring to early summer | Late summer to early fall |
| Target | Eggs and young larvae | Actively feeding grubs |
| Speed of control | Gradual, before damage occurs | Fast, stops current damage |
| Residual activity | Several weeks to months | Days to a couple weeks |
| Best applied | Before grub damage appears | After confirming grub damage |
If you're reading this in late summer and finding dead patches, a preventive product won't help you right now. You need a curative approach to stop the grubs that are already eating your lawn. Save the preventive application for next spring to get ahead of the next generation.
Common Mistakes People Make When Diagnosing and Treating Grub Damage
Even when homeowners correctly identify grub damage, the treatment phase is where things often go sideways. Here are the most frequent errors we see.
Applying preventive products in fall. Imidacloprid and chlorantraniliprole are designed to target eggs and very young grubs. By fall, the grubs are too large and too deep for these products to be effective.
You're wasting money and delaying the solution.
Not watering after application. Most granular grub control products need to be watered into the soil to reach the root zone where grubs are feeding. Applying product and leaving it on the surface without irrigation drastically reduces effectiveness.
Treating based on a single spot check. Grub populations can vary significantly across a lawn. Finding ten grubs in one square foot doesn't mean the whole lawn is infested at that level.
Always check multiple areas before committing to a full-lawn treatment.
Ignoring secondary animal damage. If skunks or raccoons are digging, treating the grubs alone solves both problems. Trying to deter animals without addressing the grub population is an exercise in frustration.
Applying insecticides preventively every year without monitoring. Not every lawn has a grub problem every year. Routine preventive applications without confirmation of a threshold-level population waste money and contribute to unnecessary chemical load.
Test first, then decide.
Confusing grub damage with other problems. As we covered earlier, the list of lookalikes is long. Treating for fungus when you have grubs, or vice versa, wastes time while the real problem gets worse.
Always confirm with the pull-back test and a soil inspection before you treat.
Step-by-Step: Confirming Grub Damage and Choosing the Right Fix
Walk through this sequence in order to go from suspicion to solution without wasting time or money.
Step 1: Identify suspicious patches. Look for irregular brown areas that don't match any watering pattern. Prioritize spots that haven't responded to irrigation.
Step 2: Perform the pull-back test. Grab the edge of a damaged patch and lift. If it comes up easily with no root resistance, you've got strong evidence of grub feeding.
Step 3: Cut and inspect. Remove a 1-foot square of turf at the damaged edge. Count the grubs in the top 1 to 3 inches of soil. Repeat across multiple patches.
Step 4: Compare against the threshold. Use the 5 to 10 grubs per square foot guideline. Below 5, you can usually wait and monitor. At 10 or above, treatment is warranted.
Step 5: Choose your treatment timing. If it's spring through early summer, a preventive application makes sense. If it's late summer or fall and you already have visible damage, go curative.
Step 6: Apply product properly. Use a spreader for granular products. Follow label rates exactly. Water lightly after application to move the active ingredient into the root zone.
Step 7: Monitor recovery. Damaged areas won't green up on their own until the next growing season, but new growth should appear by the following spring if the grub population is controlled.
When You Should Call a Professional (And When You Can Handle It Yourself)
Most homeowners can manage grub identification and treatment on their own with the steps above. That said, there are situations where calling a lawn care professional makes sense.
DIY when: You have a confirmed grub count above threshold, a lawn under 5,000 square feet, and the damage is scattered rather than widespread. Products at retail are effective when applied correctly.
Call a pro when: The infestation covers most of the lawn, you've had recurring problems year after year despite treatment, or the turf is already severely damaged and needs renovation. Larger properties also benefit from professional-grade equipment and access to restricted-use products not available to homeowners.
Professionals can also apply beneficial nematodes (Heterorhabditis bacteriophora) at commercial-grade rates, which perform better than store-bought versions. If you want biological control but need serious coverage, a pro call is worth the cost.
Frequently Asked Questions
What time of year is grub damage most visible?
Grub damage peaks from August through October across most of the US. That's when late-stage larvae are consuming root mass fastest. In warm southern regions, visible damage can persist into early November.
Can grubs kill my entire lawn?
Yes, if left untreated. Heavy infestations exceeding 15 to 20 grubs per square foot can destroy large sections. Preventive management keeps populations at non-damaging levels before that point.
Is grub damage permanent?
The grub damage itself isn't permanent, but the dead patches won't regenerate without help. Once grubs are controlled, you'll need to reseed or sod the damaged areas the following spring for full recovery.
Do all grubs damage lawns?
Most white grubs eat grass roots at some stage, but not every species causes equal damage. Japanese beetle and European chafer grubs are the most destructive lawn pests in North America.
How do I confirm grubs versus a fungal disease?
The pull-back test is the fastest confirmation. Fungus-damaged turf has intact roots and resists lifting. Grub-damaged turf lifts easily and reveals larvae in the top few inches of soil.
Is it safe to replant immediately after treating grubs?
Wait at least 2 to 4 weeks after applying insecticide before reseeding. Check the specific product label, as some active ingredients restrict replanting for longer periods.