To replace the belt on your Craftsman self-propelled lawn mower, start by disconnecting the spark plug for safety, then remove the mower deck cover, release the tension on the belt, and carefully slide the old belt off. Install the new belt by looping it around the pulleys, ensuring it’s seated correctly, and then reassemble everything. Finally, double-check the belt tension before testing the mower to guarantee smooth operation.
Replacing the belt on your Craftsman lawn mower might seem daunting, but with a few simple steps, you can have it done quickly and efficiently. This task involves removing the mower deck cover, releasing belt tension, and swapping out the old belt for a new one. Proper installation and tension adjustment are essential to keep your mower running smoothly. Whether your mower isn’t propelling properly or the belt shows signs of wear, replacing it will restore your machine’s performance and extend its lifespan. Ready to get your mower back in top shape? Just follow these straightforward instructions, and you’ll be mowing like new in no time!

How to Replace Belt on Craftsman Self-Propelled Lawn Mower
Replacing the belt on your Craftsman self-propelled lawn mower might seem complicated at first, but with the right instructions, it becomes a manageable task.
This process is essential when the belt is worn out, cracked, or broken, affecting the mower’s ability to move efficiently.
Understanding each step will help you save time and money, avoiding a costly service call or replacement of the entire mower.
Understanding the Belt System of Craftsman Self-Propelled Lawn Mowers
The belt connects the engine pulley to the drive wheels, transferring power to move the mower forward or backward.
Most Craftsman self-propelled mowers use a V-belt, which is durable and designed to handle the stress of regular mowing.
Knowing the proper belt type and placement is crucial for a successful replacement.
Components of the Belt System
- Engine pulley: Spins the belt when the engine runs.
- Driven pulley: Connects to the drive wheels.
- Belt: Loops around both pulleys, transferring power.
- Guide and tension pulleys: Keep the belt aligned and tight.
Tools and Parts Needed for Belt Replacement
Before starting, gather all necessary tools and parts to make the process smooth and efficient.
Having everything at hand saves time and prevents multiple trips to the garage or hardware store.
Tools Required
- Socket set or wrench set for removing bolts and screws.
- Screwdriver (flat-head and Phillips).
- Replacement belt matching your mower’s specifications.
- Pliers for handling clips and pulleys if needed.
- Work gloves for hand protection.
Additional Supplies
- Owner’s manual for model-specific guidance.
- Lighting source for good visibility if working outdoors.
Step-by-Step Guide to Replacing the Belt
Follow these instructions systematically to replace the belt and restore your mower’s functionality.
Preparing Your Mower
- Ensure the mower is off, and disconnect the spark plug wire to prevent accidental starting.
- Place the mower on a flat, stable surface, preferably on a workbench or driveway with ample space.
- Engage the parking brake for added safety.
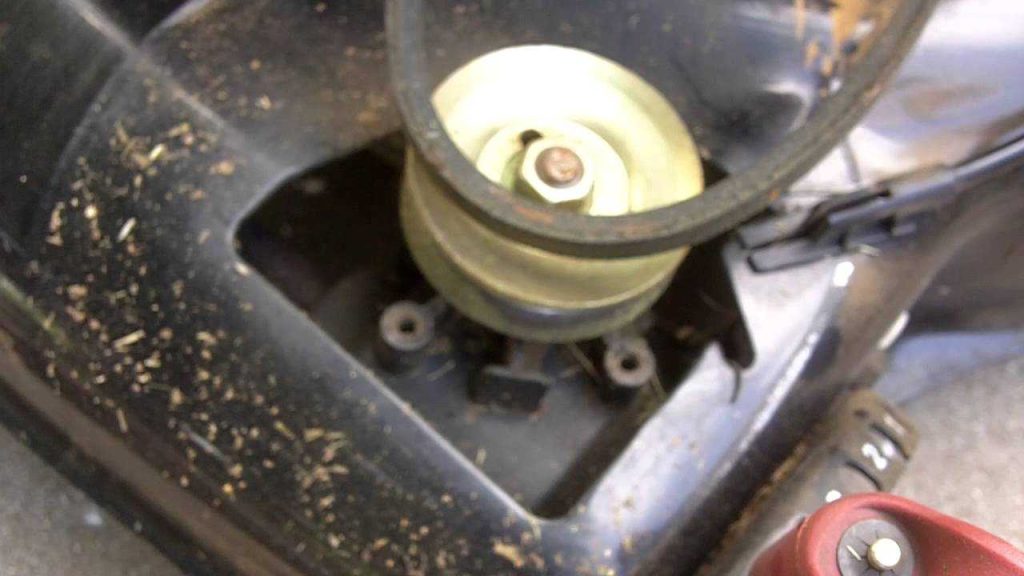
Removing the Outer Cover
- Locate the outer deck cover or housing that protects the belt system.
- Use the appropriate socket or screwdriver to remove bolts securing the cover.
- Carefully lift off the cover and set it aside for reinstallation later.
Releasing Tension from the Belt
- Identify the tension pulley, which keeps the belt tight during operation.
- Use a wrench or pliers to release tension by adjusting or removing the pulley bolt.
- This step will loosen the belt, making removal easier.
Removing the Old Belt
- Slide the belt off the pulleys, noting its routing path.
- If needed, take a photo or draw a diagram to remember the belt’s position.
- Inspect the pulleys for wear or damage while the belt is off.
Installing the New Belt
- Place the new belt onto the pulleys following the previous routing, or refer to the diagram you made.
- Ensure the belt seats properly in all pulley grooves.
- Reattach the tension pulley and tighten it to apply the correct tension.
Checking the Belt Tension and Alignment
Proper tension ensures the belt does not slip or wear prematurely.
It should be snug but not overly tight; refer to your owner’s manual for specific tension settings.
Run the mower briefly to check if the belt moves smoothly, and listen for unusual noises.
Reassembling the Mower
Replace the outer cover carefully, ensuring all bolts are tightened securely.
Reconnect the spark plug wire and perform a test run to verify proper operation.
If the mower moves smoothly without slipping or noise, the belt replacement is successful.
Tips for a Successful Belt Replacement
Always use a belt that matches your mower’s exact specifications to avoid compatibility issues.
Check the pulleys for dirt, debris, or damage that could impede belt movement.
Regular maintenance, such as cleaning and inspecting the belt, prolongs its lifespan.
Common Problems and Troubleshooting
Slipping Belt
If the belt slips during operation, it might be loose or worn out. Adjust the tension or replace the belt if necessary.
Broken or Cracked Belt
A broken belt needs immediate replacement. Examine the pulleys for damage and replace if worn.
Worn Pulleys
Worn or damaged pulleys can cause belt misalignment or slipping. Replace pulleys as needed to ensure smooth operation.
Maintenance Tips to Keep Your Belt in Good Condition
- Regularly inspect the belt for cracks or fraying.
- Clean the deck area to prevent debris from getting into the pulley system.
- Ensure pulleys are aligned and spin freely without wobbling.
- Adjust tension periodically as recommended by the manufacturer.
Additional Related Topics
Consider exploring topics such as how to adjust drive belts for different mower models, signs of belt wear, and best practices for mower maintenance.
Understanding these aspects will help you keep your Craftsman lawn mower running efficiently and extend its lifespan.
Remember, performing belt replacement yourself can be rewarding and cost-effective, provided you follow safety procedures and model-specific instructions carefully.
Craftsman Self-Propelled Lawnmower Belt Replacement
Frequently Asked Questions
What tools do I need to replace the belt on my Craftsman self-propelled lawn mower?
You’ll need a socket wrench set, screwdrivers, a replacement belt designed for your mower model, and possibly pliers. Having a pair of work gloves can protect your hands during the process. Check your mower’s manual for any specific tools or parts required.
How do I access the belt compartment on my Craftsman mower?
Start by turning off the mower and disconnecting the spark plug for safety. Remove the grass catcher if attached. Locate the belt cover or housing near the blades and belt area. Use a screwdriver or socket wrench to remove the cover screws, then gently pull off the cover to expose the belt and pulleys.
What steps should I follow to remove the old belt safely?
First, release tension from the belt by moving any tensioner or pulley as specified in your manual. Carefully slide the belt off the pulleys, making note of its routing. Avoid forcing or twisting the belt excessively to prevent damage to components. Take a picture if needed to remember the belt path.
How can I ensure I install the new belt correctly on my mower?
Place the new belt onto the pulleys following the same routing pattern as the old belt, referencing any diagrams if available. Ensure the belt sits properly within all grooves and pulleys. Confirm that the tensioner applies adequate tension to keep the belt tight without over-tightening. Reassemble the cover securely once installation is complete.
What safety precautions should I keep in mind during belt replacement?
Always disconnect the spark plug before working on the mower to prevent accidental starting. Wear gloves to protect your hands from sharp edges and moving parts. Handle the blades with care if working near the cutting area. Follow the manufacturer’s instructions closely to avoid damaging components or injuring yourself.
Final Thoughts
Replacing the belt on your Craftsman self-propelled lawn mower is straightforward. First, disconnect the spark plug to ensure safety. Then, tilt the mower to access the underside and remove the belt cover.
Carefully remove the old belt and compare it with the new one for accuracy. Loop the new belt around the pulleys and reassemble the cover.
In conclusion, how to replace belt on craftsman self-propelled lawn mower involves a few simple steps. Follow these directions for a quick, effective replacement, and ensure your mower runs smoothly again.