To remove the carburetor from your Briggs and Stratton lawn mower quickly, start by disconnecting the spark plug to ensure safety. Then, remove the air filter and fuel lines, followed by unbolting the carburetor itself. Lastly, carefully detach the carburetor from its mounting to complete the process.
In just a few simple steps, you can remove the carburetor from your Briggs and Stratton lawn mower to perform maintenance or repairs. The key is to disconnect the essential parts methodically and handle each component carefully to avoid damage. Whether you’re cleaning or replacing it, understanding the process can save you time and frustration.
Removing the carburetor from your Briggs and Stratton lawn mower might seem tricky at first, but once you know the steps, it becomes a straightforward task. It’s a common maintenance step that helps improve engine performance, especially if your mower is stalling, idling poorly, or experiencing fuel delivery issues. The process involves a few basic tools and precautions, making it accessible even for those with minimal mechanical experience. By carefully disconnecting the fuel lines, unscrewing mounting bolts, and detaching the carburetor, you’ll be ready to clean or replace it, ensuring your mower runs smoothly and efficiently all season long.

How to Remove Carburetor from Briggs and Stratton Lawn Mower
Removing the carburetor from a Briggs and Stratton lawn mower might seem challenging at first, but with the right steps, it becomes manageable. This process is essential if your mower is experiencing issues like difficulty starting, poor engine performance, or fuel leaks. Proper removal and cleaning of the carburetor can improve your mower’s performance and extend its lifespan. Throughout this guide, we will walk you through each step in detail, providing tips to make the process easier.
Tools and Materials Needed for Carburetor Removal
Before you begin, gather all necessary tools and materials to ensure a smooth process. Having everything ready saves time and prevents frustration.
- Socket wrench set with various sizes
- Screwdrivers (Phillips and flat-head)
- Needle nose pliers
- Carburetor cleaner spray
- Container for draining fuel
- Work gloves for safety
- Rags or paper towels
Understanding the tools required helps you prepare for the task and avoid unnecessary delays. Always wear gloves to protect your hands from fuel and cleaning chemicals.
Preparing Your Lawn Mower for Carburetor Removal
Start by parking your mower on a flat surface to prevent movement during work. Turn off the engine and allow it to cool completely before proceeding. Disconnect the spark plug wire to prevent accidental starting, ensuring safety throughout the process.
Next, drain any remaining fuel from the tank to avoid spillage. You can remove the fuel cap and tilt the mower slightly to pour fuel into a suitable container. Alternatively, use a siphon or turkey baster for safer draining. Removing excess fuel reduces fire risk and makes handling easier.
Accessing the Carburetor
Locate the carburetor, which is generally positioned on the side of the engine. It typically appears as a rounded metal or plastic component attached to the intake manifold.
Remove any covers, shrouds, or air filters blocking access to the carburetor. Use a screwdriver or socket wrench depending on your mower model. Keep track of all screws and bolts by placing them in a small container to prevent losing them.
Inspect the area around the carburetor for any disconnected hoses or cables. Take note of their positions for reassembly. Carefully disconnect any attached fuel lines or vacuum hoses using needle nose pliers. Labelging these parts helps during reinstallation and prevents mistakes.
Removing the Carburetor from the Briggs and Stratton Lawn Mower
Once accessible, loosen the mounting bolts holding the carburetor in place. These are usually two or three bolts situated around the carburetor base. Turn each bolt counterclockwise to loosen and remove them.
Gently lift the carburetor away from the engine, being careful not to damage any attached hoses or linkages. If the carburetor is stuck, wiggle it slightly to loosen it. Avoid pulling too hard, as this might damage other engine components.
Clean the surrounding area before removing the carburetor completely. This prevents dirt and debris from falling into the engine during removal. When fully free, lift out the carburetor carefully, holding it by the body, not the linkage.
Handling Attached Components
Pay attention to all attached parts when removing the carburetor. Common connections include throttle linkages, choke cables, and fuel lines.
Use needle nose pliers or your fingers to disconnect these components gently. Be cautious to avoid bending or damaging the linkages. Some carburetors have clips or clamps securing hoses; remove them carefully.
If necessary, take pictures of the connections for reference during reassembly. This step ensures you reconnect everything correctly later, saving time and effort.
Inspecting the Carburetor Before Cleaning or Replacing
Before cleaning or reusing the carburetor, inspect it for signs of damage or wear. Look for cracks, corrosion, or stuck parts that might compromise performance.
Check the float, needle valve, jets, and passages for debris or clogging. A clogged carburetor often causes engine issues, so cleaning it thoroughly is crucial. If the carburetor is damaged beyond repair, consider replacing it with a new one compatible with your mower model.
Gather replacement parts beforehand if you plan to overhaul or fix specific components. Proper inspection ensures you address all issues during reassembly.
Cleaning and Rebuilding the Carburetor
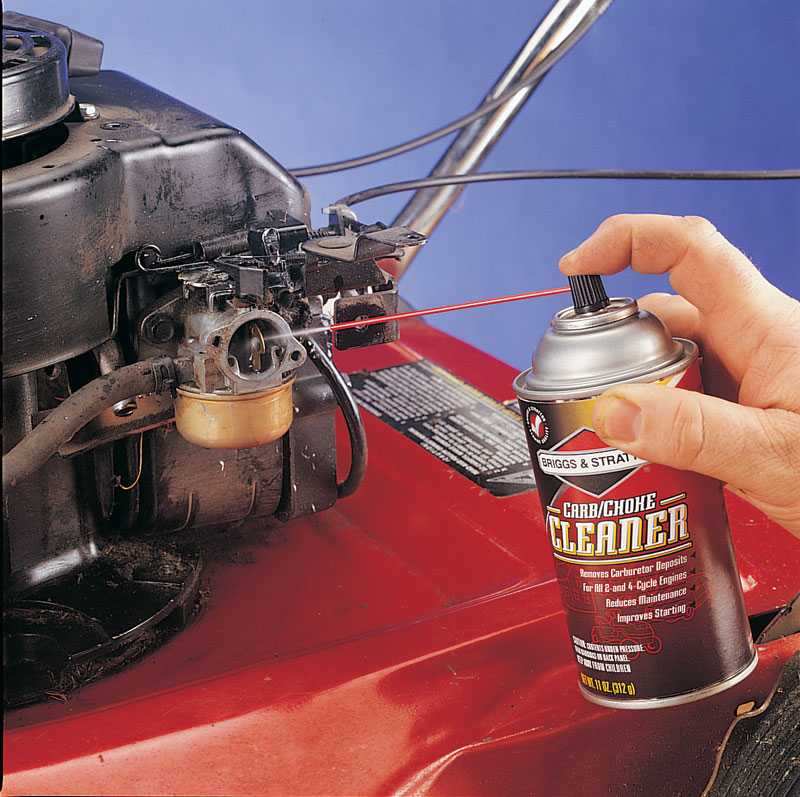
Cleaning involves removing dirt, varnish, and fuel deposits that obstruct airflow. Use carburetor cleaner spray to spray all internal parts and passages. Compressed air can also blow out dirt from tiny jets and holes.
Take caution not to damage delicate parts like the float or needle valve. If necessary, disassemble the carburetor further, following the manufacturer’s instructions. Replace any worn or damaged parts, such as gaskets or seals, to ensure proper sealing.
Rebuilding the carburetor with a repair kit specifically designed for Briggs and Stratton models enhances performance. Follow instructions carefully to reassemble the carburetor correctly.
Reinstalling the Carburetor
Place the cleaned or new carburetor back onto the intake manifold, aligning it with the mounting holes. Secure it by tightening the bolts evenly in a crisscross pattern to ensure a tight fit.
Reconnect all hoses, linkages, and cables as per your reference photos or notes. Ensure each connection is secure and correctly positioned. Reattach any covers or filters that were removed earlier.
Before adding fuel, double-check all connections for tightness and proper placement. Turn on the fuel valve if applicable, then refill the tank with fresh fuel. Start the engine to test if everything functions smoothly.
Final Tips for Successful Carburetor Removal and Maintenance
Patience is key; work slowly and carefully to avoid damaging parts. Keep track of all screws and small components to prevent loss.
Using manufacturer-recommended tools and parts helps maintain your mower’s performance and longevity. Regular cleaning and inspection can prevent major carburetor problems in the future.
If you’re unsure about any step, consult your mower’s user manual or seek assistance from a professional. Proper maintenance ensures your Briggs and Stratton lawn mower continues to operate efficiently for years to come.
This detailed process of removing and maintaining the carburetor can significantly improve your lawn mower’s performance, saving you time and money on repairs. Remember, a clean and well-maintained carburetor is vital for a smooth-running mower.
Briggs & Stratton Small Engine Carburetor Replacement Part # 799584
Frequently Asked Questions
What tools are necessary to remove the carburetor from a Briggs and Stratton lawn mower?
To remove the carburetor, you will need basic tools such as a set of screwdrivers, socket wrenches, and pliers. A carburetor cleaner spray and a container to catch any fuel that might spill during removal can also be helpful. Make sure to have gloves and safety goggles for protection while working on the mower.
How do I disconnect the linkage and fuel lines from the carburetor during removal?
Start by carefully locating the throttle and choke linkages connected to the carburetor. Use pliers or screwdrivers to gently disconnect these linkages, noting their placement for reassembly. Then, loosen the fuel line clamps with a screwdriver or pliers and carefully detach the fuel line from the carburetor, allowing any residual fuel to drain into a container.
What is the proper way to remove the carburetor from the mower’s mounting surface?
After disconnecting all linkages and fuel lines, remove the bolts securing the carburetor to the mounting surface using a socket wrench. Once the bolts are out, gently lift the carburetor away from the engine, ensuring not to damage the gasket. If the carburetor is stuck, tap lightly with a rubber mallet or use a flat-head screwdriver to gently pry it free, taking care not to damage the mounting surface.
Final Thoughts
To remove the carburetor from a Briggs and Stratton lawn mower, first disconnect the spark plug for safety. Drain any fuel from the tank to prevent spills. Remove the air filter and cover.
Next, disconnect the linkage and carburetor bolts carefully. Gently lift the carburetor from the engine, making sure not to damage any connected parts. Clean or replace the carburetor as needed before reassembling.
In conclusion, how to remove carburetor from Briggs and Stratton lawn mower involves careful disconnection and handling. Following these steps ensures a smooth process and helps maintain your mower’s performance.