If you've pulled up a struggling tomato plant and found pale, C-shaped larvae curled in the root zone, you're asking the same question every summer grower eventually faces: how to get rid of grubs in vegetable garden soil fast, without wrecking the food you're about to eat. The good news is that most vegetable garden grub problems are solvable at home with the right timing and the right tool for your situation. The bad news is that grabbing the first bottle off the shelf usually wastes money and misses what's actually happening underground.
White grubs, the larval stage of scarab beetles like the Japanese beetle and European chafer, feed on roots between late summer and mid-fall, then again in spring before they pupate. By the time you see wilting or yellowing plants, those grubs have already been feeding for weeks. According to data from various university extension programs, treatment thresholds for white grubs typically start at around five to ten larvae per square foot of soil.
Numbers below that usually correct themselves with healthy biology. This guide walks through exactly how to figure out which scenario you're in and what to do about it.
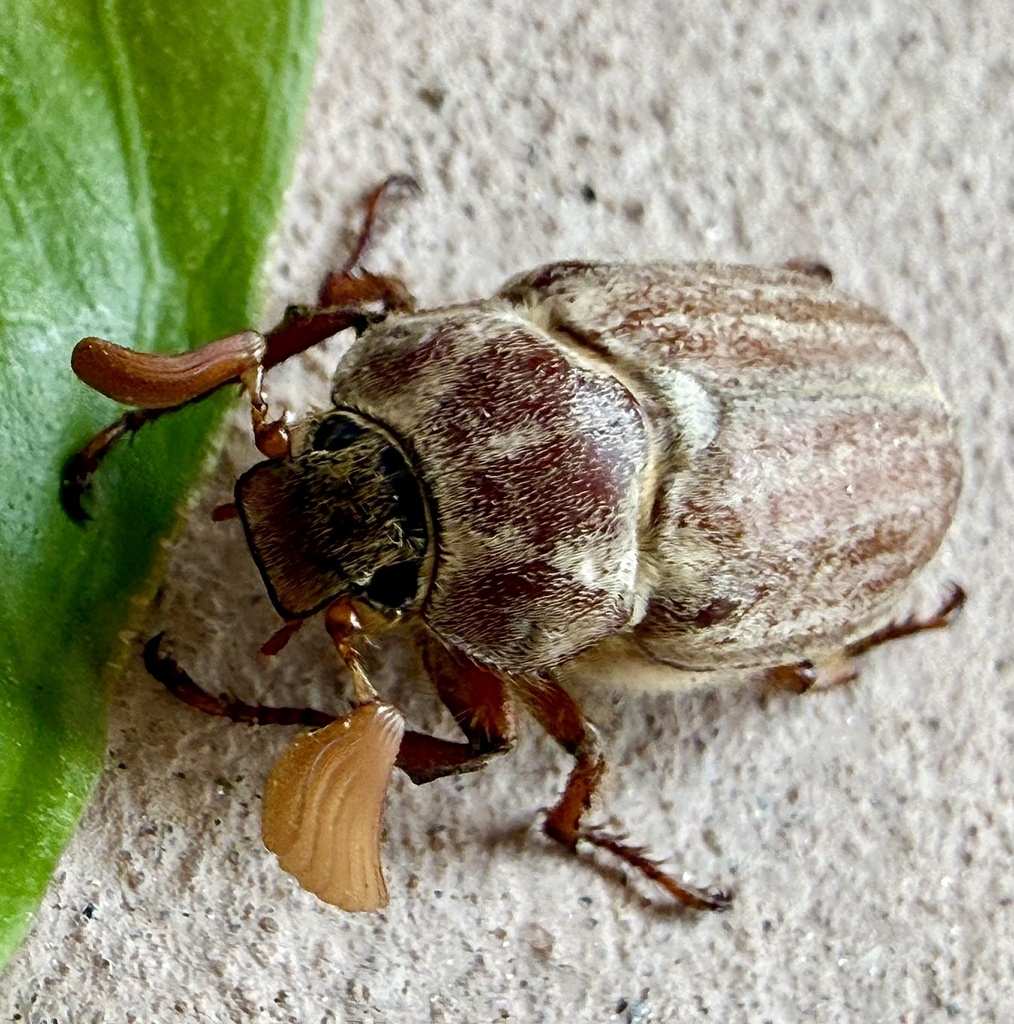
Image source: iNaturalist / Irene
Quick Answer
Identify white grubs by digging. Count five to ten larvae per square foot to confirm a problem. Treat young grubs with beneficial nematodes.
Apply Heterorhabditis bacteriophora for best results. Time treatment from late July through early September.
Wait — Are You Sure It's Grubs Damaging Your Vegetable Garden?
Before treating anything, step back and confirm the symptoms actually point to grubs. Wilting, yellowing, and stunted growth in vegetable gardens come from dozens of causes. Drought stress, root knot nematodes, fungal wilts, nutrient deficiencies, and vine borers all cause similar above-ground symptoms.
Grubs are specifically root pruners. They don't bore into stems or suck sap. They chew off fine root hairs and can girdle larger roots, which cuts the plant's ability to take up water.
That distinction matters because the fix is totally different.
Another thing that trips people up is the timeline. Young seedlings that collapse overnight are rarely a grub issue. Grubs tend to hit established plants hardest, especially heavy feeders like tomatoes, squash, peppers, and corn.
If you've got a well-grown plant that suddenly starts flagging on hot days despite adequate water, that's your cue to start digging.
Over-watering is the other common red herring. Many gardeners see wilting and add more water, which only makes root rot worse. If you suspect grubs, stop watering for a day, then investigate dry-ish soil.
You'll get a much cleaner look at root condition that way.
What Grubs Are Actually Doing Underground
"White grubs" isn't one species. It's a growth stage shared by several scarab beetles common across North America and Europe. The ones most often found in vegetable gardens are Japanese beetle (Popillia japonica), European chafer (Amphimallon majale), and masked chafers (Cyclocephala spp.).
Each has a one-year life cycle. Adults lay eggs in midsummer, usually in turf or moist soil near plantings. Those eggs hatch within two weeks, and the tiny larvae immediately start feeding on roots.
The first instar is barely visible, about a quarter-inch long and translucent. That's not when you kill them. By late July and into August, they've reached second and third instar stages, the growth phases that cause the most damage.
They're an inch or more long, creamy white, and actively chewing through everything in the root zone. That's your window. Miss it by even a few weeks and the grubs burrow deeper to overwinter.
They become much harder to reach with any treatment once they drop below the frost line.
Understanding this cycle changes everything about your approach. Fall applications of certain biological controls only work because you're catching grubs near the soil surface during active feeding. Timing your nematode drench to match that stage is what separates a successful season from an expensive dud.
How to Confirm You've Got a Real Grub Problem
No product fixes a problem you haven't verified. Soil confirmation takes five minutes and saves you the cost and effort of an unnecessary treatment. Grab a trowel and head to the spot where a plant looks worst.
The soil sample tug test
Before digging, grab a fistful of stems near the base and tug gently. Plants with intact root systems resist. Plants whose root mass has been pruned by grubs pop right out of the ground with almost no resistance.
That's not diagnostic on its own, but it tells you damage is below ground and worth investigating further.
What to look for when you dig
Cut a square roughly 6 inches across and 4 inches deep right at the base of the affected plant. Flip it over and break it apart with your fingers. What you're looking for is straightforward.
White grubs have a distinct C-shape, a brown head capsule, and six visible legs near the head end. The body is creamy white to grayish, sometimes with a slightly darker abdomen where you can see soil particles inside. Size ranges from about a quarter-inch for very young larvae up to an inch and a half for mature ones, depending on species and timing.
Here's the key number to remember. If you find fewer than five grubs in that 6-by-6-inch sample, which scales to roughly that per-square-foot threshold, your soil biology is probably keeping up. Predatory beetles, ground-foraging birds, and naturally occurring parasitic wasps all do background control.
That doesn't mean ignore the grubs entirely, but it means a heavy intervention isn't warranted yet. If your count jumps to ten or more per square foot, plants will likely show visible damage in days to weeks. That's when you move from observation to treatment.
A note on look-alikes. Ground beetle larvae also live in the same soil zone and are beneficial predators, not pests. They tend to be darker, more elongated, and more active than the slow-curling C-shape of a scarab grub.
Quick identification photos are widely available from university extension pages if you want to double-check what you're looking at.
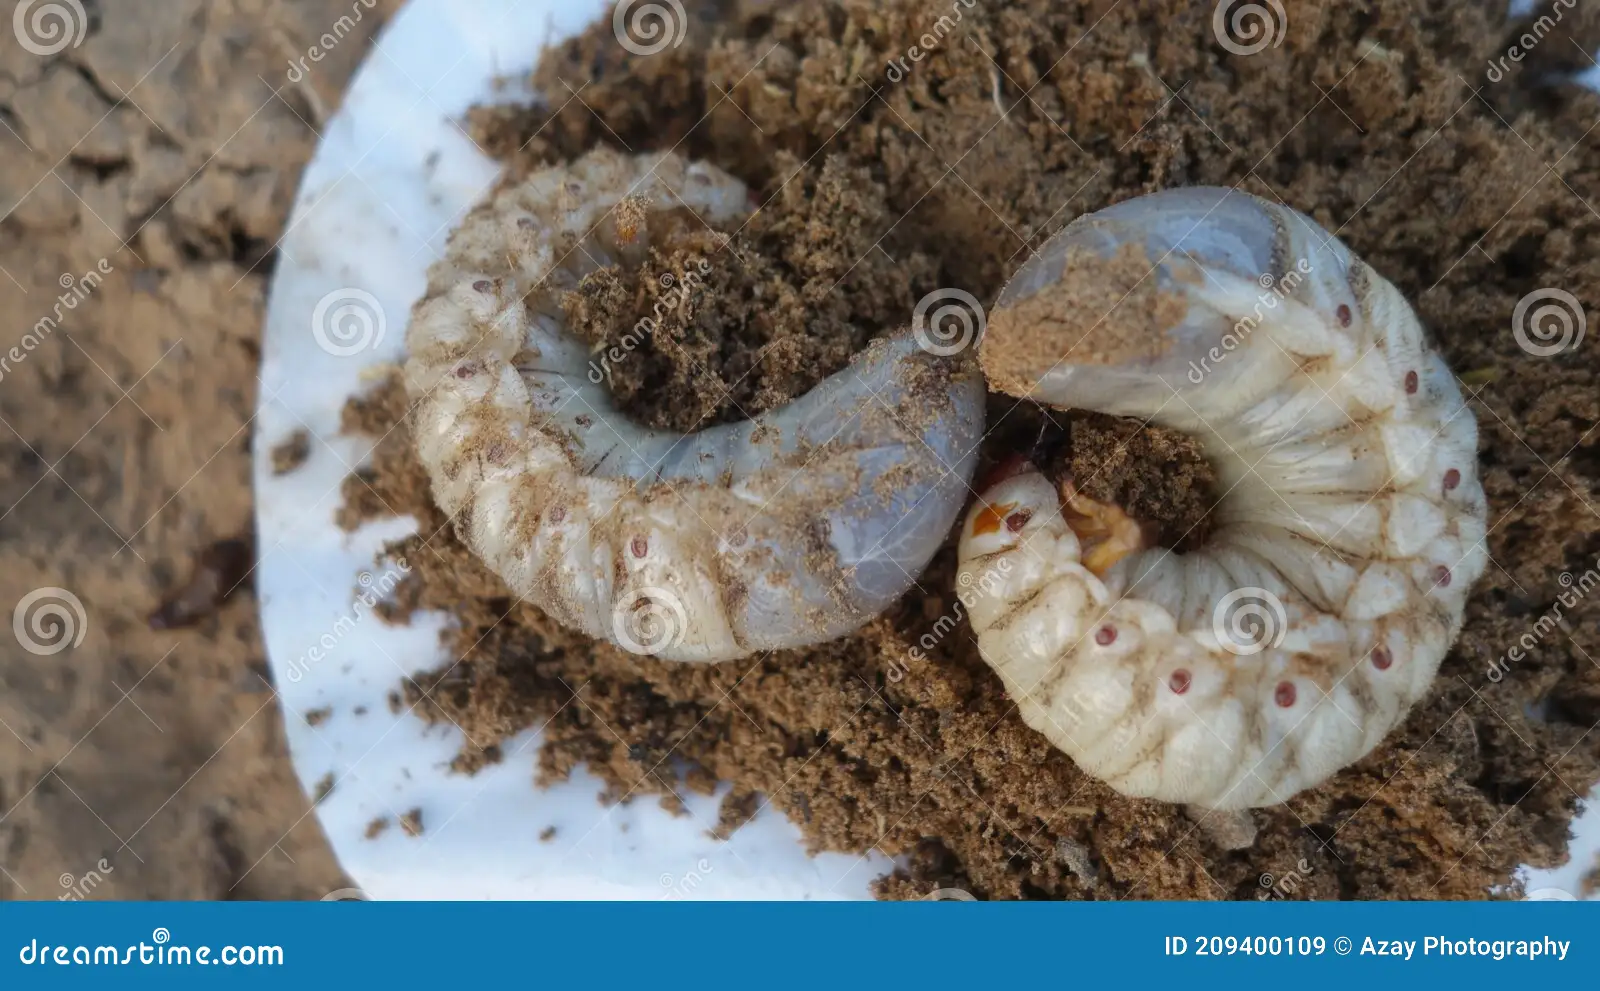
Image source: Bing (Web (fair-use with source credit))
Knowing When to Treat vs. When to Do Nothing
Not every grub needs killing. That might sound strange in a guide about getting rid of them, but there's a practical difference between a manageable population outbreak. Healthy soil supports a range of organisms that keep scarab beetle populations in check most years.
Fungal pathogens, parasitic nematodes already resident in the soil, ground beetles, and insectivorous birds all contribute to natural control.
The case for treating gets stronger when any of these conditions apply. You counted over ten grubs per square foot. You're growing shallow-rooted crops that are especially sensitive, such as lettuce or baby greens.
Your garden borders a large lawn or pasture that's a known breeding site and adult beetles pour in every July. Plants are showing visible wilting despite proper watering and feeding. You lost a significant portion of last year's crop to root damage and grubs were confirmed present.
The case for holding off is equally clear. You found only one or two grubs in your inspection. The plants look healthy overall and the occasional wilted leaf coincides with a heat wave.
Your garden has good diversity with flowering plants that support parasitic wasps and other beneficial insect populations. You've recently added compost or organic matter that's already boosting soil biology.
Here's where patience actually pays. Treating a small grub population with a broad intervention like a synthetic soil drench can do more harm than good. You'll kill off the existing beneficial organisms along with the grubs and leave an empty ecological niche that reinvades faster.
Save targeted treatments for confirmed, damaging outbreaks. Everything else gets managed through soil health and observation.
The Decision Path at a Glance
| Condition | Action |
|---|---|
| Fewer than 5 grubs per square foot, plants healthy | Monitor only, build soil biology |
| 5–10 grubs per square foot, mild wilting signs | Apply beneficial nematodes if larvae are young |
| Over 10 grubs per square foot, visible root damage | Treat immediately with nematodes or BtG |
| Grubs found in fall after hard frost has begun | Mark the area for early-spring treatment |
| Uncertain identification | Collect a sample, get an ID before treating |
Choosing Your Approach Based on Your Situation
Once you've confirmed the problem and the population level, the right intervention depends on your specific variables: how many grubs you're dealing with, what you're growing, whether you need a quick fix or a long-term solution, and what timeline you're working within.
Small outbreak, small garden: hand-picking and raw removal
If you're working with a handful of raised beds and found fewer than ten grubs total across your entire inspection, physical removal is surprisingly effective. Dig around the root zones of the worst-affected plants in the morning hours when grubs tend to feed closer to the surface. Drop them into a bucket of soapy water.
This won't eliminate every larva, but it knocks down the population enough that plants can recover, especially if your soil biology is otherwise healthy.
Hand-picking pairs well with a light cultivation of the top two inches of soil around affected plants. Breaking up the root zone briefly exposes larvae to surface-dwelling predators like ground beetles and foraging birds. It also disrupts the moist micro-habitat grubs prefer.
If you keep chickens, let them scratch through beds between plantings. They'll clean up larvae faster than any product.
Moderate infestation, food crops: beneficial nematodes
This is the workhorse treatment for most vegetable gardeners dealing with a confirmed white grub outbreak. Beneficial nematodes, specifically Heterorhabditis bacteriophora, are microscopic roundworms that actively hunt and kill soil-dwelling grubs. They enter the grub's body through natural openings and release symbiotic bacteria that kill the host within 24 to 72 hours.
The nematode then reproduces inside the dead larva and the offspring spread through the soil to find more hosts.
Several companies culture and ship Heterorhabditis nematodes for home garden use. These products are OMRI-listed and approved for use on food crops. They don't harm earthworms, pollinators, or other beneficial species.
That selectivity is their biggest advantage over synthetic soil drenches.
Coverage rates vary by product, but a standard 10-million-count packet typically treats roughly 3,200 square feet. A concentrated 1-million-count packet handles about 20 square feet. For vegetable garden beds, even the small packet is enough to treat a typical 4-by-8 raised bed setup multiple times.
Keep that in mind if you're doing the math on cost versus coverage.
Long-term prevention in warm climates: milky spore
Milky spore disease is caused by the soil bacterium Paenibacillus popilliae. It specifically targets Japanese beetle grubs and does nothing against other scarab species. You apply it as a granular powder or a diluted drench, dropping a small dollop every four feet in a grid pattern across the affected area.
The grubs ingest it while feeding and the bacteria multiply inside their blood, killing them over several weeks.
The big selling point is persistence. Once milky spore bacteria establish in your soil, they can remain viable and active for ten years or more. Many gardeners treat once and handle Japanese beetle grubs passively for the rest of the decade.
That long tail makes it cost-effective if Japanese beetles are your primary and persistent problem.
The big limitation is climate. Milky spore performs best in USDA Zones 5 through 8, where soil stays warm enough long enough for the bacteria to infect larvae in late summer. In Zones 4 and below, the soil cools too quickly in fall and the bacteria struggle to cycle.
Several northern-state extension offices report inconsistent results from milky spore in colder regions. If you're north of roughly Pennsylvania or southern Wisconsin, milky spore alone probably isn't enough.
Fast knockdown needed: BtG and what it does best
Bacillus thuringiensis galleriae, often labeled as BtG or sold under the trade name beetleGONE!, is a bacterial pathogen that attacks both grubs and adult beetles. Unlike regular Bt varieties that target caterpillars and mosquitoes, this subspecies works specifically on scarab beetle larvae. It's a contact and ingestion toxin, meaning the grub picks it up while moving through treated soil and feeding on treated root material.
BtG works faster than nematodes in most conditions, showing visible die-off within three to ten days of application. That speed makes it a strong choice when plants are already showing significant stress and you can't wait weeks for natural predators to do their job. It's also OMRI-approved for organic food production.
The tradeoff is longevity. BtG degrades in UV light and gets washed out of the soil with heavy rain or irrigation. It doesn't reproduce or persist the way nematodes and milky spore do.
Most gardeners get one to two weeks of active control per application and need to reapply if adult beetles continue laying eggs. Think of BtG as a tactical strike, not a long-term strategy.
The One Timing Rule That Makes or Breaks Your Treatment
Every biological control for grubs has the same critical requirement: you must apply it when larvae are young, small, and actively feeding near the soil surface. That window runs from roughly late July through early September in most temperate regions. The exact dates shift based on your local climate and the specific beetle species present.
Here's why timing matters so much. Newly hatched grubs are tiny, soft-bodied, and concentrated in the top two to three inches of soil. Nematodes can find them easily.
Milky spore gets ingested readily. BtG contacts them before they burrow deep. By October, mature grubs have moved down six inches or more and entered a semi-dormant state.
Treatments applied that late mostly miss the target.
The best approach is to start monitoring soil in early July. If you see adult beetles feeding on nearby plants or laying eggs in turf, expect hatch within two to three weeks. Dig a few test holes in your garden beds at that point.
If you find first-instar larvae, that's your green light. Apply nematodes or BtG within the next seven to ten days for maximum impact.
A second, smaller treatment window opens in early spring, typically April through May, when overwintered grubs return to the surface to feed before pupating. Spring applications tend to be less effective because the grubs are larger and tougher, but they still work if you catch them early enough. Spring is also a good time to apply milky spore, since the bacteria need the full warm season to establish.
Step-by-Step: Applying Nematodes Correctly in Vegetable Beds
Beneficial nematodes are living organisms, which means they can die before they ever reach the soil if you mishandle them. Proper application technique matters as much as the product itself. Follow these steps and you'll get the best return on what you paid.
Step 1: Store them correctly on arrival. Nematode products ship with cold packs and need to go straight into refrigeration. They'll stay viable for roughly two to four weeks at 35 to 45°F. Don't freeze them and don't leave them on a hot porch.
If you can't apply within a few days of receiving them, check the packaging for specific storage guidance from the manufacturer.
Step 2: Prep the soil the day before. Water your garden beds thoroughly the evening before you plan to apply. The soil needs to be moist but not waterlogged. Nematodes move through water films in the soil, so dry conditions kill them fast.
Saturated soil drowns them or washes them below the root zone.
Step 3: Mix and apply in low light. Nematodes are extremely sensitive to UV radiation. Mix them into room-temperature water according to the product label, usually in a bucket or a clean sprayer with the filter removed. Apply in early morning or after sunset.
Midday sun on a wet leaf or soil surface can kill exposed nematodes in minutes.
Step 4: Water them in. After application, run a gentle sprinkler or soaker hose for about 15 minutes. This pushes the nematodes off leaf surfaces and down into the soil where the grubs are. Don't blast them with a pressure washer-style spray.
A soft, even soak is what you want.
Step 5: Keep the soil moist for a week. Nematodes need moisture to move and hunt. If rain doesn't cooperate, water lightly every two to three days for the first week after application. After that, return to your normal irrigation schedule.
Step 6: Re-inspect in two to three weeks. Dig a new sample in the same area you checked before. You should see fewer live grubs and some that look discolored or inactive. If the population hasn't dropped significantly, a second application may be warranted, especially if new eggs have hatched since the first treatment.

Image source: Bing (Web (fair-use with source credit))
Natural Controls That Work and Ones That Just Sound Good
The internet is full of home remedies for grubs, and most of them range from mildly helpful to completely useless. Here's what the evidence actually supports.
Neem oil: antifeedant or overhyped?
Neem oil, extracted from the neem tree and containing the active compound azadirachtin, works primarily as an insect growth regulator and antifeedant. It disrupts the molting cycle of larvae and discourages feeding. Against grubs in soil, neem has limited effectiveness because it breaks down quickly in sunlight and doesn't penetrate deep into the root zone where grubs feed.
A neem soil drench can provide some suppression of very young larvae near the surface. It's not going to rescue a garden with a heavy infestation. Where neem earns its place is as a companion treatment.
Applying it to foliage can deter adult beetles from feeding and egg-laying on nearby plants, which reduces next year's grub population. Use it as part of a broader strategy, not as your primary weapon.
Spinosad: effective but narrow
Spinosad is a bacterial fermentation product that works on a range of soil and foliar pests. It has some efficacy against young grubs on contact, but it binds tightly to soil particles and doesn't move through the profile the way nematodes do. It's best suited for spot-treating a small area where you've confirmed larvae are concentrated.
Spinosad is toxic to bees when wet, so never apply it to flowering plants or during bloom time. Let it dry completely before allowing pollinator access. That restriction makes it awkward for vegetable gardens with squash, cucumbers, or other flowering crops.
Use it on non-blooming plantings only.
Attracting birds: limited results worth understanding
Birds like starlings, grackles, and robins do eat grubs, and encouraging bird activity in your garden is never a bad idea. The problem is scale. A serious grub infestation can involve hundreds of larvae per garden bed.
Birds will pick off some, but they won't put a dent in a population that's already causing visible plant damage.
Bird attraction works best as a preventative measure. Maintaining a bird-friendly garden with water sources, perches, and native shrubs keeps a resident population of grub-eating birds on site year-round. They'll handle the background level of grubs that never reaches treatment threshold.
When an outbreak hits, though, you'll need something more targeted.
Common Mistakes That Make Grub Problems Worse
Even the right product fails if basic steps get skipped. These are the errors that show up most often in failed grub treatments.
Applying treatments in the wrong season. Soil drenches in October mostly miss the target. Grubs have already burrowed deep, and biological controls lose viability in cool soil.
Letting nematode packets sit in a hot delivery truck. These are living organisms. If they arrive warm or have been sitting on a shipping dock in summer heat, they may already be dead. Always verify cold-pack integrity on receipt, and if in doubt, contact the supplier about replacement.
Watering heavily after a treatment application. Over-irrigation immediately after applying nematodes can wash them below the active root zone where grubs are feeding. A gentle post-application soak to move nematodes into the soil is sufficient.
Killing every grub-like thing in the soil. Not every larva in your garden is a pest. Ground beetle larvae, soldier beetle larvae, and other predatory insects look vaguely similar to white grubs on a casual glance. Treating indiscriminately with broad-spectrum products destroys the predators that provide free background control.
Expecting one application to solve a multi-year problem. A single nematode treatment can knock down an active outbreak, but adult beetles will return from neighboring areas season after season. Long-term control takes a combination of tactics applied across multiple seasons.
What Grub Species Are Most Likely in Your Region
Your geography determines which species you're most likely dealing with, and that affects which treatment makes the most sense.
Japanese beetle (Popillia japonica) is the most destructive and most widespread species across the eastern and midwestern United States. It has established populations as far west as Nebraska and Texas. This is the primary target for milky spore.
European chafer (Amphimallon majale) is common in the Great Lakes region and the Northeast. Adults are brown, unlike the metallic green-and-copper Japanese beetle, and they tend to lay eggs in slightly drier soil. Milky spore does not work on European chafer.
Nematodes are your best specialist treatment.
*Northern and Southern masked chafers (Cyclocephala spp.)* are common across the Southeast and Mid-Atlantic. They're smaller than Japanese beetles and cause similar root damage in the grub stage. They also don't respond to milky spore.
West of the Rocky Mountains, Japanese beetle pressure is lower and other local scarab species may dominate. Extension offices in California and the Pacific Northwest publish region-specific scouting guides annually.
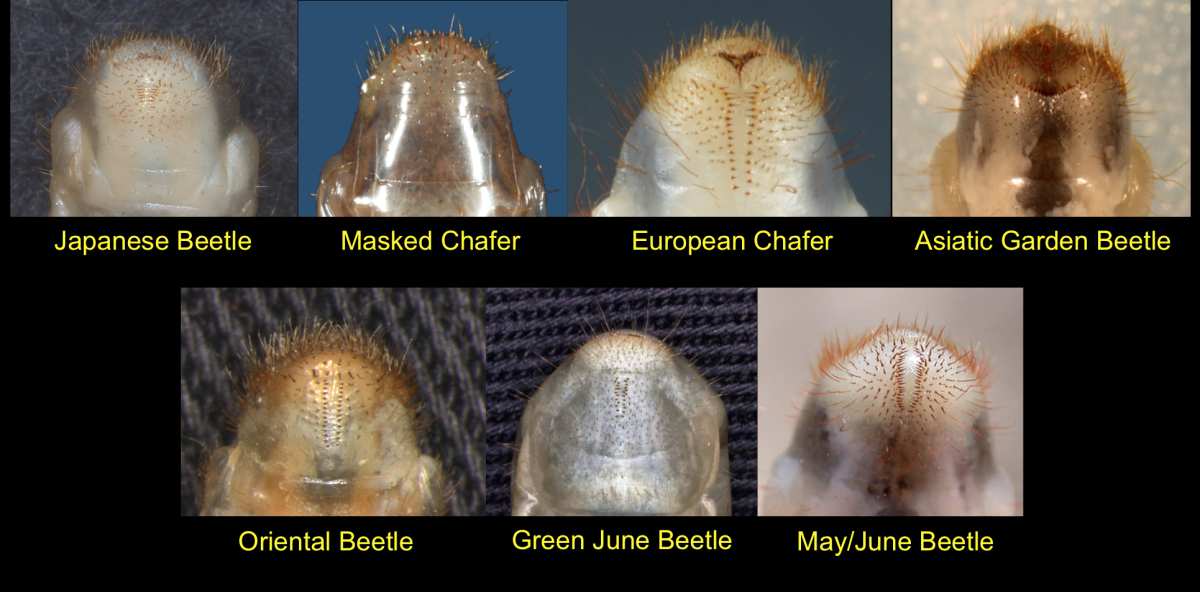
Image source: Bing (Web (fair-use with source credit))
Seasonal Game Plan: Spring Through Fall
Here's a practical calendar to keep grub management on track without overthinking it.
Early spring (April, May): Turn garden beds lightly. This exposes overwintered grubs to predators. If you had a bad grub year, consider a preventive milky spore application now while the bacteria have full summer to establish.
Late spring (May, June): Watch for adult beetle emergence. The first Japanese beetles typically appear in June. Document what you see.
Midsummer (July): This is your monitoring window. Dig test holes in beds that struggled last year.
Peak season (August, September): Treat based on what you found. For young larvae, apply beneficial nematodes or BtG. This is your highest-success window.
Late fall (October, November): Don't treat. Focus on cleanup and soil building.
Winter now: Read extension bulletins for your specific state. Knowing what species are in your area narrows down your treatment choices by next July.
When to Skip DIY and Call a Professional
Most home grub situations are manageable with the steps in this guide. A few situations warrant professional help before you dig another hole:
- You've applied nematodes or BtG correctly for two consecutive seasons and grub populations haven't dropped. A licensed pest advisor can identify species and soil conditions that change the treatment approach.
- Grubs are present in extremely high numbers across a large area, like more than 50 per square foot. At that scale, a professional application with commercial-grade equipment is more effective and may be faster than repeated home treatments.
- You're uncertain whether grubs are the real problem. Misdiagnosis could be drought stress, root-knot nematodes, or a fungal wilt. Professional scouting eliminates that guesswork.
- You're certified organic and want to verify that your treatment approach meets National Organic Program standards for your specific situation.
Your county or regional cooperative extension office is usually the free starting point. Their agents identify grub species and region-specific extension bulletins are available in every U.S. state and most Canadian provinces.
Frequently Asked Questions
How long do beneficial nematodes live after application?
Most commercially applied nematodes survive in soil for two to six weeks post-application, depending on moisture, temperature, and soil type. They need to find a host grub during that window. If hosts are plentiful and conditions are good, some populations persist longer through reproduction inside killed grubs.
Can I use milky spore and nematodes together?
Yes, they target different segments of the grub population and have complementary activity. Milky spore works through ingestion over a period of days. Nematodes actively hunt and kill within 24 to 72 hours.
Using both can shorten the time to population knockdown. Just don't tank-mix them in the same water. Apply separately with a few days between.
Do grub treatments harm earthworms?
Beneficial nematodes and milky spore are earthworm-safe. BtG does not affect earthworms either. These biological controls are far more selective than synthetic soil drenches.
Broad-spectrum insecticides can harm earthworm populations along with killing grubs. That's one of the main reasons many vegetable gardeners stick with biological options on productive soil.
How do I know if my grub treatment worked?
Re-inspect two to three weeks after application. Dig a new sample in the same area you checked before. You should see fewer live grubs and some in a discolored or inactive state.
Plants typically show greening and resumed growth within two to four weeks. If grub numbers haven't dropped and plants continue declining, a second application may be needed especially if new eggs have hatched.
What's the fastest way to kill grubs without chemicals?
Beneficial nematodes are the fastest biological option, typically killing grubs within 24 to 72 hours of contact. BtG works at a similar pace on young larvae. For immediate small-scale relief, hand-picking removes visible grubs instantly, though it misses larvae that are deep or scattered throughout the soil.
Can grubs come back next year even after treatment?
Yes. Treatments kill the larvae present in your garden at the time of application. Adult beetles from neighboring properties can fly in and lay new eggs.
This is why long-term management combines seasonal treatment with preventive tactics like milky spore establishment, soil health building, and managing adjacent turf areas where egg-laying happens.