If you've noticed brown patches spreading across your lawn and the turf pulls up like loose carpet, you're probably wondering whether grubs are behind it. Learning how to check for grubs properly saves you from treating a problem you don't have or ignoring one that's actively destroying your root system. The good news is you don't need special equipment or a degree in entomology to get a reliable answer.
White grubs are the larval stage of scarab beetles, and they feed on grass roots just below the soil surface. Most university extension programs recommend sampling when grub counts exceed 6 to 10 per square foot, though the exact threshold depends on your turf species and overall lawn health. The key is knowing when to look, where to dig, and what you're actually counting.

Image source: Wikimedia Commons / Сарапулов (CC BY)
Quick Answer
To check for grubs, cut a 1-square-foot section of turf with a shovel. Peel it back and count the white grubs in the root zone and top 2 to 3 inches of soil. Repeat this at four to six spots across your lawn.
Compare your average count to the treatment threshold for your region. Replace each test square and water it afterward.
Why Your Lawn Looks Dead (And How to Know If Grubs Are the Real Culprit)
Brown patches in a lawn can come from a dozen different causes, and grubs are only one of them. Drought stress, fungal disease, dog urine spots, compacted soil, and improper watering all create damage that looks similar at a glance. That's why guessing based on surface appearance alone leads so many homeowners down the wrong path.
The signature sign of grub damage is turf that lifts easily because the roots have been chewed away. If you can grab a handful of grass and it peels back like a rug with almost nothing holding it down, that's a strong indicator. The damage also tends to appear in irregular patches that expand over weeks rather than the uniform circles you'd see with many fungal diseases.
But here's the catch. By the time you see obvious surface damage, the grub population has often been feeding for weeks or months. That's why proactive checking matters.
You can confirm the problem before your lawn reaches the point of no return.
Secondary signs help build the case too. Skunks, raccoons, and birds digging at your turf are often after grubs. If you notice increased animal activity in specific areas, those are prime spots to test.
Just remember that animal digging is a clue, not a diagnosis. You still need to dig and count to know for sure.
The 30-Second Check: Is It Grubs or Something Else?
Before you grab a shovel, do a quick triage to narrow down whether grubs are even likely. This saves you time and helps you focus your digging where it matters most.
Start by walking your lawn and looking at the pattern of damage. Grub damage typically shows up as irregular, spreading brown areas that don't follow a neat circular shape. The edges blend into healthy grass rather than forming a sharp border.
If you see perfect rings or defined patches with a darker green outer edge, you're more likely dealing with a fungal issue like brown patch or dollar spot.
Next, do the tug test. Grab a handful of the brown grass and pull firmly. If it resists and stays anchored, the roots are probably intact and grubs aren't the primary issue.
If it lifts cleanly with little resistance, that's your signal to dig deeper.
Finally, consider the timing. Grub damage in most regions becomes visible from mid-summer through early fall when larvae are actively feeding near the surface. If your lawn went brown in late spring during a dry spell, drought is the more likely culprit.
Matching the symptom to the season eliminates a lot of false leads before you ever cut into the turf.
What Grubs Actually Are (And Why That Matters for Your Diagnosis)
White grubs aren't a single pest. They're the larval form of several scarab beetle species, and the one in your yard affects when you should check and how you should respond. The most common species in North American lawns include Japanese beetles, European chafers, masked chafers, black turfgrass ataenius, and May beetles (Phyllophaga species).
All of them share the same basic body plan. They're C-shaped, creamy white, with a tan or brown head capsule and three pairs of legs near the front. Size varies by species and age, ranging from a quarter inch in early instars to over an inch for mature Japanese beetle or June beetle larvae.

Image source: Wikimedia Commons / Tim Gage (CC BY-SA)
One identification mistake that trips people up is confusing grubs with billbug larvae. Billbug larvae look similar but have no legs. If you find legless white larvae in your turf, you're dealing with a different pest that requires a different management approach.
Taking a close look at the head end clears this up fast.
The life cycle matters for timing your check. Adult beetles lay eggs in mid to late summer. Those eggs hatch into small larvae that feed on roots through fall, move deeper into the soil to overwinter, and return to the root zone the following spring.
The window when grubs are small, near the surface, and most vulnerable to treatment is typically July through September for most species. That's also the easiest time to find and count them.
When to Check: Timing That Makes or Breaks Your Results
Checking for grubs at the wrong time of year leads to two problems. You either miss them entirely because they're too deep, or you find them when they're too large and the damage is already done.
The ideal sampling window is late July through September in most temperate regions. During this period, larvae are in their early to mid instar stages, meaning they're small enough to still be feeding near the surface but large enough to spot easily. Soil temperatures are warm, grubs are active in the root zone, and you still have time to apply curative treatment if your counts warrant it.
Spring sampling is less reliable. Grubs that survived the winter have either pupated into adults or moved back up from deeper soil layers, but their numbers may have dropped significantly due to winter mortality. You might underestimate the population or miss it entirely.
Spring is better for assessing the damage that occurred the previous fall than for making treatment decisions.
Avoid sampling during drought or frozen conditions. Dry, hard soil makes digging difficult and grubs may have moved deeper to find moisture. Frozen ground is obviously a non-starter.
If conditions are dry, water the area lightly a day before you plan to sample. Moist soil is easier to cut and grubs stay closer to the surface where you can find them.
As of 2026, many university extension services have updated their regional recommendations based on shifting pest pressure and climate patterns. Check with your local extension office for species-specific timing in your area, since southern regions may shift the window earlier and northern regions may compress it into August and early September.
How to Check for Grubs: The Step-by-Step Dig Test
This is the core process. It's straightforward, but doing it correctly makes the difference between a reliable count and a wasted afternoon.
What You Need
You don't need much. A flat-bladed spade or lawn shovel is the main tool. A piece of cardboard or a tarp helps keep the soil and sod organized so you can replace it cleanly.
A ruler or tape measure ensures your sample size is consistent. Gloves are optional but helpful if you're squeamish about handling larvae.
Some people use a golf course cup cutter for a cleaner sample, but a standard shovel works fine for home use. The goal is a defined area you can count grubs in, not a perfect cylinder of turf.
The Cut-and-Peel Method
Pick your first test spot in a damaged area, ideally near the edge where brown grass meets healthy turf. That transition zone is where active feeding is most likely happening.
Measure and mark a 12-inch by 12-inch square. Push your shovel straight down along all four sides to a depth of about 3 to 4 inches. You want to cut through the root zone where grubs are feeding.
Once you've cut all four sides, slide the shovel underneath and peel the square back like opening a trapdoor. Try to keep the sod intact so you can replace it later. Flip it over and examine the root zone and the soil surface underneath.
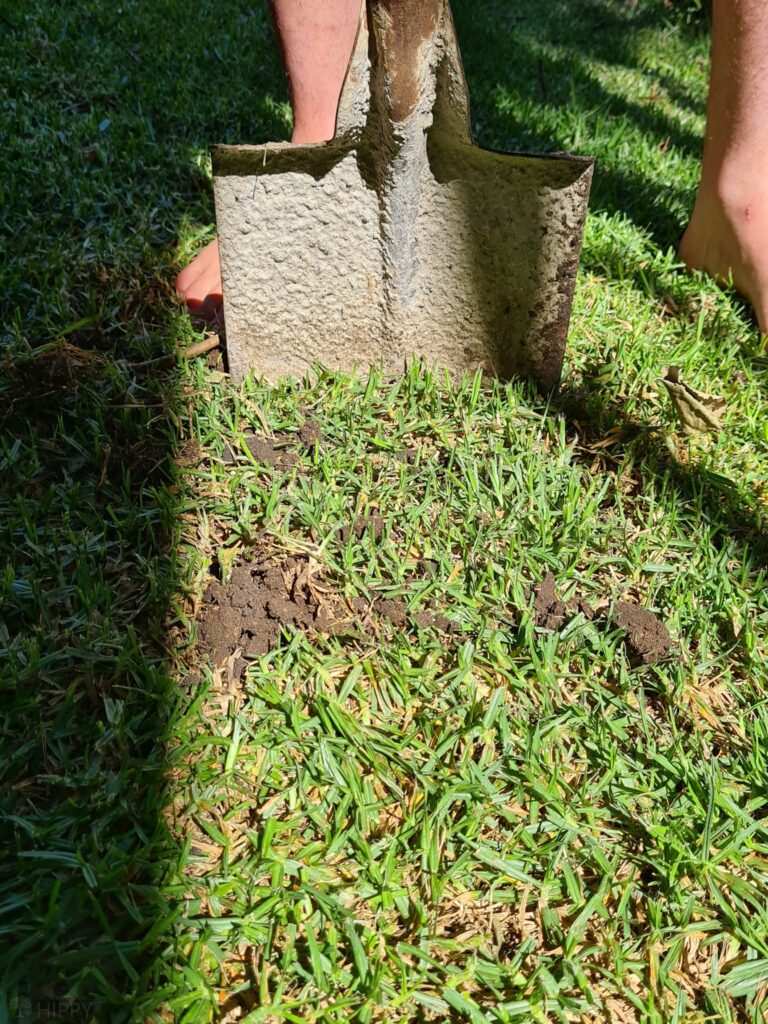
Image source: Bing (Web (fair-use with source credit))
What to Count and Where to Look
Count every grub you see in the exposed root zone and the top 2 to 3 inches of soil beneath the peeled-back sod. Grubs may be curled up in the thatch layer, nestled among the roots, or sitting in the soil just below. Work through the area systematically so you don't double-count or miss any.
Record the number for that square. Then replace the sod, tamp it down firmly, and water it. The turf will usually re-establish within a couple of weeks if the roots weren't already destroyed.
Repeat this process at four to six locations across your lawn. Include spots that look damaged and a couple that look healthy. This gives you a representative picture rather than just sampling the worst areas.
Add up all your counts and divide by the number of samples to get your average grubs per square foot. That number is what you'll compare to the treatment threshold.
How Many Grubs Is Too Many? Understanding Treatment Thresholds
A few grubs in your lawn isn't an emergency. Healthy turf can tolerate low populations without showing visible damage. The question is when the numbers cross the line from background noise into economically significant injury.
Most extension programs set the general treatment threshold between 5 and 10 grubs per square foot for common species like Japanese beetles and masked chafers. European chafers can cause damage at lower counts. Some stressed lawns show injury at just 3 to 5 per square foot.
Well-maintained turf with deep roots might handle 12 or more before you see browning.

Image source: Bing (Web (fair-use with source credit))
If your average count falls between 5 and 10 per square foot, you're in the gray zone. Consider your lawn's overall health, how much irrigation you can provide, and how much damage you're willing to accept. A thick, well-watered lawn in good soil can outgrow moderate grub feeding.
A thin lawn under drought stress will show damage at the same population.
Above 10 to 12 per square foot for most species, treatment is almost always justified. The root loss at that density becomes severe enough that the grass can't recover on its own, especially if hot weather follows. At those levels, even if the grubs stop feeding soon, the damage is already baked in.
Below 5 per square foot, treatment is rarely worth it. You're better off focusing on cultural practices like proper watering, aeration, and overseeding to build turf resilience. A few grubs in the soil is normal and actually part of a healthy ecosystem context, especially if birds and other predators are keeping them in check.
These thresholds vary by state and species. Check your local extension service for region-specific guidance, since pest pressure and turf tolerance aren't uniform across the country.
Grub Species Differences That Change Your Approach
Not all grubs behave the same way, and identifying which species you're dealing with affects both your treatment timing and your product choice.
Japanese beetle grubs are the most commonly referenced species. They follow a predictable one-year cycle with eggs laid in July and August, peak feeding damage in late summer and early fall, and a treatment window centered on August and early September when larvae are small and vulnerable. They tend to turfgrasses like Kentucky bluegrass, perennial ryegrass, and fescues.
European chafers are similar in appearance but cause damage at lower population thresholds. They're particularly problematic in the Northeast and Mid-Atlantic where they've become the dominant grub pest in many areas. Their damage often appears earlier in the season, sometimes by mid-summer, because adults lay eggs slightly earlier than Japanese beetles.
Masked chafers, common across the Midwest and Northeast, are a bit more tolerant of drier conditions. Their feeding can be harder to distinguish from drought stress because the damage may appear in lawns with adequate moisture. Species-level identification requires examining the raster pattern on the underside of the larva's abdomen, which is best done with a hand lens or under magnification.
Black turfgrass ataenius is a smaller species that can produce two generations per year in warmer climates. This means you might see two distinct feeding periods, one in late spring to early summer and another in late summer. Their smaller size makes them easier to miss during casual inspection, so a thorough dig test matters even more.
May beetle grubs (Phyllophaga species) have a longer life cycle, sometimes taking two to three years to mature. Damage can pop up sporadically rather than following a single-season pattern. They're more common in areas with mature trees nearby since adults feed on oak, maple, and other hardwoods.
If you can't identify the species with confidence, focus on timing your test and treatment based on the general larval stage rather than the species name. Small, early-stage larvae respond better to most curative products than large, mature ones.
Signs Animals Are Already Telling You Something
Before you even pick up a shovel, look at what wildlife has been doing on your lawn. Animals that dig for grubs leave distinctive patterns that can guide you to the worst-infested spots for testing.
Skunks are the most notorious grub foragers. They create cone-shaped holes, roughly 3 to 4 inches across, where they've punched through the turf to reach larvae underneath. The holes are neat and relatively small compared to the larger, ragged tearing you'd see from raccoons.
Skunk damage often appears overnight in clusters focused on grub-heavy areas.
Raccoons tear up larger sections of sod. They roll back patches of turf like they're peeling a carpet, searching for grubs in a broader area. Raccoon damage can actually destroy grass mechanically even if grub populations are moderate, so it's worth checking when you see this pattern.
Birds like starlings, grackles, and robins feeding on your lawn are another clue. They tend to probe the soil surface with their beaks, leaving small holes as they extract larvae. Heavy bird activity in concentrated areas suggests a food source worth investigating.
If you're seeing animal damage across a wide area, prioritize those zones for your dig test. The animals have essentially done the scouting for you. Just remember that they're attracted to even moderate grub populations, so their presence alone doesn't automatically mean you've exceeded the treatment threshold.
On the flip side, if animal activity is scattered and light, your grub counts are probably low. No animal digging at all doesn't rule out grubs entirely, but it suggests populations are below the level that attracts significant foraging.
Curative vs. Preventative: Choosing the Right Response
Once you have your grub count, you need to decide what to do about it. There are two fundamentally different approaches, and choosing the wrong one wastes money and product.
Curative treatment targets grubs that are already present and feeding. Products containing trichlorfon (Dylox) work fast, often showing results within a few days, and can be effective even against larger, mid-to-late instar larvae Chlorantraniliprole (found in products like GrubEx) is another curative option that works well against smaller larvae and has a longer residual, but it needs to be applied earlier in the season to be most effective.
The best window for curative treatment is late July through September when grubs are small, close to the surface, and actively feeding. Once grubs move deep for winter in October and November, most curative products become ineffective because the larvae aren't in contact with the treated soil layer.
Preventative treatment aims to stop future grub populations before damage occurs. Products containing imidacloprid, thiamethoxam, or chlorantraniliprole (at higher application rates) are applied in late spring to early summer, typically May through early July. The active ingredient sits in the root zone and kills newly hatched larvae as they begin feeding in late summer and fall.
Preventative products are most effective when applied before adult beetles lay eggs. In many regions, this means timing your application to coincide with adult beetle flight, which extension services often track. If you miss that window, you may get reduced efficacy.
Here's the practical decision logic. If your counts are high and you're in late summer or early fall, go curative. If your counts are low to moderate but you had grubs the previous year, apply preventative next spring.
If your counts are below threshold and you've never had a grub problem, skip treatment entirely and retest the following season.
Overlapping both approaches in the same year is rarely necessary and can lead to unnecessary chemical load in the soil. Commit to one strategy based on your actual findings and the time of year.
Common Mistakes That Lead to Wrong Conclusions
Even a straightforward process like a grub count can go sideways if you hit one of these common pitfalls.
Sampling only the worst-looking areas skews your results high. You need to include spots that look healthy alongside the damaged ones to get an accurate average. Testing only brown patches gives you a worst-case number, not a representative one.
Digging too shallow is another frequent error. Grubs feed in the top 2 to 4 inches of soil, and some species sit right at the boundary between soil and thatch. If you only examine the grass blades and surface roots, you'll miss larvae sitting just below.
Cut all the way through the root zone and check the soil underneath.
Testing at the wrong time of year leads to both false negatives and false confidence. Sampling in early summer when grubs haven't hatched yet gives you a zero count that doesn't mean your lawn is clean. Sampling in late fall after grubs have moved deep for winter does the same thing.
Stick to the July-through-September window for reliable results.
Confusing old, dead grubs with active ones can make you think a treatment failed when it actually worked. Grubs that have been killed by a recent application may still be visible in the soil. Check for signs of decay or desiccation, and retest two to three weeks after treatment to confirm the population has dropped.
Overreacting to a few grubs is probably the most expensive mistake. A count of 1 to 3 per square foot on a healthy lawn doesn't justify the cost and environmental impact of a full chemical treatment. Pause, assess your turf's overall condition, and focus on building resilience through good cultural practices instead.
Finally, forgetting to replace and water your test squares creates unnecessary bare spots. Pulling up turf and leaving it kills the grass in those patches and creates a new problem to fix. Always press the sod back down and give it a good soaking.
When to Call in a Professional
If your grub counts are consistently above 15 per square foot across multiple test sites, or if you're seeing rapid turf decline despite treatment, it's time to bring in a licensed lawn care professional. They have access to commercial-grade products and application equipment that deliver more consistent coverage than most homeowner options.
Professionals are also worth the call when you can't identify the species causing damage. Misidentification leads to mistimed treatments that waste money and leave the problem unresolved. A turf management specialist can examine the larvae under magnification and match the treatment to the specific pest.
Another scenario that warrants expert help is recurring grub damage year after year despite your best efforts. This often points to an underlying issue like excessive thatch, poor drainage, or a landscape layout that attracts adult beetles. A pro can assess the bigger picture and recommend changes beyond just chemical control.
Frequently Asked Questions
Can I check for grubs without digging up my lawn?
Not reliably. Surface inspection alone misses grubs sitting below the thatch line. The cut-and-peel method is the standard because it lets you see the root zone where feeding actually occurs.
Non-destructive methods like flush tests using soapy water can bring some grubs to the surface, but they're inconsistent and don't give you an accurate count per square foot.
How often should I check for grubs?
Once per year during the peak window of July through September is sufficient for most lawns. If you've had grub problems in previous years, testing annually helps you catch populations before they reach damaging levels. There's no need to test multiple times in a single season unless you're evaluating whether a treatment worked.
Do grub counts in one area represent the whole lawn?
Not necessarily. Grub populations are often patchy, with hotspots near adult beetle feeding sites like trees or light sources. That's why sampling four to six locations across the lawn gives you a much more accurate picture than testing a single spot.
An average across multiple samples is what you should compare to the treatment threshold.
Will my lawn recover from grub damage on its own?
If the root system isn't completely destroyed and you address the grub population, most turfgrasses will recover with proper watering and fertilization. However, severe damage where roots are entirely gone may require overseeding or sodding in the affected areas. Recovery is fastest in cool-season grasses during fall when growing conditions are favorable.
Are natural or biological controls effective against grubs?
Beneficial nematodes (Heterorhabditis bacteriophora) can provide meaningful control when applied correctly to moist soil during peak grub activity. Milky spore (Paenibacillus popilliae) targets Japanese beetle grubs specifically and can persist in the soil for years, but it works slowly and is less effective against other species. These options are best suited for moderate populations or as part of an integrated approach rather than emergency curative treatment.
What's the difference between grub damage and drought damage?
Grub damage causes turf that lifts easily because roots are gone. Drought-stressed grass stays anchored but feels dry and brittle. If you tug on drought-affected grass, it resists because the roots are still intact.
Grub-damaged areas also tend to feel spongy underfoot due to the tunneling activity in the soil.