To change the belt on your Craftsman self-propelled lawn mower, start by disconnecting the spark plug for safety, then remove the mower deck to access the belt area. Loosen the pulleys and carefully slide out the old belt before installing the new one, ensuring everything is aligned correctly. Finish by reassembling the deck and testing the mower to confirm proper operation.
Replacing the belt on your Craftsman self-propelled lawn mower might seem daunting at first, but with a few simple steps, you can do it yourself and save time and money. This process involves safely removing the mower deck, detaching the old belt, and fitting a new one properly. Proper maintenance ensures smooth mowing and prolongs your mower’s lifespan. Keep reading to learn the straightforward steps that will help you get your mower back in top shape quickly and efficiently.

How to Change Belt on Craftsman Self Propelled Lawn Mower
Changing the belt on your Craftsman self-propelled lawn mower may seem like a daunting task, but with the right steps, it becomes manageable. The belt is an essential part that helps drive the mower’s wheels and blades. Over time, belts can wear out, crack, or slip, causing the mower to perform poorly or stop working altogether. Knowing how to replace it can save you time and money, and keep your mower running smoothly.
Understanding Your Craftsman Self Propelled Lawn Mower
Before beginning the belt replacement process, it’s important to understand your mower’s parts and how they work. The main components involved include the engine, the drive belt, the pulley system, and the wheels. The drive belt connects the engine pulley to the wheels, transmitting power to propel the mower forward. The blade belt, if separate, connects the engine to the blade deck, powering the cutting blades.
Tools and Materials Needed for Belt Replacement
Preparing the right tools ensures a smooth replacement process. Here is a list of items you will typically need:
- Screwdrivers (flat-head and Phillips-head)
- Socket wrench set
- Pliers
- Replacement drive belt (make sure it matches your mower’s model)
- Work gloves for safety
- Carburetor cleaner or belt degreaser (optional for cleaning)
Having these items ready before starting will streamline your task and prevent interruptions.
Safety Precautions Before Starting
Always prioritize safety when working on your lawn mower. Disconnect the spark plug wire to prevent accidental engine start. Ensure the mower is on a flat, stable surface and the parking brake is engaged. Wearing gloves and eye protection can prevent injuries from moving parts or debris.
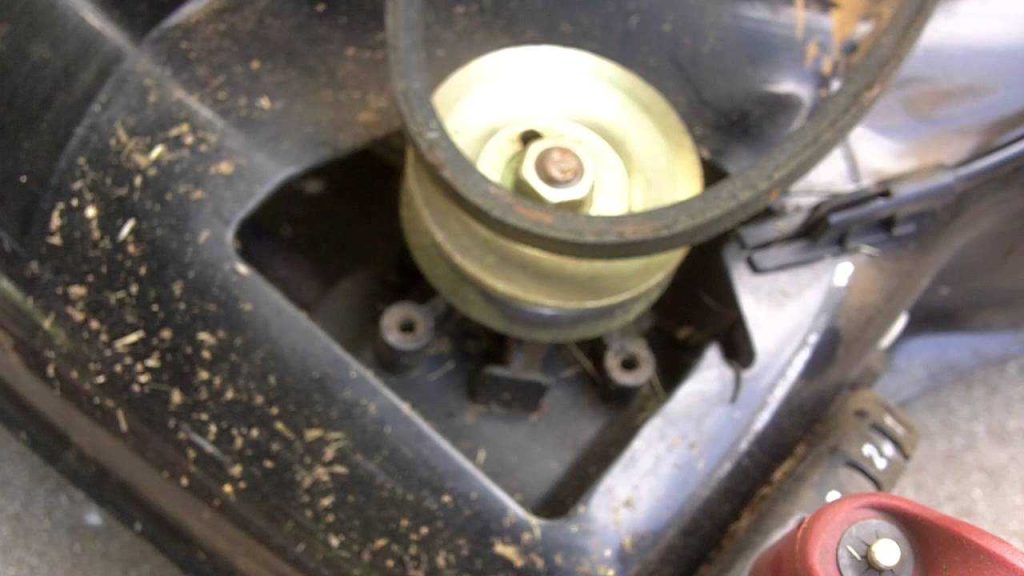
Locating the Belt and Understanding Its Path
Identify where the belt is located on your mower by consulting the user manual or examining the deck area. Typically, the drive belt runs from the engine pulley to the transmission pulley on the wheels. The blade belt, if separate, connects the engine pulley to the blade pulley. Tracing the belt’s route helps you understand what parts need removal during the replacement.
Removing the Old Belt
Start by removing the mower’s outer cover or shroud. Use a screwdriver or socket wrench to unscrew the fasteners holding the cover in place. Carefully lift off the cover and set it aside. Next, locate the belt and loosen any tensioners or pulleys that hold the belt tight. Gently slide the belt off the pulleys, taking note of its routing for the new belt installation.
How to Loosen Tensioner Pulleys
Most Craftsman mowers have a spring-loaded tensioner pulley. Use pliers or a wrench to rotate or move the tensioner away from the belt, creating slack. With the tension released, slide the belt off the pulley. Remember the belt’s path and how it wraps around each pulley for reference when installing the new belt.
Inspecting Components for Wear or Damage
Before installing the new belt, check pulleys, blades, and other drive components for damage. Look for cracks, rust, or misalignment. Replace any worn-out pulleys or damaged parts to prevent future issues. Lubricate moving parts if necessary, but avoid getting lubricant on the belt.
Installing the New Belt
Position the new belt around the pulleys following the same routing as the old belt. Ensure the belt sits properly in the grooves of each pulley. Use the tensioner pulley to apply tension to the belt, making sure it’s tight but not overly strained. Double-check that no parts are pinched or misaligned before proceeding.
Proper Belt Tensioning
The belt should have a slight give – generally about a quarter inch of play when pressed. Accurate tensioning is crucial for effective power transfer and extended belt life. Use a belt tension gauge if available or follow the tension recommendations in your mower’s manual.
Securing the Cover and Final Checks
Replace the outer cover or shroud, tightening all screws securely. Confirm that all fasteners are in place and tight. Remove the spark plug wire to test the mower before fully reassembling. Turn the blades by hand to ensure smooth operation and proper belt movement.
Testing Your Mower After Belt Replacement
Reconnect the spark plug wire, start the mower, and engage the drive and blades. Observe the operation, listening for unusual noises or belt slipping. If everything runs smoothly, your belt replacement is successful. If you notice issues, double-check belt routing and tension.
Maintenance Tips to Extend Belt Life
To prolong the life of your new belt, keep the deck clean and free of debris. Regularly inspect for wear, cracks, or loose parts. Adjust the belt tension periodically according to the manufacturer’s instructions. Lubricate pulleys and moving parts, but avoid getting lubricant on the belt itself.
Common Problems and Troubleshooting
If your mower isn’t propelling properly, verify the belt is correctly installed and tensioned. A slipping belt might need tightening or replacement. Check for broken or cracked belts and replace them promptly. Misaligned pulleys can also cause belt issues; realign them if necessary.
Additional Tips for Ease of Replacement
For easier access, raise the mower on a stable surface or use jack stands. Keep track of all screws and parts removed during disassembly. Taking pictures during the process can help during reassembly. Patience and careful handling ensure a successful belt change.
Summary of Key Steps
- Disconnect spark plug wire for safety.
- Remove deck cover to access belt.
- Loosen tensioner pulley to slip off old belt.
- Inspect pulleys and replace if damaged.
- Routing the new belt correctly following the original path.
- Adjusting belt tension properly.
- Reassemble cover and test mower operation.
Replacing the belt on your Craftsman self-propelled mower might seem complicated initially, but with detailed steps and proper tools, it becomes straightforward. Regular maintenance and prompt replacement of worn belts will keep your mower functioning efficiently, ensuring a well-manicured lawn all season long.
Craftsman Self-Propelled Lawnmower Belt Replacement
Frequently Asked Questions
What tools are necessary to replace the belt on a Craftsman self-propelled lawn mower?
To replace the belt, gather tools such as a socket wrench, screwdrivers, pliers, and possibly a belt removal tool. You may also need a new belt compatible with your mower model. Having gloves on hand can protect your hands during the process.
How can I access the belt area on my Craftsman mower for replacement?
Start by turning off the mower and disconnecting the spark plug for safety. Remove the mower’s side covers or the deck shield, usually held with screws or clips. Lift the deck if necessary to gain easy access to the belt and pulleys. Consult your mower’s manual for specific instructions related to your model.
What steps should I follow to properly remove the old belt from the mower?
Locate the belt and note its routing before removal. Use your tools to loosen the pulleys and slide the belt off the blades and pulleys. Be careful not to damage any parts. Once removed, inspect the pulleys and blades for wear or damage before installing the new belt.
How do I correctly install the new belt on my Craftsman mower?
Position the new belt around the pulleys, following the original routing pattern. Make sure the belt seats properly into the pulleys. Tighten the pulleys securely, ensuring the belt has the correct tension—neither too tight nor too loose. Double-check the routing before reassembling the covers.
What are the key precautions to take during belt replacement to avoid damage?
Always turn off the mower and disconnect the spark plug before working on the belt. Wear gloves to protect your hands. Handle the pulleys gently to prevent bending or breaking. Use the correct tools to avoid stripping screws or damaging parts. Follow your mower’s manual for specific safety guidance.
Final Thoughts
Changing the belt on a Craftsman self-propelled lawn mower is straightforward with the right steps. First, disconnect the spark plug to ensure safety. Remove the mower deck cover to access the belt.
Next, slide the old belt off the pulleys and note how it’s positioned. Install the new belt by looping it around the pulleys, ensuring it sits correctly in all grooves.
Finally, reassemble the mower deck and reconnect the spark plug. Knowing how to change belt on craftsman self propelled lawn mower ensures smooth operation and extends your mower’s lifespan efficiently.