
Looking for affordable lawn aeration? This guide reveals simple, cost-effective techniques to improve soil health without breaking the bank. Learn how to manually aerate your lawn using common household items or low-cost tools for lusher, greener grass.
Are you dreaming of a lush, green lawn that’s the envy of your neighbors, but dreading the potential cost of lawn care services? We get it! Many homeowners associate lawn aeration with expensive machinery rentals or pricey professional treatments. But what if I told you that achieving healthier soil and a more vibrant lawn doesn’t have to cost a fortune? It’s absolutely possible to aerate your lawn cheaply, and we’re here to show you how.
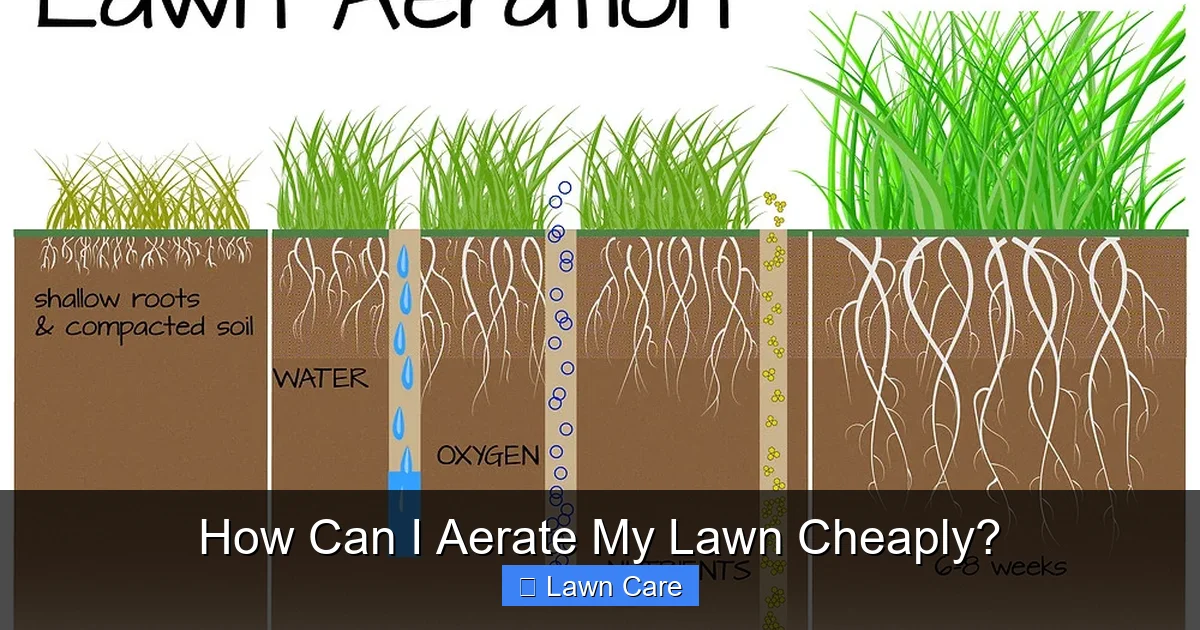
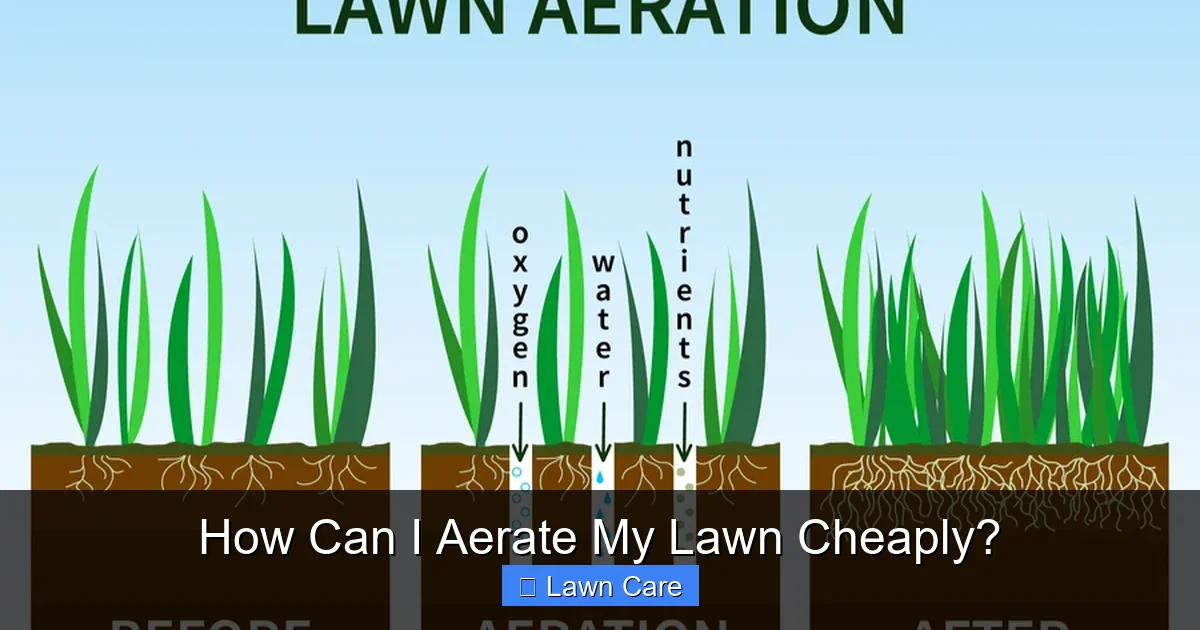
You might be wondering why you even need to aerate your lawn in the first place. Over time, foot traffic, heavy rainfall, and even mowing can compact your soil. This compaction squeezes out air pockets, making it difficult for water, nutrients, and oxygen to reach your grass’s roots. Think of it like trying to breathe with a pillow over your face – not ideal for healthy growth! Aeration is the process of creating small holes in the soil to relieve this compaction, allowing essential elements to penetrate. The good news is, you can achieve these benefits without emptying your wallet.
Let’s dive into the most effective and budget-friendly ways to aerate your lawn, proving that a beautiful lawn is within reach, no matter your budget. This is all about smart, simple techniques that get the job done.
Key Takeaways
- Manual Aeration with Basic Tools: Utilize forks or shovels to create holes in your lawn, a highly effective and inexpensive method.
- DIY Spike Aerator Shoes: Craft your own spike aerator shoes using old boots and screws or nails for a portable, cheap solution.
- The “Push-Pull” Method: Employ a garden fork or sturdy stick to push and pull, loosening compacted soil in a cost-effective way.
- Leveraging Existing Tools: Adapt tools like a pitchfork or even a stiff broom to create aeration holes for minimal expense.
- Timing is Key: Aerate when the soil is moist but not saturated, and during your lawn’s active growing season for best results.
- Benefits of Aeration: Understand that aeration improves water and nutrient absorption, reduces thatch, and promotes deeper root growth.
- Considerations for Small vs. Large Lawns: Choose the cheapest method that suits the size of your lawn; manual methods are best for smaller areas.
Quick Answers to Common Questions
1. What is the cheapest tool I can use to aerate my lawn?
The cheapest and most accessible tool is a standard garden fork or pitchfork. If you don’t have one, they are relatively inexpensive to purchase at most hardware or garden stores.
2. Can I really aerate my lawn just by walking on it?
Yes, with DIY spike aerator shoes, you can aerate your lawn by simply walking on it. These shoes have spikes attached that penetrate the soil with each step.
3. How deep do the spikes need to be for effective aeration?
For effective aeration, the spikes or tines should penetrate the soil at least 3 inches deep. This ensures you’re reaching the root zone and relieving compaction.
4. How often should I aerate my lawn using cheap methods?
For most lawns, aerating once a year is sufficient. However, if your lawn experiences heavy foot traffic or shows signs of severe compaction, you might consider aerating twice a year.
5. Is there any benefit to aerating a lawn that doesn’t seem compacted?
Yes, even lawns that don’t appear severely compacted can benefit from regular aeration. It helps maintain healthy soil structure, improves water and nutrient infiltration, and promotes stronger root growth, leading to a more resilient lawn.
📑 Table of Contents
Why Bother with Cheap Aeration? The Real Benefits
Before we jump into the “how,” let’s quickly touch on the “why.” Even the cheapest aeration methods offer significant advantages for your lawn’s health. Understanding these benefits will motivate you to get started.
Enhanced Nutrient and Water Uptake
When your soil is compacted, water tends to run off the surface instead of soaking in. Fertilizer and other essential nutrients also struggle to reach the root zone. Aeration creates pathways, allowing water and nutrients to penetrate the soil more effectively. This means your grass can absorb more of what it needs to thrive.
Reduced Thatch Buildup
Thatch is a layer of dead and living organic matter that accumulates between your grass blades and the soil surface. A thin layer is normal, but excessive thatch can block air, water, and nutrients from reaching the soil. Aerating helps break down this layer, allowing it to decompose more readily.
Stronger Root Development
With compacted soil, grass roots have a hard time growing deep. Aeration loosens the soil, giving roots the space they need to grow deeper and stronger. Deeper roots make your lawn more resilient to drought and stress.
Improved Soil Health
Aeration introduces oxygen into the soil, which is crucial for beneficial microorganisms. These tiny helpers break down organic matter and make nutrients available to your grass. A healthy soil ecosystem leads to a healthier lawn overall.
Better Disease and Pest Resistance
A healthy, well-nourished lawn is naturally more resistant to diseases and pests. By improving the conditions for root growth and nutrient uptake, aeration indirectly helps your lawn fend off common problems.
The Ultimate Budget-Friendly Aeration Methods
Now, let’s get to the good stuff – how to aerate your lawn without spending a lot of money. These methods are perfect for homeowners who want to take a hands-on approach to lawn care.
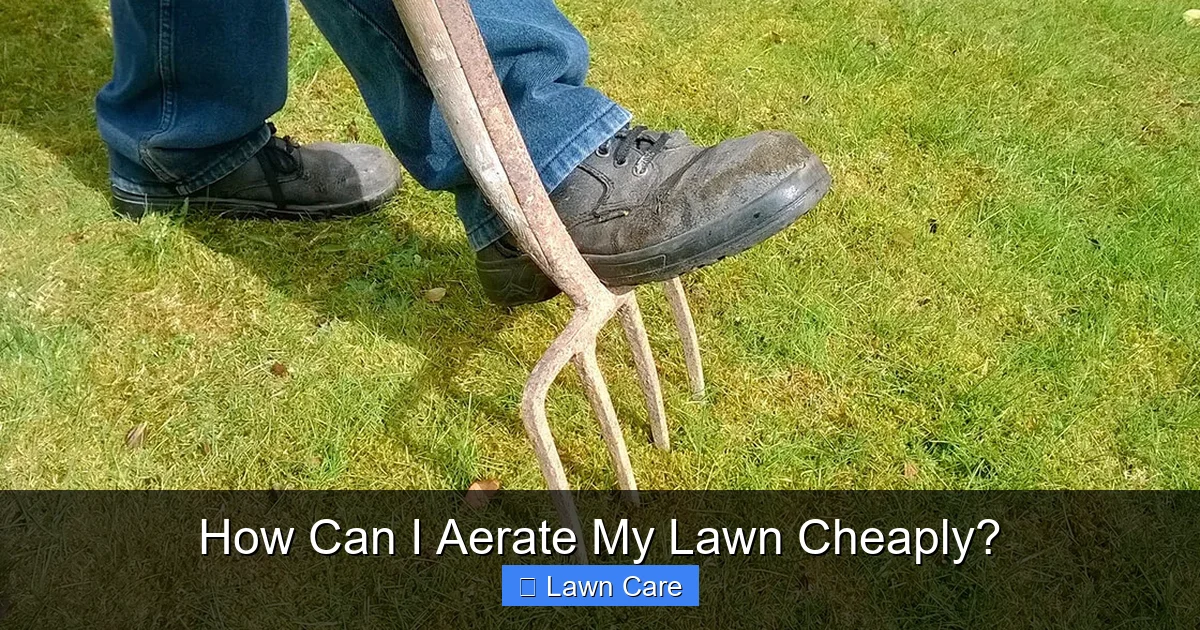
Method 1: The Humble Garden Fork (or Pitchfork)
This is perhaps the most straightforward and cheapest way to aerate your lawn. If you have a sturdy garden fork or a pitchfork lying around, you’re already halfway there!
How to Do It:
1. Prepare the Soil: The best time to aerate is when the soil is moist but not waterlogged. If your lawn is dry, water it a day or two beforehand. Avoid aerating when the ground is soggy, as this can cause more compaction.
Visual guide about How Can I Aerate My Lawn Cheaply?
Image source: static.wixstatic.com
2. Work in Sections: Start at one edge of your lawn and work your way across.
3. Insert the Fork: Push the tines of the garden fork into the soil to a depth of about 3-4 inches. Try to go straight down.
4. Wiggle and Lift: Once the tines are in, gently wiggle the fork back and forth and slightly lift. This loosens the soil and creates a small opening.
5. Repeat Regularly: Space your fork insertions about 3-6 inches apart in a grid pattern. You want to ensure you’re covering the entire area. It’s a workout, but it’s effective!
Tips for Success:
- Use a fork with strong, thick tines. If your fork has hollow tines, even better, as it removes small plugs of soil.
- Don’t worry if the process seems slow. This is a manual labor task, and the results are worth the effort.
- You can also use a sturdy shovel or spade, digging down and gently twisting to create holes. This is particularly effective for smaller, highly compacted areas.
Method 2: DIY Spike Aerator Shoes
Want to combine a bit of exercise with your lawn care? Create your own spike aerator shoes! This is a fantastic and incredibly cheap way to aerate your lawn as you walk.
How to Do It:
1. Gather Your Materials: You’ll need an old pair of sturdy boots or shoes, a generous supply of long screws (around 3-4 inches) or nails, and a drill with a bit that matches your screws.
2. Mark and Drill: Put on the boots. Decide where you want your spikes to go. Mark the soles.
3. Attach the Spikes: Using your drill, screw the long screws or hammer the nails through the soles of the boots. Make sure they are securely fastened. You want the spikes to be long enough to penetrate the soil effectively, about 3 inches. Space them evenly across the sole.
4. Aerate While You Walk: Put on your DIY spike aerator shoes and simply walk across your lawn. As you step, the spikes will poke holes into the soil.
Tips for Success:
- Ensure the screws/nails are firmly attached and won’t loosen or fall out while you’re walking.
- Be cautious when walking! The spikes can make the shoes slippery, so take smaller steps and be mindful of your balance.
- This method is best for moderate compaction. For very hard soil, you might need to make multiple passes or use a different method.
This method is a great example of how to aerate your lawn without a machine, offering a truly DIY approach.
Method 3: The “Push-Pull” or “Leverage” Method with a Stick or Pipe
This technique uses leverage to create deeper holes, especially useful for stubborn compacted spots. You can use a sturdy stick, a piece of rebar, or even a length of metal pipe.
How to Do It:
1. Find Your Tool: Select a strong, straight tool. A broom handle might work for lighter compaction, but something more robust like a piece of PVC pipe (at least 1 inch in diameter) or metal rebar is ideal.
2. Prepare the Soil: Again, moist soil is key. Water your lawn a day or two in advance if needed.
3. Create the Holes: Place one end of your tool into the soil. You can either push straight down, or for tougher soil, place your foot on the opposite end to add weight, and then push down.
4. Leverage for Loosening: Once the tool is inserted, use it as a lever. Push down on one side and pull up on the other, or rock it back and forth gently. This action creates a larger, more aerated void than just a simple poke.
5. Space Them Out: Aim to create these loosened areas every 4-6 inches, depending on the severity of compaction.
Tips for Success:
- If using a hollow pipe, you can actually remove small cores of soil. This is more effective than just poking holes.
- This method can be a bit more strenuous. Take breaks as needed.
- Consider reinforcing the end of a stick or pipe if it tends to bend or break under pressure.
Method 4: Adapt Existing Tools – The Stiff Broom Trick
This is for very light aeration needs or for a quick touch-up. It won’t be as effective as the methods above for heavy compaction, but it’s incredibly easy and free if you have the right tool.
How to Do It:
1. Use a Stiff-Bristled Broom: Find a broom with very stiff bristles.
2. Scrape and Agitate: In a back-and-forth or circular motion, vigorously scrape and agitate the surface of your lawn. The goal is to slightly disturb the top layer of soil and create tiny openings.
3. Focus on Compacted Areas: Pay special attention to areas where foot traffic is heaviest.
Tips for Success:
- This method is best for loosening thatch and breaking up surface crusting, not deep compaction.
- Combine this with light watering to help the loosened soil settle.
- For better results, consider using a metal rake to scarify the surface before using the broom.
When and How Often Should You Aerate Cheaply?
Visual guide about How Can I Aerate My Lawn Cheaply?
Image source: buffaloturf.com.au
Even the cheapest aeration needs to be done at the right time to be most effective.
The Best Time for Aeration
The ideal time to aerate your lawn is during the active growing season of your grass type.
- Cool-Season Grasses (e.g., Kentucky Bluegrass, Fescue, Ryegrass): Spring and fall are best. Aerating in early spring allows the grass to recover and grow before summer heat. Fall aeration helps roots establish before winter.
- Warm-Season Grasses (e.g., Bermuda, Zoysia, St. Augustine): Late spring through summer is ideal. This is when these grasses are actively growing and can quickly recover from the aeration process.
You can also learn more about what month should I aerate my lawn to get specific guidance.
How Often to Aerate
For most lawns, especially those experiencing moderate compaction, aerating once a year is usually sufficient. If you have a very high-traffic lawn or notice significant signs of compaction (water pooling, thin grass), you might consider aerating twice a year. However, for cheap methods, it’s more about consistent effort than heavy, infrequent treatments.
Tips for Maximizing Your Cheap Aeration Efforts
Visual guide about How Can I Aerate My Lawn Cheaply?
Image source: thisismygarden.com
To get the most bang for your buck (or for your free effort!), keep these tips in mind.
Water Before Aerating
As mentioned, moist soil is crucial. Water your lawn 24-48 hours before you plan to aerate. This makes it easier for your tools to penetrate the soil and reduces the risk of further compaction.
Don’t Aerate When It’s Too Wet
While moist soil is good, waterlogged soil is not. If you step on the lawn and your shoes sink deeply or leave significant mud, wait for it to dry out a bit. Aerating soggy ground can undo the benefits of aeration and create even worse compaction.
Consider Overseeding After Aerating
The holes created by aeration are perfect for new grass seed. If you’re looking to fill in thin patches or improve your lawn’s density, lightly spread grass seed over the aerated areas. The seeds will fall into the holes, making good contact with the soil and increasing germination rates. This is an extra step that can be done cheaply if you buy a small bag of seed.
Follow Up with Fertilization
After aerating, your lawn is more receptive to nutrients. If you plan to fertilize, now is an excellent time to do it. The fertilizer will have a direct path to the root zone, making it more effective.
Be Patient
Don’t expect overnight miracles. The benefits of aeration are cumulative. Consistently applying these cheap methods over time will lead to a noticeably healthier and more vibrant lawn. You’ll see improvements in grass density, color, and overall resilience.
When to Consider Other Options (Even Cheap Ones)
While these DIY methods are fantastic for saving money, there might be times when you need to consider slightly different approaches, even if they still keep costs low.
For Very Large Lawns
Manually aerating a very large lawn can be incredibly time-consuming and physically demanding. If your lawn is an acre or more, you might consider borrowing a manual core aerator from a neighbor or friend. Renting a powered aerator is an option, but it’s less “cheap” than the methods discussed here.
For Severely Compacted Soil
If your soil is like concrete, manual methods might struggle to make sufficient holes. In such cases, adding soil amendments like gypsum can help break up heavy clay soils over time, making future aeration easier. You can learn how much gypsum do I put on my lawn for guidance.
When Time is Scarce
If you simply don’t have the time for manual labor, you might need to invest in a very basic, affordable spike aerator tool you can buy at a garden center. These are usually inexpensive and can speed up the process slightly compared to a garden fork.
Ultimately, the goal is to find a method that fits your budget, your time, and your lawn’s needs. The most important thing is to aerate your lawn consistently. A healthy lawn, like this one, is a result of ongoing care.
Conclusion: A Healthy Lawn Doesn’t Require a Huge Budget
As you can see, achieving a beautifully aerated lawn doesn’t require a hefty investment. By utilizing common household tools like garden forks or by getting creative with DIY spike aerator shoes, you can significantly improve your lawn’s health without spending a fortune. These methods are not only cost-effective but also provide a great way to connect with your outdoor space and understand your lawn’s needs better.
Remember, consistent care is the secret to a thriving lawn. So, grab your tools, get out there, and start aerating! Your lawn will thank you for it with deeper roots, better growth, and a vibrant, green appearance. Happy aerating!
Frequently Asked Questions
What’s the best time of year to aerate my lawn cheaply?
The best time depends on your grass type. For cool-season grasses, aim for spring or fall. For warm-season grasses, late spring through summer is ideal. Aerating during the active growing season allows the grass to recover quickly.
How do I know if my lawn needs aeration?
Signs of compacted soil include water pooling on the surface after rain, thin or weak grass growth, and difficulty driving a screwdriver into the ground. Heavy foot traffic also indicates a need for aeration.
Can I aerate my lawn after it has been recently seeded?
It’s generally best to aerate *before* seeding. The holes created by aeration provide an ideal environment for new seeds to germinate by ensuring good soil contact. Aerating over existing new seedlings might damage them.
Will aerating my lawn help with drainage issues?
Yes, aeration can significantly improve drainage. By creating pathways through compacted soil, it allows water to penetrate the ground more easily, reducing surface runoff and waterlogging.
What are the risks of aerating my lawn too often?
While less of a concern with gentle manual methods, over-aerating, especially with aggressive mechanical methods, can stress the grass if done too frequently or at the wrong time. It’s best to stick to the recommended frequency for your lawn type.
Can I use a garden rake to aerate my lawn?
A garden rake is useful for loosening thatch and disturbing the very top layer of soil, but it won’t penetrate deeply enough to effectively aerate compacted soil. For aeration, tools that go deeper, like forks or spikes, are necessary.