If you’re looking to add a burst of color to your garden this spring, planting bulbs is the way to go! These delightful plants, including tulips, daffodils, and hyacinths, are easy to grow and can transform your outdoor space into a vibrant oasis. To get started, choose a sunny spot with well-drained soil, plant your bulbs at the right depth, and water them lightly. With the right care, you’ll see the fruits of your labor come to life when those stunning blooms break through the soil. Let’s dive into the step-by-step guide that will ensure your spring bulbs thrive, bringing joy and beauty to your garden for seasons to come!

Guide To Planting Spring Bulbs
Planting spring bulbs can be a delightful activity that adds vibrant color to your garden. This guide will walk you through everything you need to know to make your springtime bloom a success. From selecting the right bulbs to maintaining them, every step is crucial. Let’s dive in!
Choosing the Right Bulbs
When you start your journey with spring bulbs, the first step is choosing which bulbs to plant. Popular options include tulips, daffodils, hyacinths, and crocuses. Each of these flowers brings its unique beauty and charm to your garden.
– **Tulips**: Known for their bright colors and elegant shapes, tulips are a favorite among gardeners.
– **Daffodils**: These cheerful yellow faces are robust and can multiply every year.
– **Hyacinths**: Their fragrant blooms are perfect for adding scent to your garden.
– **Crocuses**: These early bloomers can push through the snow and bring cheer at the first sign of spring.
As you choose, consider the climate in your region, as well as the soil conditions in your garden. Researching which bulbs thrive in your area will yield the best results.
When to Plant Spring Bulbs
Timing is key when it comes to planting spring bulbs. Most bulbs should be planted in the fall, ideally between September and November. This allows them to establish roots before winter.
– **Zone Awareness**: Different planting zones have varying timelines for bulb planting. Always check your local zone to determine the best planting time.
– **Soil Temperature**: Aim for soil temperatures between 50-60°F. This is the ideal range for many bulbs to take root successfully.
If you miss the fall window, don’t worry too much. Some bulbs can still be planted in early spring but be aware that you may not get the desired bloom.
Preparing the Soil
Healthy soil is essential for growing beautiful spring bulbs. Start by preparing the area where you plan to plant.
– **Clear the Area**: Remove any weeds or debris from the garden bed to give your bulbs the best chance of thriving.
– **Soil Testing**: Conduct a soil test to check pH levels. Most bulbs prefer slightly acidic to neutral soil (pH 6 to 7).
– **Amend the Soil**: If needed, amend the soil with compost or well-rotted manure to improve fertility.
A well-prepared bed will support healthy growth and vibrant blooms.
Planting Techniques
Now that your soil is ready, it’s time to plant your bulbs. Follow these steps for the best results:
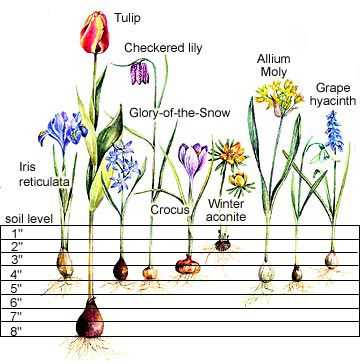
1. **Digging Holes**: Dig holes that are about two to three times deeper than the bulb’s height.
2. **Spacing**: Space bulbs according to their type. For example:
– Tulips should be spaced about 4-6 inches apart.
– Daffodils can be spaced closer together, about 3-4 inches apart.
3. **Positioning**: Place the bulb in the hole with the pointed end facing up. This helps ensure the bulb grows in the correct direction.
4. **Covering**: Gently cover the bulbs with soil and pat down lightly.
5. **Watering**: Water the area thoroughly after planting to help settle the soil.
Mulching for Protection
Mulching is an excellent practice for protecting your bulbs during winter.
– **Types of Mulch**: You can use shredded leaves, straw, or wood chips.
– **Benefits**: Mulch helps regulate soil temperature, keeps moisture in, and prevents weeds.
Apply a layer of mulch about 2-3 inches thick after planting your bulbs. This layer will safeguard your bulbs from harsh winter conditions.
Watering and Fertilizing
Proper watering and fertilizing are crucial for the health of your bulbs.
– **Watering**: After the initial watering post-planting, bulbs generally don’t need much water until spring. Monitor the moisture levels, especially during dry spells.
– **Fertilizing**: When shoots begin to emerge in spring, apply a balanced fertilizer. Look for a fertilizer with equal parts nitrogen, phosphorus, and potassium.
Following these steps will ensure your bulbs receive the nutrients they need to flourish.
Pests and Disease Management
Like any garden plants, spring bulbs can be vulnerable to pests and diseases. Here are some tips for keeping them healthy:
– **Common Pests**: Watch for aphids, slugs, and bulb mites. These pests can damage your bulbs significantly.
– **Preventive Measures**:
– Regularly inspect your plants for signs of pests.
– Use organic pesticides as a preventive measure if you spot any pests.
– **Diseases**: Fungal infections can affect bulbs, especially if the soil drainage is poor. Ensure good drainage to prevent rot.
Being proactive can help you avoid serious issues later in the growing season.
Aftercare: Enjoying Your Blooms
Once your bulbs bloom in spring, take the time to enjoy their beauty. Here are some tips for aftercare:
– **Deadheading**: After flowering, deadheading (removing spent flowers) can encourage bulbs to focus their energy on strengthening the bulb rather than producing seeds.
– **Foliage Care**: Allow the foliage to die back naturally. The leaves help the bulb store energy for next year’s growth.
– **Post-Bloom Fertilization**: Consider applying a low-nitrogen fertilizer after blooming to support bulb health for the next year.
Taking care of your bulbs after they bloom is just as important as planting them.
Companion Planting
Pairing bulbs with other plants can create beautiful garden displays. Consider these tips for companion planting:
– **Low-Growing Groundcovers**: Plants such as creeping thyme or sedum can keep the soil in place and add texture to your garden.
– **Perennials**: Pairing bulbs with perennials like hostas or ferns creates a layered effect that looks appealing.
– **Color Coordination**: Choose companion plants that complement the colors of your bulbs for a cohesive look.
Companion planting not only enhances the beauty of your garden but can also improve growth for all plants involved.
Bulb Storage for Future Planting
If you have leftover bulbs or want to save some for next year, proper storage is essential.
– **Drying**: Allow bulbs to dry completely after harvesting. This helps prevent mold and rot.
– **Storage Conditions**: Store bulbs in a cool, dry, and dark place. Paper bags or mesh bags work well for this purpose.
– **Planting Again**: Most bulbs can be reused for several years; however, some may lose vigor, so consider this when replanting.
Storing bulbs properly will help ensure you have vibrant flowers for years to come.
Common Mistakes to Avoid
Here are some common mistakes new gardeners make when planting spring bulbs, and how to avoid them:
– **Planting Too Shallow**: Ensure bulbs are planted deep enough. Shallow planting can expose them to cold temperatures.
– **Skipping Amending Soil**: Don’t neglect to amend your soil. Bulbs thrive in rich, well-draining soil.
– **Ignoring Sunlight Needs**: Make sure to plant bulbs in spots that receive adequate sunlight according to their requirements.
Avoiding these pitfalls can make your growing experience more rewarding.
As you prepare to plant your spring bulbs, remember that patience is key. With careful planning and attention, your garden will burst into a symphony of colors as spring arrives. Enjoy the process, and happy planting!
A guide to garden bulbs for beginners
Frequently Asked Questions
“`html
What types of bulbs are best for spring planting?
When choosing bulbs for spring planting, consider popular options like tulips, daffodils, hyacinths, and crocuses. These varieties thrive in spring conditions and provide vibrant colors. Additionally, look for smaller bulbs like snowdrops for early blooms or larger ones like alliums for a dramatic effect later in the season.
How should I prepare the soil before planting bulbs?
Prepare the soil by first removing any weeds and debris from the planting area. Loosen the soil to a depth of about 12 inches and mix in compost or well-rotted manure to improve drainage and fertility. Aim for a slightly acidic to neutral pH for optimal growth.
When is the ideal time to plant spring bulbs?
Plant spring bulbs in the fall, ideally between September and November, before the ground freezes. This timing allows the bulbs to establish roots before winter. In warmer climates, you may plant as late as December, as long as the soil remains workable.
How deep should I plant my spring bulbs?
Generally, plant bulbs at a depth of two to three times their height. For instance, a bulb that is 2 inches tall should be planted about 4 to 6 inches deep. This depth helps protect the bulbs from temperature fluctuations and supports healthy growth.
What care do spring bulbs need after planting?
After planting, water the bulbs thoroughly, especially if the fall is dry. Ensure the soil remains moist but not waterlogged throughout the growing season. Once the flowers bloom, deadhead them to promote a new round of growth, and allow the foliage to die back naturally for nutrient replenishment.
“`
Final Thoughts
Planting spring bulbs brings vibrant colors and fresh blooms to your garden. By following the steps outlined in our ‘Guide To Planting Spring Bulbs,’ you ensure that your flowers thrive come springtime. Choose quality bulbs, plant them at the right depth, and provide adequate care for best results.
As you prepare your garden beds and select your favorite bulb varieties, keep in mind the importance of timing and location. With proper planning and care, you’ll enjoy a stunning floral display that brightens up your space. Happy planting!