
Applying pre-emergent at the right time is crucial for maintaining a healthy, weed-free Bermuda grass lawn. The key is to monitor soil temperature: target spring applications when soil consistently reaches 55°F for several days, and fall applications when it drops to 70°F. This precise timing ensures the pre-emergent creates a protective barrier before weed seeds germinate, effectively stopping troublesome weeds like crabgrass and poa annua in their tracks.
When to Apply Pre Emergent for Bermuda Grass
If you dream of a lush, vibrant Bermuda grass lawn that stands out as the envy of the neighborhood, then understanding when to apply pre emergent for Bermuda grass is one of the most important lessons you’ll learn. Pre-emergent herbicides are your secret weapon against pesky weeds, stopping them before they even have a chance to sprout and invade your beautiful turf.
This comprehensive guide will walk you through everything you need to know about the proper timing and application of pre-emergent for Bermuda grass. We’ll cover the science behind why timing is so crucial, how to hit those sweet spots in spring and fall, and give you step-by-step instructions for getting it right. By the end, you’ll be armed with the knowledge to keep your Bermuda lawn looking its best, year after year.
Key Takeaways
- Soil Temperature is King: The most critical factor for successful pre-emergent application on Bermuda grass is soil temperature, not just the calendar date.
- Spring Application Timing: Apply pre-emergent in spring when soil temperatures consistently reach 55°F for 3-5 consecutive days, typically targeting summer annual weeds like crabgrass.
- Fall Application Timing: Apply pre-emergent in fall when soil temperatures consistently drop below 70°F, aimed at preventing winter annual weeds such as poa annua and chickweed.
- Read the Label Carefully: Always consult your chosen pre-emergent product label for specific instructions, application rates, and reapplication windows.
- Watering In is Essential: After applying pre-emergent, water your lawn thoroughly to activate the chemical barrier in the soil; without this, it won’t be effective.
- Avoid Seeding Conflict: Do not apply pre-emergent if you plan to seed new Bermuda grass or overseed existing turf within the product’s specified window, as it will prevent desirable grass seeds from germinating too.
- Consider Split Applications: For extended protection, especially in areas with long growing seasons, consider splitting your spring application into two doses 6-8 weeks apart.
Understanding Pre-Emergents and Their Role
Before we dive into *when* to apply, let’s briefly touch on *what* a pre-emergent is and how it works. A pre-emergent herbicide creates a protective chemical barrier in the top layer of your soil. When weed seeds attempt to germinate and push through this barrier, they absorb the herbicide and die. It’s important to understand that pre-emergents do not kill existing weeds; they *prevent* new ones from emerging. That’s why timing is everything – you want that barrier in place before the weed seeds wake up.
For Bermuda grass, a warm-season grass, pre-emergents are especially vital because Bermuda’s vigorous growth can sometimes mask emerging weeds, allowing them to establish before you notice. Proactive prevention with a well-timed application of pre-emergent for Bermuda grass is always better than reactive treatment of established weeds.
The Core Principle: Soil Temperature is Key
Forget your calendar for a moment. While calendar dates can offer a general guideline, the real indicator for when to apply pre emergent for Bermuda grass is **soil temperature**. Weed seeds don’t sprout based on the date; they sprout based on how warm or cold the soil is.
Monitoring soil temperature allows you to apply pre-emergent precisely when it will be most effective, right before weed seeds begin their germination cycle. Applying too early risks the product degrading before weeds emerge, while applying too late means weeds have already started to sprout, rendering the pre-emergent ineffective against them.
Spring Application: Targeting Summer Weeds
The spring application of pre-emergent for Bermuda grass is primarily aimed at preventing summer annual weeds. These are the weeds that thrive in warm weather, often appearing in late spring and summer. The most common culprits include:
- Crabgrass: Perhaps the most notorious summer annual weed, crabgrass can quickly take over a lawn if not prevented.
- Goosegrass: Similar to crabgrass but tougher, goosegrass has a flattened appearance and often grows in compacted soil.
- Spurge: A low-growing, mat-forming weed that can quickly spread across bare spots.
- Nutsedge: While often considered a perennial, some pre-emergents can offer limited control of nutsedge if timed correctly.
When to Apply in Spring:
The golden rule for spring pre-emergent application on Bermuda grass is to apply when your soil temperature consistently reaches **55°F for 3-5 consecutive days**. This is the temperature range when crabgrass and other summer annual weed seeds begin to germinate.
How to Monitor Soil Temperature:
- Soil Thermometer: This is the most accurate method. Purchase an inexpensive soil thermometer and insert it 2-3 inches deep into your lawn. Check it daily in the morning for several days.
- Online Resources: Many university extension offices and local weather websites provide regional soil temperature maps or data. Look for resources specific to your area.
- Local Gardening Centers: Your local nursery or garden center staff are often excellent resources for current soil temperatures and ideal application times in your specific climate.
What Happens If Applied Too Early or Too Late:
- Too Early: If you apply pre-emergent when soil temperatures are still too cold, the product might break down or dissipate before the weed seeds are ready to sprout. This leaves your lawn unprotected later in the season. Most pre-emergents offer 6-12 weeks of protection, so you need that protection window to align with peak germination.
- Too Late: If you wait until soil temperatures are consistently above 60-65°F, many weed seeds, especially crabgrass, may have already begun to germinate. Pre-emergents do not kill existing weeds or those that have already broken through the soil. You’ll end up with a weed problem despite your efforts.
Fall Application: Preventing Winter Annuals
While spring application targets summer weeds, a fall application of pre-emergent for Bermuda grass is equally important to prevent winter annual weeds. These weeds sprout in the cooler fall temperatures, grow throughout winter, and often go to seed in early spring before dying off. They can be a major eyesore when your Bermuda grass is dormant. Common winter annual weeds include:
- Poa Annua (Annual Bluegrass): A very common, light-green grassy weed that forms dense clumps. It’s particularly frustrating as it becomes noticeable when Bermuda grass is brown and dormant.
- Chickweed: A low-growing, broadleaf weed with small white flowers.
- Henbit: Another broadleaf weed with purple flowers, often found alongside chickweed.
- Clover: While some consider clover beneficial, if you prefer a monoculture Bermuda lawn, pre-emergent can help control it.
When to Apply in Fall:
For fall pre-emergent application, the ideal timing for Bermuda grass is when soil temperatures consistently drop below **70°F and are trending downwards, usually into the 60s°F range**. This is typically when winter annual weed seeds begin to germinate.
What Happens If Applied Too Early or Too Late:
- Too Early: If applied while soil temperatures are still too warm, the pre-emergent may degrade before the winter annual seeds germinate, leaving your lawn vulnerable.
- Too Late: If you wait until temperatures are too cold, or after a hard frost, many winter annual seeds will have already sprouted and established themselves. Again, pre-emergent won’t kill existing weeds.
Step-by-Step Guide to Applying Pre-Emergent
Applying pre-emergent for Bermuda grass isn’t complicated, but following these steps carefully will ensure maximum effectiveness.
Step 1: Identify Your Weeds and Choose the Right Product
Not all pre-emergents are created equal. Some are better for grassy weeds, others for broadleaf weeds, and some offer a broad spectrum.
- Active Ingredients: Common active ingredients include Prodiamine, Dithiopyr, and Pendimethalin. These are generally safe for Bermuda grass.
- Granular vs. Liquid: Granular products are applied with a spreader and then watered in. Liquid products are mixed with water and sprayed, then watered in. Both are effective; choose what you’re most comfortable with. Granular products often come with fertilizer, which can be a convenient all-in-one approach.
- Read the Label: ALWAYS read the product label. It contains crucial information on application rates, specific weeds controlled, safety precautions, reapplication intervals, and warnings about seeding.
Step 2: Measure Your Lawn Accurately
Over-applying can harm your lawn; under-applying makes the product ineffective. Use a measuring wheel or a tape measure to determine the square footage of your lawn. This will tell you how much product you need.
Step 3: Calibrate Your Spreader
Whether you use a rotary (broadcast) or drop spreader, proper calibration is crucial for even application. The product label will usually provide recommended spreader settings for various brands. If not, perform a simple calibration test on a hard surface to ensure it’s dispensing at the correct rate.
Step 4: Prepare Your Lawn for Application
- Mow: Mow your Bermuda grass lawn a day or two before application to remove excess leaf tissue and allow the granules or spray to reach the soil surface easily.
- Clear Debris: Rake up any leaves, sticks, or other debris that might prevent the pre-emergent from reaching the soil.
- Lightly Water (Optional but Recommended): Some professionals recommend lightly watering the lawn before applying granular pre-emergent. This helps the granules stick to the grass blades and reduces bounce, ensuring more product reaches the soil.
Step 5: Apply the Pre-Emergent Evenly
- Wear PPE: Always wear appropriate personal protective equipment (PPE), such as gloves, long sleeves, pants, and eye protection, as recommended on the product label.
- Walk in a Pattern: To ensure even coverage, walk in a consistent pattern (e.g., parallel lines, overlapping slightly on each pass) across your lawn. For granular products, it’s often recommended to apply half the product in one direction and the other half perpendicular to the first pass. This minimizes skips and overlaps.
- Avoid Over-Application: Do not double-apply or dump extra product in certain areas. This can lead to turf damage.
Step 6: Water It In (Crucial Step!)
This is one of the most critical steps. Pre-emergents need to be watered into the soil to activate the chemical barrier.
- Amount: Refer to your product label for the exact amount of water needed, but typically 0.25 to 0.5 inches of water is sufficient.
- Timing: Water immediately after application or within 24-48 hours. If rain is expected, you might be able to rely on that, but ensure it’s enough rainfall.
- Purpose: Watering moves the herbicide from the grass blades down into the top layer of soil, creating the protective zone where weed seeds will encounter it. Without proper watering, the pre-emergent will sit on the surface and eventually degrade without forming an effective barrier.
Step 7: Re-application (If Necessary)
Most pre-emergent products offer protection for 6-12 weeks. In areas with long growing seasons or where weed pressure is particularly high, a “split application” is often recommended. This involves applying half the recommended rate at the initial timing and the second half 6-8 weeks later. This extends the protective window, offering continuous coverage. Again, always check the product label for guidance on re-application intervals and maximum annual rates.
Important Considerations and Practical Tips
- Do Not Apply to Newly Seeded Lawns: Pre-emergents prevent *all* seeds from germinating, including your desired Bermuda grass seeds. If you’ve just seeded or plan to seed within the next 8-12 weeks (check the label), do not apply pre-emergent.
- Avoid If Overseeding Soon: Similarly, if you plan to overseed your Bermuda grass with ryegrass for winter color, you must avoid applying a fall pre-emergent, as it will prevent the ryegrass from germinating. Plan your pre-emergent timing around your seeding schedule.
- Read the Label, Seriously: This cannot be stressed enough. Every product is slightly different. The label is your ultimate guide.
- Wear Protective Gear: Always prioritize your safety. Gloves, long sleeves, and eye protection are a minimum.
- Consider Split Applications: As mentioned, for extended control, especially in warm climates, a split application can be highly effective for your Bermuda grass.
- Avoid Applying Before Heavy Rain or High Winds: Heavy rain can wash away granular products before they can be watered in properly, or cause liquid applications to runoff. High winds can lead to uneven application and drift onto unintended areas.
- Pre-Emergent is Not a “Fix All”: While powerful, pre-emergent is one part of a holistic lawn care program. Proper mowing, watering, and fertilization are still essential for a healthy Bermuda grass lawn that naturally outcompetes weeds.
Troubleshooting Common Pre-Emergent Issues
Even with the best intentions, sometimes things don’t go as planned. Here are a few common issues and their potential solutions:
My pre-emergent didn’t work, I still have weeds!
There are a few reasons this could happen. The most common is incorrect timing. If you applied too late, weeds may have already germinated. If too early, the product might have degraded before weed germination. Another reason could be insufficient watering-in, meaning the barrier wasn’t properly established. Finally, make sure the product you used targets the specific weeds you’re seeing. Some pre-emergents are better for certain types of weeds than others.
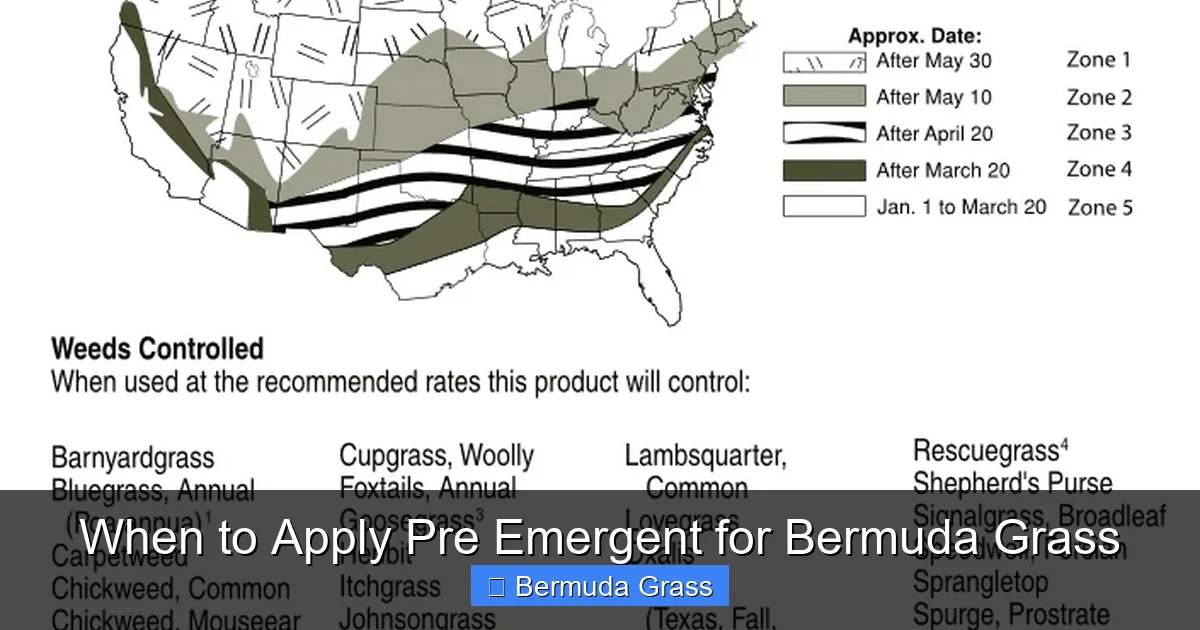
Visual guide about When to Apply Pre Emergent for Bermuda Grass
Image source: howtowithdoc.com
I have bare spots or thin areas after applying. What happened?
This is usually due to over-application in specific spots, which can cause turf damage. It can also happen if you applied pre-emergent too soon after seeding or if the product wasn’t meant for Bermuda grass, though most common pre-emergents are safe. Ensure your spreader is calibrated correctly and you walk at a consistent pace to avoid uneven coverage.
I still see *some* weeds, but not as many. Is this normal?
Yes, it’s very rare for any pre-emergent application to achieve 100% weed control. “Breakthrough” weeds can occur due to missed spots during application, heavy rains washing away the barrier, or new weed seeds being introduced by wind or birds. For these weeds, you’ll need to use a post-emergent herbicide (one that kills existing weeds) or remove them manually.
Conclusion
Applying pre-emergent for Bermuda grass is a cornerstone of a successful lawn care program. By understanding the critical role of soil temperature – 55°F in spring for summer weeds like crabgrass, and below 70°F in fall for winter weeds like poa annua – you can precisely time your applications for maximum effectiveness.
Remember to read your product label meticulously, measure your lawn accurately, calibrate your spreader, and always water in the product thoroughly. With these practices in place, you’ll establish a powerful defense against weeds, allowing your beautiful Bermuda grass to flourish year-round. Consistent and correctly timed pre-emergent applications will save you countless hours of weeding and result in the healthy, vibrant lawn you desire.