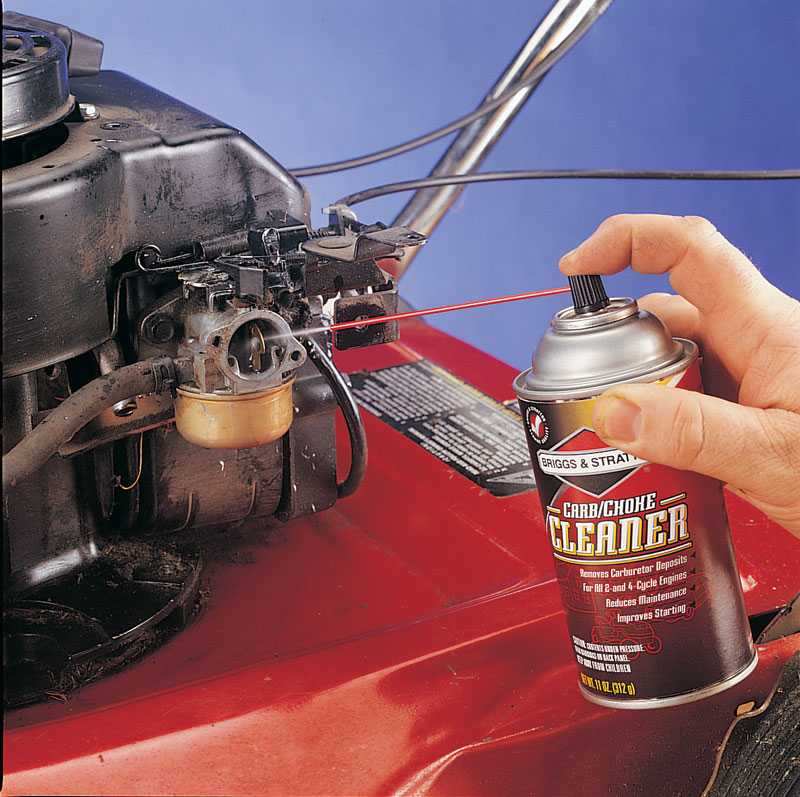
To clean your lawn mower carburetor quickly, start by turning off the mower, removing the air filter, and spraying carburetor cleaner into the carburetor ports. Then, loosen the screws, carefully extract the carb, and give it a thorough cleaning with a brush and more cleaner. Reassemble everything, and your mower should run smoothly again.
Cleaning a lawn mower carburetor might seem intimidating, but with the right steps, it’s a straightforward process that can save you both time and money. Over time, dirt, old fuel, and debris can clog the tiny passages inside the carburetor, causing your mower to sputter or refuse to start. The good news is that with basic tools and a few supplies, you can clean out this essential component yourself. Regular maintenance keeps your mower running efficiently and extends its lifespan. Just remember to work in a well-ventilated area, wear safety glasses, and be patient—your mower will thank you for the effort!

How to Clean Out Lawn Mower Carburetor
Cleaning the carburetor of your lawn mower is essential for keeping it running smoothly. Dirt, old fuel, and debris can clog the small passages inside the carburetor, causing poor engine performance. Regular cleaning helps prevent issues like stalling, hard starting, or uneven cutting.
Understanding the Importance of a Clean Carburetor
The carburetor mixes air and fuel for the engine. When it gets dirty or clogged, this mixture becomes disrupted. A clean carburetor ensures proper fuel flow and optimal engine performance.
Over time, fuel residues and dirt can build up inside, leading to clogged jets and passages. Cleaning the carburetor is a simple way to restore the mower’s power and efficiency.
Tools and Materials Needed for Cleaning
Gather these supplies before starting:
- Screwdriver set (flathead and Phillips) for removing panels and parts
- Wrench or socket set for disconnecting the carburetor
- Carburetor cleaner spray (preferably with a straw nozzle)
- Compressed air can or air compressor
- Small brushes or toothbrush for scrubbing
- Cleaning cloth or rag
- Replacement gaskets and seals (if needed)
- Container or tray for soaking parts
Preparing Your Lawn Mower for Cleaning
Ensure Safety First
Start by turning off the mower and disconnecting the spark plug wire to prevent accidental starting. Let the engine cool down completely before handling any parts.
Drain the Fuel
It’s best to drain the old fuel to avoid spills and fire hazards. Use a siphon or drain plug if your mower has one. Properly dispose of old fuel according to local regulations.
Remove the Carburetor
Locate the carburetor—usually attached to the engine’s air filter. Use the appropriate tools to loosen and carefully detach it. Keep track of all screws and parts.
Disassembling the Carburetor
Careful Removal of Components
Remove the carburetor cover and float bowl. Take note of how parts are assembled for reassembly. Avoid forcing parts apart to prevent damage.
Inspect for Damage or Wear
Check gaskets, seals, and rubber parts for cracks or deterioration. Replace any damaged parts before cleaning.
Cleaning the Carburetor Components
Soaking Parts
Submerge metal parts in carburetor cleaner solution for about 15 to 20 minutes to loosen grime. Avoid soaking rubber or plastic parts to prevent damage.
Brushing and Scrubbing
Use small brushes or old toothbrushes to scrub jets, passages, and float bowls. Gently remove stubborn deposits without scratching surfaces.
Blowing Out Passages
Use compressed air to blow out all small holes and passages. Cover openings to prevent debris from flying away. Ensure all passages are clear and unobstructed.
Cleaning the Main Jet and Needle
Special attention should be paid to the main jet and needle. Remove and clean these carefully, as they control fuel flow. Replace if damaged or clogged beyond cleaning.
Reassembling and Reinstalling the Carburetor
Replace Gaskets and Seals
Ensure all gaskets are fresh and properly positioned to prevent leaks. Do not reuse old gaskets that may be cracked or brittle.
Reattach Components
Carefully assemble the carburetor parts in reverse order. Tighten screws snugly but avoid overtightening to prevent damage.
Reinstall the Carburetor
Reconnect the carburetor to the engine. Reattach fuel lines and air filter, ensuring all connections are secure.
Testing the Mower After Cleaning
Refill with Fresh Fuel
Fill the tank with fresh, clean gasoline. Avoid using old or contaminated fuel to maintain engine health.
Start the Mower
Reconnect the spark plug wire. Start the mower and observe its operation. It should start more easily and run smoothly.
Adjust Settings if Necessary
If the engine runs unevenly or stalls, adjustments to the carburetor’s idle screw or mixture screw may be required. Consult your mower manual for specific instructions.
Additional Tips for Maintaining a Clean Carburetor
- Use fuel stabilizer during off-season storage to prevent gumming and varnish buildup.
- Run the mower periodically to keep fuel flowing and prevent stagnation.
- Replace filters regularly to keep debris from entering the carburetor.
- Inspect and clean the air filter often for optimal engine performance.
Common Problems and How to Avoid Them
| Issue | Cause | Solution |
|---|---|---|
| Engine stalls or sputters | Clogged carburetor passages | Clean the carburetor thoroughly |
| Hard starting | Old fuel or dirty carburetor | Use fresh fuel and clean the carburetor |
| Engine runs rich (black smoke) | Incorrect carburetor adjustment or dirty parts | Adjust mixture screw and clean carburetor |
| Engine won’t start at all | Spark plug, fuel supply, or carburetor issues | Check spark plug, fuel levels, and clean carburetor |
Related Topics for Better Lawn Mower Maintenance
- How to Replace a Lawn Mower Air Filter
- Best Practices for Storing Your Lawn Mower
- How to Change Oil in a Lawn Mower
- Signs That Your Engine Needs Repairs
- Tips for Choosing the Right Fuel for Lawn Mowers
Cleaning out your lawn mower’s carburetor may seem daunting at first, but with the right tools and steps, it is straightforward. Regular maintenance can extend the life of your mower and ensure it performs at its best. Taking the time to clean and inspect the carburetor can save you money on repairs and keep your yard looking its best throughout the mowing season.
HOW TO CLEAN A CARBURETOR ON A CRAFTSMAN 21" LAWN MOWER FOR BEGINNERS
Frequently Asked Questions
What are the signs indicating that my lawn mower carburetor needs cleaning?
When your lawn mower struggles to start, runs rough, or stalls frequently, these are clear signs that the carburetor may be clogged or dirty. You might also notice reduced engine performance or increased fuel consumption. These symptoms suggest dirt or debris obstructing fuel or air flow within the carburetor, making cleaning necessary to restore proper function.
What tools and materials are essential for cleaning a lawn mower carburetor?
Gather a flat-head screwdriver, socket wrench, carburetor cleaner spray, compressed air, a small brush or toothbrush, and a container to hold small parts. Wearing gloves and safety glasses is advisable to protect yourself from fumes and debris. Having these tools ready helps make the cleaning process more efficient and thorough.
How should I prepare my lawn mower before cleaning the carburetor?
Start by disconnecting the spark plug to prevent accidental starting. Turn off the fuel valve or drain the fuel tank to avoid spills. Clean the exterior of the mower to prevent dirt from entering the carburetor during disassembly. Remove the air filter so you can access the carburetor more easily and inspect it for dirt or damage before proceeding with cleaning.
What steps should I follow to clean the carburetor effectively?
Remove the carburetor from the mower, noting how parts are assembled. Disassemble the carburetor carefully, paying attention to small parts and jets. Spray carburetor cleaner into all passages and jets, ensuring they are clear of dirt or deposits. Use compressed air to blow out any remaining debris. Clean the exterior parts with a brush if needed. Reassemble the carburetor and reinstall it onto the mower, reconnecting all components securely.
How can I prevent future carburetor issues on my lawn mower?
Regularly replace or clean the air filter to prevent dirt from entering the carburetor. Use fresh, clean fuel and add fuel stabilizer if you store the mower for extended periods. Periodically inspect and clean the carburetor to remove buildup and ensure smooth engine operation. Additionally, avoid running the mower with a nearly empty fuel tank to prevent debris from being drawn into the system.
Final Thoughts
To clean out lawn mower carburetor, start by removing the carburetor from the mower. Disassemble it carefully, noting how parts fit together. Use a carburetor cleaner spray to loosen deposits and dirt. Rinse all parts thoroughly and reassemble.
Regular maintenance prevents clogs and ensures smooth operation. Keep the area around the carburetor clean. This simple process of how to clean out lawn mower carburetor prolongs the life of your mower and maintains optimal performance.