To clean a Briggs and Stratton lawn mower carburetor quickly, start by removing the carburetor, disassemble it carefully, and soak the parts in a carburetor cleaner solution. Use a small brush and compressed air to clear out any debris, then reassemble and test the mower. This straightforward process restores optimal engine performance and prevents starting issues.
Cleaning your Briggs and Stratton lawn mower carburetor might seem intimidating, but with the right steps, it’s a manageable task that can save you money and ensure your mower runs smoothly all season long. Over time, dirt, old fuel, and debris can clog the tiny passages inside the carburetor, causing your mower to stall or run poorly. The good news is that with some basic tools and a bit of patience, you can clean the carburetor yourself without needing professional help. In this guide, we’ll walk you through a simple, step-by-step process to get your mower back in top shape quickly and effectively.

How to Clean Carburetor Lawn Mower Briggs and Stratton
Understanding the Role of the Carburetor in Your Lawn Mower
A carburetor mixes air and fuel to help your Briggs and Stratton lawn mower run smoothly. If your mower starts hesitating or stalls, the carburetor might be clogged or dirty. Keeping it clean ensures the engine performs well and lasts longer.
Signs That Your Carburetor Needs Cleaning
Watch out for signs such as difficulty starting the mower, reduced engine power, or irregular idling. If you notice these, it’s time to clean the carburetor. A dirty carburetor can cause poor fuel flow and engine problems.
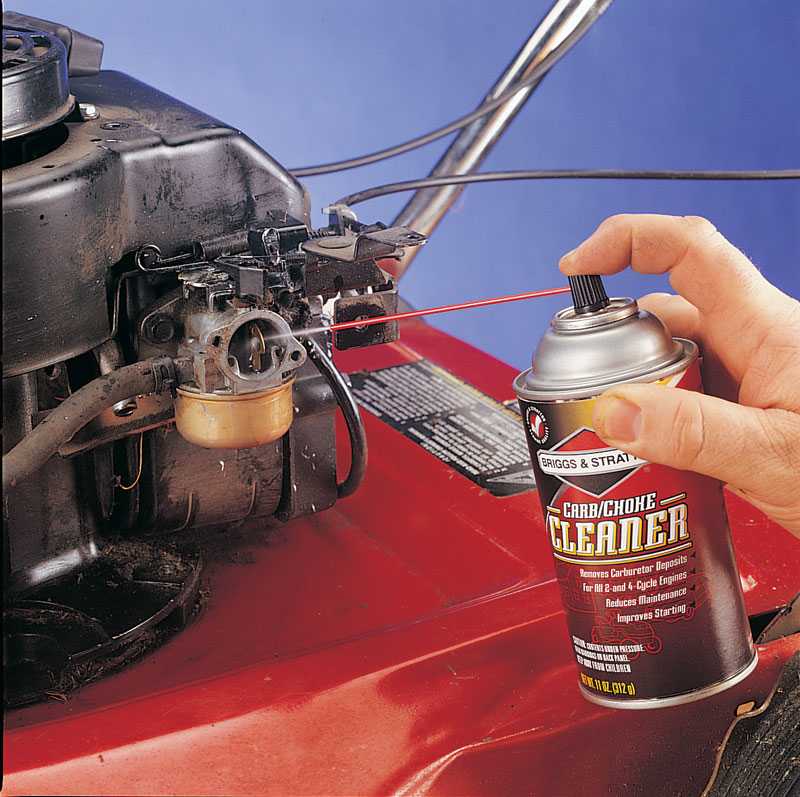
Tools and Supplies Needed for Cleaning
Before starting, gather these essential items:
- Screwdrivers (Phillips and flat-head)
- Wrench or socket set
- Carburetor cleaner spray
- Clean rags or paper towels
- Replacement gaskets or seals (if needed)
- Container for draining fuel
Having everything ready makes the cleaning process faster and easier.
Preparing Your Lawn Mower for Cleaning
Start by turning off the mower and disconnecting the spark plug wire for safety. Let the engine cool down thoroughly. Drain the fuel tank to prevent spills during disassembly. This step prevents accidents and keeps parts clean.
Removing the Carburetor from the Lawn Mower
Locate the carburetor, usually connected to the air filter and fuel line. Use screwdrivers and wrenches to carefully detach it. Take pictures beforehand to remember how the parts fit together. Keep track of all screws and small parts so none are lost.
Disassembling the Carburetor
Once removed, carefully take apart the carburetor, noting the placement of gaskets and jets. Be gentle to avoid damage. Place small parts in a container to keep track of everything. Avoid touching the tiny passages to prevent clogging.
Cleaning the Carburetor Components
Spray carburetor cleaner generously into all passages, jets, and chambers. Use a brush or compressed air to remove stubborn dirt. Pay special attention to the float bowl and needle valve. Wipe all parts with clean rags afterward.
Checking and Replacing Worn Parts
Inspect gaskets, seals, and the float for cracks or damage. If any parts look worn or brittle, replace them with new ones. Proper sealing prevents air leaks that could affect performance. Confirm that jets are clear and not clogged.
Reassembling the Carburetor
Reassemble the cleaned components in reverse order. Ensure all screws and parts are tightened securely but avoid over-tightening to prevent damage. Replace gaskets and seals as needed for a proper fit. Double-check that everything is in its original position.
Reinstalling the Carburetor and Final Checks
Mount the carburetor back onto the mower, reconnect fuel lines carefully, and secure all bolts. Reattach the air filter and reconnect the spark plug wire. Fill the fuel tank with fresh gasoline. Make sure there are no leaks or loose connections.
Starting and Testing the Lawn Mower
Start the mower and observe its operation. It should run smoothly with steady idling and good power. If it still struggles, repeat the cleaning process or seek professional assistance. Regular maintenance prevents future carburetor issues.
Tips for Maintaining a Clean Carburetor
To keep your carburetor in optimal condition:
- Use fresh, clean fuel regularly
- Replace air filters periodically
- Run the mower dry if storing for long periods
- Schedule professional tune-ups annually
Proper care extends the life of your lawn mower and improves its efficiency.
When to Seek Professional Help
If cleaning doesn’t resolve engine problems or if you’re uncomfortable with the process, consult a lawn mower repair technician. Complex issues such as damaged carburetor parts or internal engine problems require expert attention.
Additional Considerations for Briggs and Stratton Models
Briggs and Stratton mowers often have specific carburetor designs, so consulting your owner’s manual is recommended. Some models have rebuild kits that simplify maintenance. Always use compatible parts to avoid damage and ensure smooth operation.
Related Topics
Looking after other parts of your mower improves overall performance. Consider areas like:
- Replacing spark plugs regularly
- Cleaning the air filter
- Changing the oil
- Inspecting the blades and sharpening them
Integrating these maintenance tasks helps your mower run efficiently for years.
Additional Tips for a Better Cleaning Experience
– Work in a well-ventilated area to avoid inhaling fumes
– Wear gloves and safety glasses for protection
– Take your time to avoid damaging delicate parts
– Keep small parts organized for easy reassembly
– Follow safety precautions recommended by the manufacturer
Maintaining a clean carburetor is key to ensuring your Briggs and Stratton lawn mower operates reliably and efficiently. Regular checks and proper cleaning extend your mower’s lifespan and save money in the long run.
HOW TO CLEAN A CARBURETOR ON A BRIGGS & STRATTON 550EX ENGINE FOR BEGINNERS (Yard Machines Mowers)
Frequently Asked Questions
What are the initial steps to prepare for cleaning a Briggs and Stratton lawn mower carburetor?
Begin by disconnecting the spark plug to prevent accidental starting. Remove the air filter and locate the carburetor. Carefully detach the carburetor from the mower, ensuring you keep track of all screws and hoses. Inspect the carburetor for dirt, fuel deposits, or damage before proceeding with cleaning.
How can I safely remove debris and buildup from the carburetor jets?
Remove the carburetor bowl and use compressed air to blow away dirt and debris from the jets and small passages. Use a carburetor cleaning brush or a fine needle to gently clear any clogs. Avoid applying excessive force that might damage the delicate components. Ensure all passages are clear before reassembling.
What cleaning agents are effective for cleaning a Briggs and Stratton carburetor?
Use a specialized carburetor cleaner spray that dissolves fuel residues and dirt. Avoid harsh chemicals that could damage rubber parts. Spray the cleaner generously into all accessible areas, including the jets, linkages, and passages, then let it sit for a few minutes before rinsing with compressed air.
Are there any important tips to prevent future carburetor issues?
Regularly replace the air filter to prevent dirt from entering the carburetor. Use fresh fuel and add fuel stabilizer if you store the mower for extended periods. Periodically inspect and clean the carburetor to maintain optimal performance, especially if the mower starts to run rough or stalls.
Final Thoughts
To clean a carburetor lawn mower Briggs and Stratton effectively, start by removing the carburetor and disassembling it carefully. Use a carburetor cleaner to clear any dirt or varnish buildup. Reassemble and reinstall the carburetor, then run the mower to check for improved performance.
Proper cleaning ensures smooth operation and prevents engine issues. Remember, how to clean carburetor lawn mower Briggs and Stratton is a simple process when done with the right tools and steps. Keep your mower in top shape by performing this maintenance regularly.