Creating a rain garden is a fantastic way to manage stormwater while adding beauty to your landscape. To build a rain garden, start by selecting a suitable location that collects runoff, then outline its shape and size based on the area you want to drain. Next, dig a shallow depression where the water can pool, and amend the soil to improve drainage. Finally, choose native plants that thrive in wet conditions, as they require less maintenance and attract local wildlife. With these simple steps, you’ll not only help reduce flooding and erosion but also create a vibrant ecosystem right in your backyard.
Building a rain garden is a rewarding project that benefits both your home and the environment. Not only does it help manage excess rainwater, but it also adds an attractive feature to your yard. You’ll find that a rain garden can reduce runoff, improve water quality, and support local wildlife. Plus, it’s a manageable DIY project that you can complete in a weekend. So, let’s dive into how to design and construct your very own rain garden, ensuring it brings both functionality and beauty to your outdoor space.

How To Build A Rain Garden
Building a rain garden is a wonderful way to manage stormwater runoff while enhancing your landscape’s beauty. By capturing rainwater and allowing it to filter into the ground, rain gardens help reduce pollution in nearby streams and rivers. Let’s dive into the steps you need to follow to create your very own rain garden.
What is a Rain Garden?
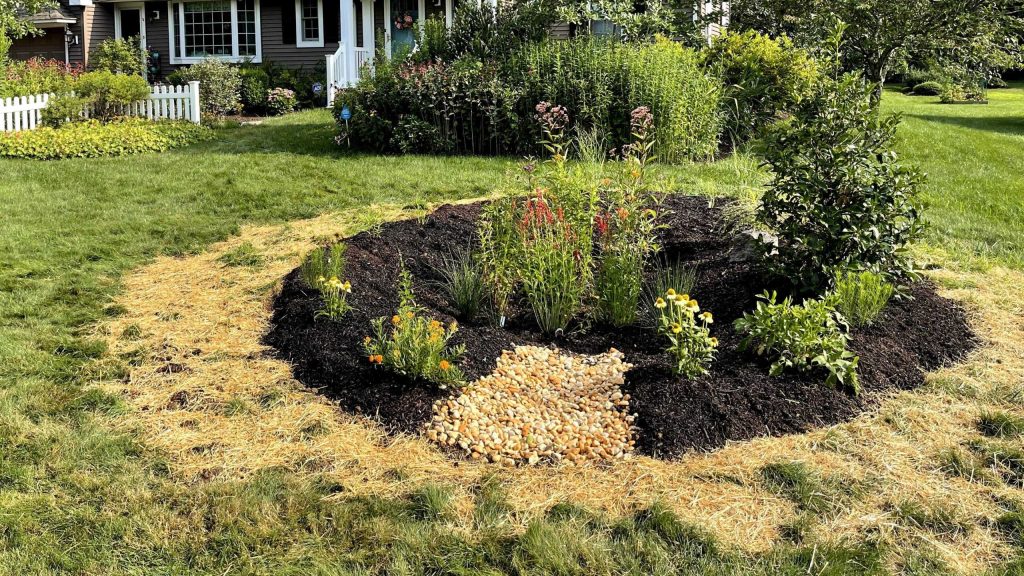
A rain garden is a specially designed garden that collects rainwater from rooftops, driveways, and sidewalks. The soil and plants in a rain garden help to filter and absorb the rainwater. This prevents flooding and minimizes water pollution.
Here are some key benefits of rain gardens:
- Reduces stormwater runoff.
- Improves water quality by filtering pollutants.
- Provides habitat for wildlife.
- Adds beauty to your landscape.
Choosing the Right Location
Selecting the perfect spot for your rain garden is crucial. Look for areas that naturally collect water or tend to stay wet after rain. Here are some tips for choosing a location:
- Avoid areas near foundations to prevent water damage.
- Pick a sunny spot if possible, as most plants thrive in sunlight.
- Ensure the location is at least 10 feet away from any water bodies.
Assessing Drainage
Before you start digging, it’s essential to assess the drainage of your selected site. Here’s how:
1. Dig a small hole about 12 inches deep.
2. Fill it with water and observe how long it takes to drain.
3. If the water drains within 24 hours, you are good to go!
This test will help confirm if your site is suitable for a rain garden.
Sizing Your Rain Garden
Once you have found the right location, it’s time to determine the size of your rain garden. The size typically depends on the amount of runoff you want to manage.
A good rule of thumb is to make the rain garden about 20% of the area from which it will collect runoff. For example, if your roof area is 1,000 square feet, your rain garden should be around 200 square feet.
Shape and Depth
Rain gardens are usually shallow, which makes them easier to maintain. Aim for a depth of about 6 to 12 inches. The shape can be anything from round to oval or even rectangular, depending on your space.
Designing Your Rain Garden
Now comes the fun part—designing your rain garden! Consider incorporating a variety of plants that thrive in wet conditions. Choose native plants, as they require less maintenance and are beneficial for local wildlife.
Choosing the Right Plants
Here are some great options for plants that work well in rain gardens:
- Black-eyed Susan
- Swamp milkweed
- Blue flag iris
- Joe Pye weed
- Aster
Make sure to plant a mix of flowers, grasses, and shrubs to create a diverse ecosystem.
Creating a Soil Mix
Your soil mix is essential for a healthy rain garden. A good soil mix will improve drainage and support plant growth. A common recipe includes:
– 50% topsoil
– 30% compost
– 20% sand
This combination helps with water catchment and aeration.
Building Your Rain Garden
Now that you’ve got the design, it’s time to build! Follow these steps to create your rain garden:
Step 1: Mark the Area
Use stakes and string to outline the shape of your rain garden. This will help you visualize the space as you dig.
Step 2: Excavate the Area
Dig out the marked area to a depth of 6 to 12 inches. Remember to create a shallow basin, sloping gently towards the center to facilitate water collection.
Step 3: Create the Inlet and Outlet
To help direct the flow of water, create a small inlet at the top of your garden. This can be as simple as a bit of a slope from your driveway or roof. An outlet at the bottom will allow excess water to flow away without creating a flood.
Step 4: Amending the Soil
Once your garden is excavated, amend the soil with your mix. Spread the soil evenly and gently rake it into place.
Step 5: Planting
Time to put in those beautiful plants! Arrange them according to your design. Make sure to plant taller species in the back and shorter ones in the front for visual appeal.
Step 6: Mulching
Adding a layer of mulch helps retain moisture and reduces weeds. Use organic mulch like shredded bark or wood chips that will break down over time and enrich the soil.
Maintaining Your Rain Garden
After your rain garden is built, it’s essential to maintain it for optimal performance. Here are some maintenance tips:
- Water plants regularly, especially during their first growing season.
- Remove any invasive weeds or plants that may compete with your established plants.
- Inspect and clean out any debris from the inlet and outlet to ensure water flows freely.
Seasonal Care
During different seasons, your rain garden may require varying levels of care. In spring, check for any winter damage and add new mulch. Summer may require more frequent weeding and watering, while fall is a great time to assess the overall health of your plants.
Additional Considerations
While building a rain garden is generally straightforward, there are additional factors you might want to consider.
Local Regulations
Before starting your project, check if there are any local regulations or guidelines regarding rain gardens. Some areas have specific rules about their construction to ensure compliance with environmental regulations.
Soil Testing
Conducting a soil test prior to planting can provide insight into nutrient levels and soil pH. This information allows you to tailor your soil amendments for optimal plant health.
Birds and Pollinators
Consider adding plants that attract birds and pollinators to your rain garden. Planting native flowering species can enhance biodiversity and create a vibrant ecosystem.
Common Mistakes to Avoid
Every gardener makes mistakes, so knowing the common ones can save you time and effort.
- Choosing the wrong location without enough sun or drainage.
- Overfilling the garden with plants, leaving little room for growth.
- Neglecting maintenance, which can lead to weed overgrowth and plant death.
By keeping these mistakes in mind, you can ensure the success of your rain garden.
Building a rain garden can be a fulfilling project that benefits the environment and enhances your yard’s appearance. With careful planning and maintenance, your rain garden will flourish year after year. Enjoy the beauty and functionality of your new garden while contributing to a healthier ecosystem.
Build a Rain Garden ☔️🌊❄️ Step by Step Instructions that Makes it Easy
Frequently Asked Questions
What materials do I need to create a rain garden?
To build a rain garden, gather materials such as native plants, compost, gravel, mulch, and landscaping fabric. You’ll also need tools like a shovel, rake, and hose for planting and shaping the garden. Make sure to choose plants that thrive in wet conditions and can tolerate both wet and dry periods.
How do I choose the right location for my rain garden?
Select a site that captures runoff from roofs, driveways, or sidewalks. Look for areas that have good drainage and are at least 10 feet away from buildings and foundations. Ensure the spot is not located near utility lines or areas that flood frequently.
How deep should I dig my rain garden?
Typically, dig your rain garden 6 to 12 inches deep, depending on your local soil conditions and the volume of runoff you expect. A deeper garden can manage more water, but ensure it doesn’t create drainage issues for surrounding areas.
What types of plants are best for a rain garden?
Choose native plants that are well-adapted to your climate and soil conditions. Good options include coneflowers, black-eyed Susans, and ferns. These plants are not only drought-resistant but also help attract pollinators and support local wildlife.
How do I maintain my rain garden after it’s built?
Regular maintenance includes removing weeds, adding mulch, and ensuring proper drainage. Check the plants for health, and replace any that die. Water the garden during dry spells and monitor it during heavy rains to make adjustments if necessary.
Can I incorporate decorative features in my rain garden?
Absolutely! You can add decorative rocks, stone paths, or even a small pond to enhance the aesthetic appeal of your rain garden. Just ensure that these features do not hinder water flow or drainage within the garden.
Final Thoughts
Building a rain garden involves several important steps. Start by selecting an appropriate location that captures runoff effectively. Next, choose native plants that thrive in your climate to ensure sustainability and support local wildlife.
Prepare the site by digging a shallow basin, then fill it with a mixture of soil and compost. Finally, strategically place your plants and add mulch to retain moisture. By following these steps, you’ll successfully create a rain garden that benefits both your landscape and the environment. Remember, “How To Build A Rain Garden” can be a rewarding project for any homeowner committed to sustainable practices.