Building a gravel path can be a simple yet effective way to enhance your outdoor space. First, mark the desired route for your path and then dig out the area to create a base. After that, lay down landscape fabric to prevent weeds from growing through the gravel. Next, pour and level your gravel, ensuring it’s compact and well-distributed. Finally, use edging to keep the gravel contained and give your path a polished look. With these straightforward steps, you’ll create an attractive and functional path that complements your garden or yard.
Creating a gravel path is not only an efficient solution for navigating your garden but also adds an appealing aesthetic. It’s perfect for those who want an easy, low-maintenance option that enhances the overall landscape. Whether you’re looking for a charming walkway or a practical solution for muddy areas, a gravel path can be both functional and beautiful. Let’s dive into the details of how to build one!

How To Build A Gravel Path
Building a gravel path can be a rewarding project that enhances your outdoor space. It adds both functionality and aesthetic appeal to your garden or yard. Your first step is to gather the necessary tools and materials. You will need gravel, a shovel, a rake, landscape fabric, edging materials, and a wheelbarrow.
Choosing the Right Gravel
Before you start your path, selecting the right type of gravel is essential. Gravel comes in several types, each with its unique characteristics.
- Pea Gravel: Small, rounded stones that provide smooth walking surfaces.
- Crushed Stone: Angular pieces that lock together, providing a stable base.
- Decomposed Granite: A finer material that compacts well and gives a natural look.
Consider the look and feel you want for your path. The texture and size of the gravel will affect the overall appearance. You can also think about how the path will blend with your existing landscaping.
Planning the Path Layout
Next, you need to plan the layout of your gravel path. Use stakes and string to outline where your path will go.
- Make sure your path is wide enough for foot traffic.
- Consider curves and angles that fit the natural flow of your yard.
- Mark any obstacles, like trees or shrubs, that you’ll need to work around.
It’s important to visualize how the path will look in your outdoor space. Walk the path with a friend or family member to see if the layout feels right to you.
Preparing the Ground
Once your layout is complete, it’s time to prepare the ground. You’ll need to clear the area of grass, weeds, and debris.
- Use a shovel to dig down about 4 to 6 inches.
- Ensure the base is level and compacted.
You can also use a tamper to pack down the soil. This step is crucial to prevent your path from sinking or becoming uneven over time.
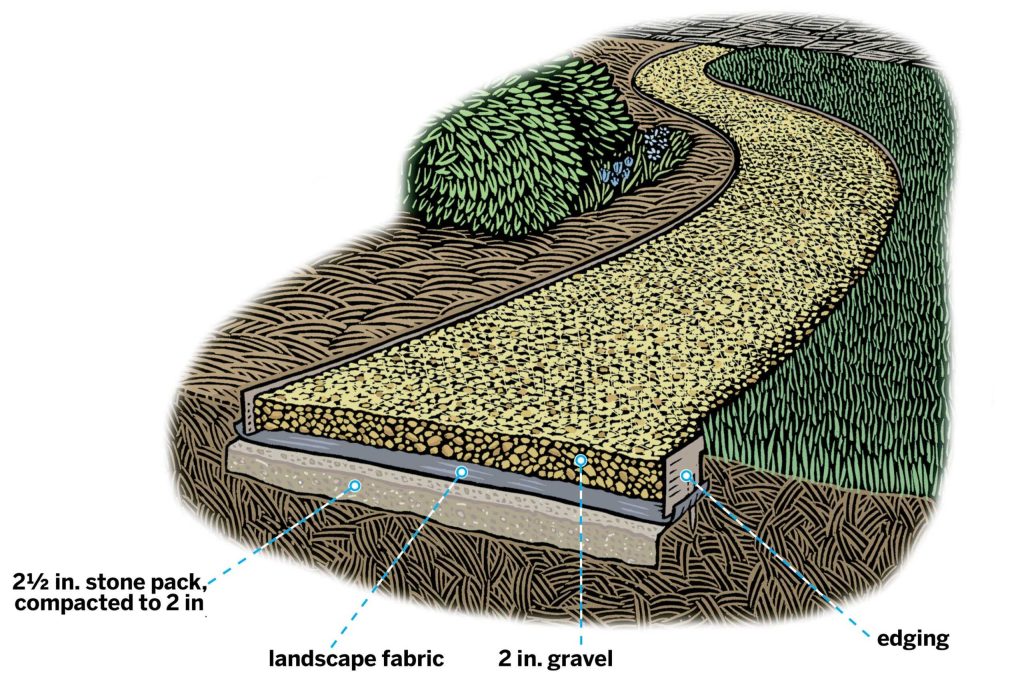
Installing Landscape Fabric
After preparing the ground, install landscape fabric over the area. This fabric helps prevent weeds from growing through your gravel.
- Cut the fabric to fit the path.
- Secure it with landscape stakes.
Ensure that the fabric overlaps at the seams. This extra measure prevents weeds from sneaking through the gaps.
Adding Edging Materials
Consider adding edging materials to define your path and keep gravel in place. You can use bricks, stones, or even wood for edging.
- Set the edging before pouring in the gravel.
- Ensure it is level and firmly bedded into the ground.
Edging not only adds a polished look but also helps to contain the gravel, making maintenance easier.
Pouring the Gravel
Now it’s time to pour the gravel! Start by spreading a base layer of gravel along your path.
- Use a wheelbarrow to transport the gravel.
- Dump it along the path, then spread it evenly with a rake.
Aim for about 2 to 3 inches of gravel for the base layer. This depth helps ensure stability and durability.
Compacting the Gravel
Next, you will want to compact the gravel to create a solid surface.
- Use a tamper to press down the gravel.
- Add more gravel as needed until you achieve the desired thickness.
Compacting the gravel helps lock the stones together, making your path more stable and walkable.
Finishing Touches
After compacting, it is time for the finishing touches. Make sure the surface is smooth and even.
- Check for any loose stones or uneven spots.
- Add additional gravel in areas that need it.
You can also consider adding stepping stones or decorative elements for added character.
Maintaining Your Gravel Path
Maintaining your gravel path over time is essential. Regular upkeep will ensure it stays looking great.
- Rake loose stones back into place as needed.
- Weed the edges to keep your path looking tidy.
If some areas become compacted or uneven, you can add fresh gravel and recompact. Keeping your path in good shape will make it inviting for years.
Tips for Success
Here are a few additional tips to keep in mind as you build your gravel path:
- Choose gravel that complements your home and garden.
- Consider drainage; a path that collects water can become muddy.
- Plan for maintenance; be prepared to refresh the gravel periodically.
With these tips, you’ll ensure a successful gravel path project that stands the test of time.
Building a gravel path can truly enhance your outdoor space. It not only provides a functional route through your garden but also adds to the overall beauty of your home. By choosing the right materials and following these steps, you can create a path that you’ll enjoy for years to come.
How to Make a Gravel Path / The Easiest and Cheapest Way
Frequently Asked Questions
“`html
What materials do I need to build a gravel path?
To build a gravel path, you will need gravel (of your choice, such as crushed stone or river gravel), landscaping fabric, a shovel, a rake, a tamper, and possibly edging materials like wood, stone, or metal. It’s important to choose the right type of gravel based on your aesthetic preferences and the intended use of the path.
How do I prepare the ground for a gravel path?
Begin by marking the area for your path. Remove any grass, weeds, or debris from the designated space. Use a shovel to excavate at least 4-6 inches deep, which allows enough room for the gravel base. Consider sloping the path slightly to promote drainage and prevent water pooling.
How do I ensure proper drainage for my gravel path?
To ensure proper drainage, create a slight slope away from any structures on either side of the path. Installing a layer of landscape fabric before adding gravel prevents weeds from growing while allowing water to pass through. Additionally, consider placing larger stones at the edges to guide rainwater away from the path.
How thick should the gravel layer be?
For most gravel paths, a thickness of 2-3 inches of gravel works well. If you expect heavy foot traffic or have a path that experiences more wear, consider increasing the depth to 4-6 inches for added durability and stability.
Can I use different types of gravel together?
Using different types of gravel can add visual interest to your path. However, make sure that the sizes and shapes of the gravel complement each other to avoid drainage issues. For best results, use a base layer of larger gravel and top it with smaller gravel for a polished finish.
How do I maintain my gravel path over time?
To maintain your gravel path, regularly rake the surface to redistribute gravel and fill in any low spots. Remove any weeds that may appear and keep edges tidy by occasionally adjusting your edging materials. If the path becomes compacted, consider using a tamper to re-loosen the gravel periodically.
“`
Final Thoughts
Building a gravel path offers a practical and aesthetically pleasing solution for your outdoor space. Begin with careful planning, selecting the right materials, and preparing the ground. Layering the gravel properly ensures durability and ease of maintenance.
Regular upkeep will keep your gravel path looking fresh and inviting. Follow these steps, and you will enjoy a beautiful walkway for years to come. Remember, ‘How To Build A Gravel Path’ focuses on simplicity and functionality, making it an achievable project for everyone.