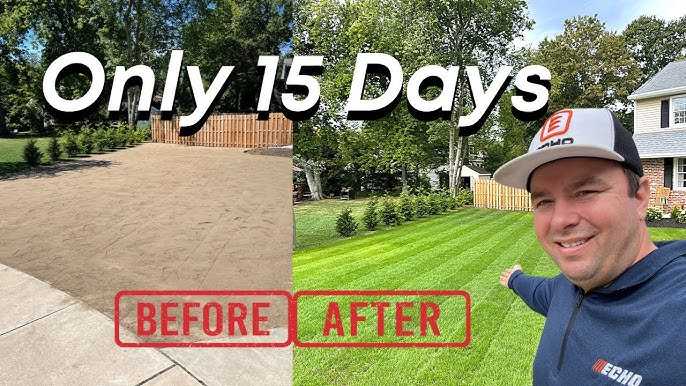
Are you looking to transform your bare backyard into a lush, striped lawn in just 15 days? With the right approach and the right seed, it’s more achievable than you might think! In this article, we’ll guide you through the essential steps to go from dirt to stripes, ensuring you have a vibrant and healthy lawn in no time. From selecting the best grass seed for your climate to proper watering techniques, we’ll cover everything you need to know. So, if you’re ready to roll up your sleeves and create a green masterpiece, let’s dive into the process of turning that patch of dirt into a stunning striped lawn with our expert tips!

Going From DIRT To STRIPES In 15 Days With SEED
When it comes to creating a lush, stripey lawn, most homeowners dream of that perfect green carpet. With the right approach and a little bit of effort, you can achieve this look. In this article, we will explore how to go from mud and dirt to beautiful stripes in just 15 days using SEED.
Understanding the Importance of Quality Seed
Before diving into the process, it is crucial to understand why **quality seed** is essential. Not all grass seeds are created equal, and choosing the right type can make a huge difference in the outcome of your lawn.
– Good quality seed promotes faster germination.
– It enhances disease resistance.
– It leads to a thicker, greener lawn.
Selecting a seed that is suitable for your climate and soil type will set the foundation for success. We will discuss various grass types in the coming sections.
Choosing the Right Grass Seed for Your Lawn
Not all grass types are ideal for every yard. Spending time on selecting the right grass can save you a lot of trouble later. Here are a few popular grass types:
- Perennial Ryegrass: Best for quick germination and establishing a lawn quickly.
- Bermudagrass: Great for sunny areas and sports fields, known for its durability.
- Kentucky Bluegrass: Offers a lush appearance and is ideal for cooler climates.
It’s vital to consider your local climate and the amount of sun your lawn receives when choosing the right seed.
Preparing the Soil
Once you have chosen quality grass seed, the next step is preparing the soil. This is a crucial part of the process, as well-prepared soil leads to better seed growth.
– Start by clearing the area of any debris, weeds, or old grass.
– Loosen the soil with a rake or tiller to allow better seed-to-soil contact.
– Level the soil to eliminate any low spots, which can collect water.
Using these techniques will create an ideal environment for your seeds to thrive.
Testing Your Soil
You might think that soil preparation ends after clearing and leveling, but it is essential to test your soil as well. This can provide crucial information about nutrient levels and pH balance.
– Obtain a soil testing kit from your local garden center.
– Follow the instructions to collect and send your soil sample for analysis.
– Once you receive the results, adjust the pH and nutrient levels as needed.
A well-balanced soil promotes healthy grass growth.
Sowing the Seed
Now it’s time for the exciting part—seeding your lawn! Here’s how to do it effectively:
– Use a broadcast spreader for even distribution.
– Follow the recommended seed rate on the package.
– Walk in a straight line while broadcasting, and use a crisscross pattern to guarantee coverage.
Remember, consistency is key. Avoid over-seeding, as this can lead to overcrowding and competition for nutrients.
Watering and Initial Care
After sowing the seeds, providing the right amount of water is crucial. Here are some guidelines:
– Water daily for the first week.
– Aim for about 1 inch of water per week.
– Use a gentle spray to avoid displacing seeds.
Proper watering will help the seeds germinate and establish roots quickly.
Fertilization
To ensure healthy growth, fertilization is essential. Here’s how to do it properly:
– Apply a starter fertilizer when you first sow your seeds.
– Follow the instructions on the fertilizer package for amounts and timing.
This will provide the necessary nutrients for your grass to grow strong and healthy.
How to Maintain Your Lawn During the Growth Phase
As your grass begins to sprout, maintenance becomes essential. Here are a few tips to keep in mind:
– Keep foot traffic to a minimum on newly seeded lawns.
– Mow the grass when it reaches the height of around 3 inches.
– Ensure you use a sharp mower blade to avoid damaging young grass.
Maintaining healthy growth is easier than you might think, and it will contribute to achieving those beautiful stripes.
Creating Lawn Stripes
Once your grass has established itself and the lawn looks lush, you can start creating stripes. Here are some tips for achieving those desired patterns:
– Use a lawn mower with a roller attachment.
– Mow in different directions: one pass creating stripes vertically, and the next horizontally.
– Ensure to maintain consistent mowing heights for the best appearance.
By alternating your mowing patterns, you create depth and visual interest in your yard.
Dealing with Weeds and Pests
In the early stages of lawn care, weeds and pests can threaten your new grass. Here’s how to manage them effectively:
– Regularly check your lawn for any signs of weeds or pests.
– Use spot treatments for weeds instead of blanket applications to protect your new grass.
– Consider organic pest control options to keep your lawn healthy.
Quick action will help you maintain a pristine lawn.
Celebrating Your New Lawn
After 15 days of diligent care and careful nurturing, your lawn will be ready to showcase. Celebrate your accomplishment by inviting friends and family over to enjoy your new outdoor space.
– Host a barbecue or picnic in your new green haven.
– Encourage children to play games in your pristine yard.
Seeing others enjoy your hard work can be incredibly fulfilling.
Common Mistakes to Avoid
Every lawn enthusiast should be aware of the common pitfalls when establishing a new lawn. Here are some mistakes to avoid:
- Overwatering: Too much water can drown your seeds.
- Skipping soil prep: Neglecting soil improvement leads to poor growth.
- Mowing too early: Cutting grass before it’s well-established can harm it.
Avoiding these mistakes can save you time and build a better lawn.
Going from dirt to stripes in just 15 days with SEED is not only possible but also rewarding. By selecting the right grass seed, preparing your soil, and following proper maintenance tips, you can achieve a stunning lawn that will be the envy of your neighbors. Enjoy the process, and celebrate the lush green space you’ve created!
Going From DIRT To STRIPES In 15 Days With SEED
Frequently Asked Questions
“`html
What equipment do I need to start the SEED program?
To begin the SEED program, you primarily need a lawn mower, a spreader for seeds and fertilizers, and possibly a dethatcher to help prepare the soil. Additionally, consider having basic gardening tools on hand, such as a rake and watering can, to aid in the process.
How do I maintain my lawn after completing the SEED program?
After completing the SEED program, regular maintenance is crucial. Mow your lawn regularly, keep it well-watered, especially during dry spells, and apply fertilizer as needed. It’s also good practice to aerate the soil annually to promote healthy growth.
Can I use the SEED program in different types of soil?
Yes, the SEED program works effectively in various soil types. However, each soil type may require specific adjustments. For example, sandy soils may need more frequent watering, while clay soils might benefit from amendments to improve drainage.
What is the expected growth rate when using the SEED program?
The expected growth rate can vary depending on the type of grass seed used, weather conditions, and soil quality. Typically, you can expect visible growth within 7 to 14 days after seeding. Factors like consistent watering and proper sunlight can significantly influence this rate.
Is there a specific time of year that is best for starting the SEED program?
Spring and early fall are the ideal times to start the SEED program, as these seasons provide optimal temperatures and moisture levels for germination. Avoid extreme temperatures, as they can hinder growth and establishment.
How can I tell if my lawn is ready for seeding?
Examine the condition of your lawn. If you see bare patches, thinning grass, or compacted soil, it’s a good sign that your lawn is ready for seeding. Additionally, ensure that the soil is moist and not overly saturated before you begin the seeding process.
“`
Final Thoughts
Going from DIRT to STRIPES in 15 Days with SEED proves that with dedication and the right tools, significant change is achievable in a short period. This journey highlights the importance of consistent effort and strategic planning in reaching your goals.
By focusing on actionable steps and maintaining a clear vision, anyone can turn their ambitions into reality. Embracing the process helps build resilience and confidence, making the transition even more rewarding. Remember, going from DIRT to STRIPES in 15 days with SEED is more than just a timeline; it’s a commitment to growth and excellence.